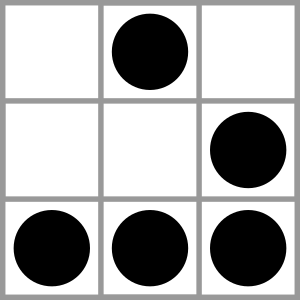
Can You Read Me The Time?

If you’re like the average clock user, you’ve probably gotten annoyed at reading analog clocks before. Typically, the solution is just to use a digital timepiece, but [sjm4306] has opted to make a small word clock that you can carry with you wherever you go to remind you of the time in the English language.

Unlike a similar project made by [Gordan Williams], which uses an 8 x 8 LED matrix with an inkjet printed overlay, this small word clock uses a 3D-printed light box to achieve its letter matrix. In fact, they were inspired by all of the existing DIY word clock designs using anything from off-the-shelf LED arrays, transparency masks and WS2812s.

The design uses a home-brewed PCB design that runs off 5 V via USB. The design places the letters on the top stop and restricts layers to keep the solder mask and copper from obstructing the light. The bottom side uses the same design principle with a square shape that overlaps the letter. In order to block light between adjacent letters, the 3D-printed light box comes into play.

One design challenge for the letter matrix was fitting all possible minutes into the array. Rather than making a larger array of letters, [sjm4306] had the clock describe the time down to five-minute intervals then add asterisks for the full time. It’s a pretty understandable solution for keeping the design simple, and the letters all fit onto the design so well!

Using a pin map assigned to the I/O for the rows and columns of the array, the software toggles the states of the pins as a switch statement. For scanning the matrix, the software uses an interrupt that draws the current column of LEDs and updates the display image before incrementing to the next column. By skipping or not skipping cycles, this allows the display to look brighter or dimmer.

The time tracking is fairly simple, using a DS1302 serial real time clock chip – it even charges a super capacitor to keep time after power is removed!

To tackle the light scattered internally in the PCB’s FR4 material, a separator is used to contain the light. As a low-cost solution, while there is still some amount of light diffused, it’s definitely better than without the separator.

Almost all of the files used for building the small word clock are available on [sjm4306]’s project page, including the software and design files. It hopefully won’t be too long before we start seeing more of these low-cost word clock designs!

Continue reading “Can You Read Me The Time?”

[Mr. Carlson] Fixes A Fridge

A dead refrigerator is an occurrence determined to frustrate any homeowner. First there’s the discovery of hundreds of dollars in spoiled food, and then the cost of a repair call and the delay of the inevitable wait for parts. It’s clear to see why a hacker like [Mr. Carlson] would seek another way.

Now, normally a fridge repair video would by unlikely fodder for a Hackaday article. After all, there’s generally not much to a fridge, and even with the newer microprocessor-controlled units, diagnosis and repair are usually at the board-level. But [Mr. Carlson] has had this fridge since 2007, and he’s got some history with it. An earlier failure was caused by the incandescent interior lights welding relay contacts closed thanks to huge inrush currents when starting the cold filaments. That left the light on all the time, heating the interior. His fix was a custom solid-state relay using zero-crossing opto-isolators to turn the bulbs on or off only when the AC power was at a minimum.

That repair kept things going for years, but when the latest issue occurred, [Mr. Carlson] took a different tack. He assumed that a board that has been powered 24-7 for the last twelve years is likely to have a bad capacitor or two. He replaced all the caps, threw in a few new relays to be on the safe side, and powered the fridge back up. It whirred back to life, ready for another decade or so of service.

Kudos to [Mr. Carlson] for his great repair tips and his refusal to surrender. The same thing happened when his solder sucker started to give up the ghost and he fixed it by adding a variable-frequency drive.

Continue reading “[Mr. Carlson] Fixes A Fridge”

OpenLeg – The Open Source Robot Leg

There’s an old saying about standing on the shoulders of giants, but how about doing so with an open source leg? Well, your robots might do so at least, thanks to OpenLeg, a new open source project for building robot legs. Created by [Joey Byrnes], this started out as a senior project for a course at the University of Illinois. The idea is to create a robot leg that others can use to build four-legged robots that can amble around the neighborhood, much like those built by Boston Dynamics. Continue reading “OpenLeg – The Open Source Robot Leg”

Custom Game Pad Can Reprogram Itself

In the heat of the moment, gamers live and die by the speed and user-friendliness of their input mechanisms. If you’re team PC, you have two controllers to worry about. Lots of times, players will choose a separate gaming keyboard over the all-purpose 104-banger type.

When [John Silvia]’s beloved Fang game pad went to that LAN party in the sky, he saw the opportunity to create a custom replacement exactly as he wanted it. Also, he couldn’t find one with his desired layout. Mechanical switches were a must, and he went with those Cherry MX-like Gaterons we keep seeing lately.

This 37-key game pad, which [John] named Eyetooth in homage to the Fang, has a couple of standout features. For one, any key can be reprogrammed key directly from the keypad itself, thanks to built-in macro commands. It’s keyboard-ception!

One of the macros toggles an optional auto-repeat feature. [John] says this is not for cheating, though you could totally use it for that if you were so inclined. He is physically unable to spam keys fast enough to satisfy some single-player games, so he designed this as a workaround. The auto-repeat’s frequency is adjustable in 5-millisecond increments using the up /down macros. There’s a lot more information about the macros on the project’s GitHub.

Eyetooth runs on an Arduino Pro Micro, so you can either use [John]’s code or something like QMK firmware. This baby is so open source that [John] even has a hot tip for getting quality grippy feet on the cheap: go to the dollar store and look for rubber heel grippers meant to keep feet from sliding around inside shoes.

If [John] finds himself doing a lot of reprogramming, adding a screen with a layout map could help him keep track of the key assignments.

Flux Gate Magnetometers Make A Special Current Probe

There are moments when current measurement is required on conductors that can’t be broken to insert a series resistor, nor encircled with a current transformer. These measurements require a completely non-invasive technique, and to satisfy that demand there are commercial magnetometer current probes. These probes are however not for the light of wallet, so [ensgoldmine] has created a much cheaper alternative.

The Texas Instruments GRV425 flux gate magnetometer integrated circuit on its TI evaluation module provides the  measuring element placed at the tip of a probe as close as possible to the conductor to be measured, with another GRV425 module at the head of the probe to measure ambient magnetic field for calibration purposes.  An Arduino Due measures and processes the readings, chosen due to its higher-resolution ADC than the more ubiquitous Arduino Uno.

The write-up is interesting even if you have no need for a current probe, because of its introduction to these sensing elements. Because it’s a rare first for Hackaday, we’ve never taken a close look at them before other than as an aside when talking about a scientific instrument on Mars.

Steam Bike Rocks It Old-School

Petrol engines dominate the world of the automobile, while electric propulsion races to take an ever larger market share. Despite this, some still hold a flame for steam power. Such aficionados would hold this build in high regard, from the recent past of 2014.

In steampunk, finish is everything.

The bike is of a recumbent design, featuring a relaxed riding position well suited to the sophisticated nature of a steam-powered vehicle. Sporting a wooden frame, the build carries a strong steampunk aesthetic. The flash boiler packs 100 feet of copper pipe, and there’s an electric pump and controller to handle water delivery from the stylish brass tank. The setup is capable of producing steam within 30 seconds of startup. Motive power is courtesy of a 1.5 inch bore single-cylinder steam engine, connected to the rear wheel via a belt drive.

There’s something intoxicating about the sounds and smells of a working steam engine, though the threat of catastrophic burns does temper the excitement just a touch. Steam power isn’t going away any time soon – and it’s not just limited to transport applications, either. Video after the break.

Continue reading “Steam Bike Rocks It Old-School”

Meccano Max Gets Hacked

There are plenty of “smart” toys out in the marketplace, some with more features than others. Nevertheless, most makers desire complete control over a platform, something that’s often lacking in any commercial offering. It was just this desire that motivated [MrDreamBot] to start hacking the Meccano Max.

Meccano Max is a small-statured companion robot, at about 30 centimeters high. Not content with the lack of an API, [MrDreamBot] decided to first experiment with creating an Arduino library to run Max’s hardware. With this completed, work then began on integrating a Hicat Livera devboard into the hardware. This is an embedded Linux system with Arduino compatibility, as well as the ability to stream video and connect over WiFi. Thus far, it’s possible to control Max through a browser, while viewing a live video feed from the ‘bot. It’s also possible to customize the expressions displayed on Max’s face.

Oftentimes, it pays to replace stock hardware rather than try and work with the limitations of the original setup, and this project is no exception. With that said, we’re still hoping someone out there will find a way to get Jibo back online. Look after your robot friends! Video after the break.

Continue reading “Meccano Max Gets Hacked”