Familiar Parts Make Interfacing Weather Station Easy

Hackers love to measure things, and enjoy monitoring the world around them. Weather stations are a big part of this, and many tinkerers have tried to interface such hardware with varying levels of success. [Ray] is one such individual, and was pleasantly surprised when working on a recent project.

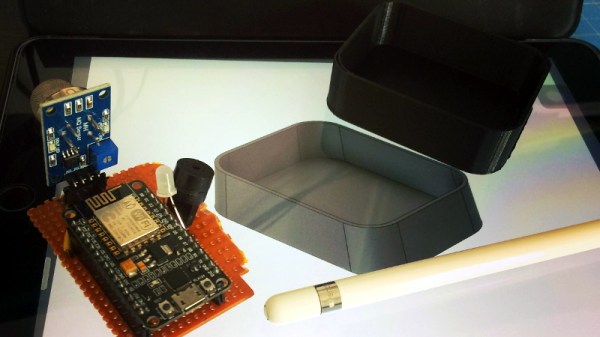
Unlike more old-school models, the model [Ray] found himself working on was a modern unit with a significant number of sensors, a WiFi interface, and even a color screen. Reading the manual, [Ray] noted the device used the IP 192.168.4.1, which is commonly used by the ESP8266 when running in AP mode. The hunch proved to be correct, and opening the device revealed an ESP-WROOM-2 running the show.

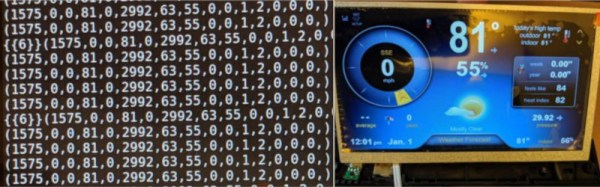
Now working with familiar parts, it was simple to hook up to the onboard serial port to scope for data. To [Ray]’s delight, the device was outputting all the weather data out over the connection, and in plaintext to boot. The station also featured the ability to connect to Weather Underground, and watching the debug messages during this process helped [Ray] to understand the format of the information.

It’s rare that manufacturers make it so easy, but debug ports can often be a treasure trove of information to the budding hacker. We’ve seen others cracked before, too.

A Capacitive Soil Sensor Hack For Lower Voltage Supplies

A frequent beginner project involves measuring soil moisture levels by measuring its resistance with a couple of electrodes. These electrodes are available ready-made as PCBs, but suffer badly from corrosion. Happily there is a solution in the form of capacitive sensor probes, and it is these that [Electrobob] is incorporating in to a home automation system. Unfortunately the commercial capacitive probes are designed to run from a 3.3 V supply and [Bob]’s project is using a pair of AA cells, so a quick hack was needed to enable them to be run from the lower voltage.

The explanation of the probe’s operation is an interesting part of the write-up, unexpectedly it uses a 555 configured as an astable oscillator. This feeds an RC low pass filter of which the capacitor is formed by the soil probe, which in turn feeds a rectifier to create a DC output. This can be measured to gain a reading of the soil moisture level.

The probe is fitted with a 3.3 V LDO regulator, which is simply bypassed. Measurements show its output to be linear, so if the supply voltage is also measured an accurate reading can be gleaned. These probes are still a slightly unknown quantity to many who might find a use for them, so it’s extremely useful to be given this insight into them.

Jazzberry Bakes The Pi Into A Mechanical Keyboard

If you hang around Hackaday long enough, pretty soon you’ll start to see some patterns emerging. As the nexus of all things awesome in the hacking world, our front page offers a unique vantage point by which you can see what’s getting folks excited this particular month, year, or decade. Right now we can tell you hackers love the Raspberry Pi, 3D printing, and perhaps above all, they can’t get enough mechanical keyboards.

So that makes the Jazzberry by [Mattis Folkestad] something of a perfect storm in the hacker world. The project uses a 3D printed enclosure to combine a Raspberry Pi 3B+ and an Ajazz AK33 mechanical keyboard into a single unit like the home computers of old. Honestly, we’re just glad he didn’t sneak an ESP8266 in there; as the resulting combination might have been enough to crash the site.

That being said, we can’t help but notice there’s a lot of open space inside the 3D printed enclosure. Right now there’s nothing inside but the Raspberry Pi, which only takes up a fraction of the internal volume. Adding a battery and hard drive would be the logical next steps, but it could also be outfitted with a suite of radios and various other hacking and security research accoutrements. We’ve seen an influx of such builds over the last few months, and the Jazzberry seems like it could make a very slick entry into this burgeoning category of mobile pentesting devices.

The STL files are designed specifically for the combination of hardware that [Mattis] used, but it shouldn’t be too difficult to modify them for your own purposes. Even if you stick with the same AK33 keyboard, an upgrade to the impressively powerful Raspberry Pi 4 would be more than worth the time fiddling with the STLs in your CAD tool of choice. If you really want to go all in, add a display and you’re well on the way to that cyberdeck you’ve always wanted.

Add Scripting To Your C++ Programs With ChaiScript

If you are writing a program that has a technical user base, it is a nice touch to make the program scriptable. In fact, you might want to do the hard work in a programming language and then use your scripting language to build out features. In theory, this should be easy. There are plenty of embedded scripting libraries and they provide some way for your code to access script resources and for script resources to access selected host variables and functions. If you use C++, one of the easier ways to do this is with ChaiScript.

ChaiScript is BSD licensed and — assuming your compiler supports C++ 14 — it is as easy as including a header file and making a few calls. There are no special tools or libraries required. The code is portable between operating systems, including both 32-bit and 64-bit Windows. It is also threadsafe unless you turn that feature off.
Continue reading “Add Scripting To Your C++ Programs With ChaiScript”

Building DIY Acoustic Panels To Cut Down On Echoes

Plenty of hackers and makers are passionate about content creation. In the dog-eat-ice-bucket-challenge world of online video, production value is everything. If you want to improve your audio quality then cutting down on echoes is a must, and these acoustic panels will help you to do just that. 

The build starts with aluminium L-channel, affixed together into an equilateral triangle with the help of some 3D printed brackets. Two of the triangular frames are then fitted together via a series of hexagonal standoffs. Foam or housing insulation is then added to act as the primary sound absorbing material. To give an attractive finish, the panels are covered in fabric. The panels are then placed on to drywall using nails glued into the standoffs.

While the panels are likely more expensive to build than off-the-shelf foam alternatives, they have an attractive look which is key in video studio environments. If you’re wondering where to position them for the best results, there’s a simple and easy approach to figure it out. Video after the break.

Continue reading “Building DIY Acoustic Panels To Cut Down On Echoes”

Building A Smarter Smoke Alarm With The ESP8266

The modern hacker wields a number of tools that operate on the principle of heating things up to extremely high temperatures, so a smoke alarm is really a must-have piece of equipment. But in an era where it seems everything is getting smarter, some might wonder if even our safety gear could benefit from joining the Internet of Things. Interested in taking a crack at improving the classic smoke alarm, [Vivek Gupta] grabbed a NodeMCU and started writing some code.

Now before you jump down to the comments and start smashing that keyboard, let’s make our position on this abundantly clear. Do not try to build your own smoke alarm. Seriously. It takes a special kind of fool to trust their home and potentially their life to a $5 development board and some Arduino source code they copied and pasted from the Internet. That said, as a purely academic exercise it’s certainly worth examining how modern Internet-enabled microcontrollers can be used to add useful features to even the most mundane of household devices.

In this case, [Vivek] is experimenting with the idea of a smoke alarm that can be silenced through your home automation system in the event of a false alarm. He’s using Google Assistant and IFTTT, but the code could be adapted to whatever method you’re using internally to get all your gadgets on the same virtual page. On the hardware side of things, the test system is simply a NodeMCU connected to a buzzer and a MQ2 gas sensor.

So how does it work? If the detector goes off while [Vivek] is cooking, he can tell Google Assistant that he’s cooking and it’s a false alarm. That silences the buzzer, but not before the system responds with a message questioning his skills in the kitchen. It’s a simple quality of life improvement and it’s certainly not hard to imagine how the idea could be expanded upon to notify you of a possible situation even when you’re out of the home.

We’ve seen how a series of small problems can cascade into a life-threatening situation. If you’re going to perform similar experiments, make sure you’ve got a “dumb” smoke alarm as a backup.

Continue reading “Building A Smarter Smoke Alarm With The ESP8266”

The March Toward A DIY Metal 3D Printer

[Hyna] has spent seven years working with electron microscopes and five years with 3D printers. Now the goal is to combine expertise from both realms into a metal 3D printer based on electron-beam melting (EBM). The concept is something of an all-in-one device that combines traits of an electron beam welder, an FDM 3D printer, and an electron microscope. While under high vacuum, an electron beam will be used to fuse metal (either a wire or a powder) to build up objects layer by layer. That end goal is still in the future, but [Hyna] has made significant progress on the vacuum chamber and the high voltage system.

The device is built around a structure made of 80/20 extruded aluminum framing. The main platform showcases an electron gun, encased within a glass jar that is further encased within a metal mesh to prevent the glass from spreading too far in the event of an implosion.

The design of the home-brewed high-voltage power supply involves an isolation transformer (designed to 60kV), using a half-bridge topology to prevent high leakage inductance. The transformer is connected to a buck converter for filament heating and a step up. The mains of the system are also connected to a voltage converter, which can be current-fed or voltage-fed to operate as either an electron beam welder or scanning electron microscope (SEM). During operation, the power supply connects to a 24V input and delivers the beam through a Wehnelt cylinder, an electrode opposite an anode that focuses and controls the electron beam. The entire system is currently being driven by an FPGA and STM32.

The vacuum enclosure itself is quite far along. [Hyna] milled a board with two outputs for a solid state relay (SSR) to a 230V pre-vacuum pump and a 230V pre-vacuum pump valve, two outputs for vent valves, and inputs from a Piranni gauge and a Cold Cathode Gauge, as well as a port for a TMP controller. After demoing the project at Maker Faire Prague, [Hyna] went back and milled a mold for a silicone gasket, a better vacuum seal for the electron beam.

While we’ve heard a lot about different metal 3D printing methods, this is the first time we’ve seen an EBM project outside of industry. And this may be the first to attempt to combine three separate uses for an HV electron beam into the same build.