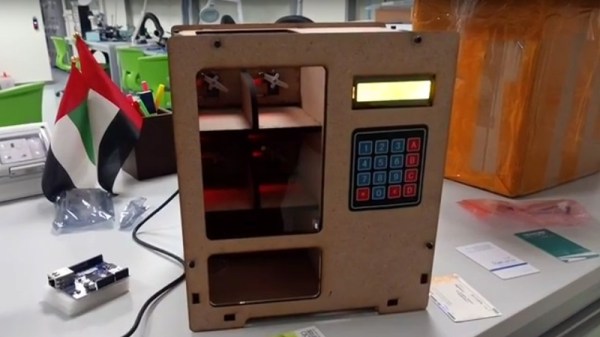
Build A Sheet Metal Brake With No Welding Required

Sometimes, there’s a job to be done and the required tools don’t fall easily to hand. [Bob] found himself in just such a position, needing to get some window flashing made up despite lacking a sheet metal brake. After waiting far too long for someone else to do the job, [Bob] elected to simply make the tools and do it himself instead (Youtube link, embedded below).

The project came about simply because [Bob] needed to bend 42″ sections of flashing, and couldn’t find a decent deal on a sheet metal brake above 36″ wide. The build starts with some angle iron and simple hinges, bolted together to form a basic brake design. With some rectangular hollow section bolted on for handles, the brake is then clamped to the bench and is ready for action.

It’s a build that any experienced hacker could whip up in an afternoon and be pumping out basic sheet metal parts by sundown, and requires no welding to boot. To learn more about bending sheet metal, check out our primer on the subject. Video after the break.

Continue reading “Build A Sheet Metal Brake With No Welding Required”

Back To Basics With An Arduino And An EEPROM

There are plenty of techniques and components that we use in our everyday hardware work, for which their connection and coding is almost a done deal. We are familiar with them and have used them before, so we drop them in without a second thought. But what about the first time we used them, we had to learn somewhere, right? [TheMagicSmoke] has produced just what we’d have needed then for one component that’s ubiquitous, the I2C EEPROM.

These chips provide relatively small quantities of non-volatile memory storage, and though they are not the fastest of memory technologies they have a ready application in holding configuration or other often-read and rarely written data.

Since the ST24C04 512-byte device in question has an I2C bus it’s a straightforward add-on for an Arduino Mega, so we’re shown the wiring for which only a couple of pull-down resistors are required, and some sample code. It’s not the most complex of projects, but it succinctly shows what you need to do so that you too can incorporate an EEPROM in your work.

If learning about I2C EEPROMs piques your interest, perhaps you’d like to read a previous look we made at them.

A Sonoff Switch Repurposed As A Thermostat

Underfloor heating is a wonderfully luxurious touch for a bedroom and en-suite bathroom, and [Andy] had it fitted so that he could experience the joy of walking on a toasty-warm floor in the morning. Unfortunately after about a year it stopped working and the culprit proved to be its thermostat. A replacement was eye-wateringly expensive, so he produced his own using an ESP8266-powered Sonoff wireless switch.

The thermostat has a thermistor as its temperature sensor, embedded in the floor itself. This could be brought to the ESP’s solitary ADC pin, but not without a few challenges along the way. The Sonoff doesn’t expose the pin, so some very fine soldering was the first requirement. A simple voltage divider allowed the pin to be fed, but through it he made the unfortunate discovery that the ESP’s analogue input has a surprisingly low voltage range. A new divider tying it to ground solved the problem, and he was good to go.

Rather than using an off-the-shelf firmware he created his own, and with a bit of board hacking he was able to hard wire the mains cabling and use one set of Sonoff terminals as a sensor connector. The whole fit neatly inside an electrical fitting box, so he’s back once more to toasty-warm feet.

This isn’t the first ESP thermostat we’ve featured, nor will it be the last. Here’s a particularly nice build from 2017.

Your Own Milliohm Meter

We like to pretend that wires are perfect all the time. For the most part that’s acceptable, but sometimes you really do care about those tiny fractional ohm quantities. Unfortunately though, most meters won’t read very low values. There are tricks you can use to achieve that aim, such as measuring low currents through a device with a known voltage applied. It is handier though to have an instrument to make the reading directly, and [Kasyan TV] did just that with a surprisingly low part count.

The whole thing is built from an LM317, a resistor, and a voltmeter module, that’s it. [Kasyan] mentions the meter’s accuracy means the lower digits are not meaningful, but it looks to us as though there are other sources of error — for example, there’s no way to zero out the probe’s resistance except during the initial calibration. Continue reading “Your Own Milliohm Meter”

Piezoelectric Crystals Explained

Summer in the Northern hemisphere means outdoor cooking. Matches are old school, and you are more likely to use a piezoelectric lighter to start your grill. [Steve Mould] has one, but he didn’t understand the physics behind why it works, so he decided to do the research and share it in a video.

The first two minutes is a recap of things you already know. But after that [Steve] gets into the crystal lattice structure of quartz. Using some computer animations and some peanut butter lids he shows you exactly why compressing the crystal generates electricity.

Continue reading “Piezoelectric Crystals Explained”

CNCing An X-Acto Knife Holder

X-acto knives are popular as the scalpel of the craft world. Obviously, holders for the blades are available off-the-shelf, but you needn’t settle for store bought. [Ariel Yahni] set about making an X-acto handle of their own, and it shows just how quick and easy making your own tools can be.

The blades are first measured to determine the appropriate dimensions for the holder. With this done, the basic shape of the handle is drawn up in CAD software using simple primitive shapes and lines. Then it’s just a simple matter of jigging up a piece of aluminium stock in the CNC machine, and letting it do its thing.

The final result needs minimal finishing – primarily just an inspection of the parts, minor deburring and the drilling and tapping of the mount holes. With a couple of socket head cap screws and an X-acto blade installed, it’s ready for work.

We see a lot of interesting tool builds around these parts. You might consider making your own ultrasonic cutter if you’re regularly finishing 3D printed parts. Video after the break. Continue reading “CNCing An X-Acto Knife Holder”

New Part Day: A 64-Bit RISC-V CPU In Raspberry Pi Hat Form

Over the last few years the open-source RISC-V microprocessor has moved from existing only on FPGAs into real silicon, and right now you can buy a RISC-V microcontroller with all the bells and whistles you would ever want. There’s an interesting chip from China called the Sipeed M1 that features a dual-core RISC-V core running at 600MHz, a bunch of I/Os, and because it’s 2019, a neural network processor. We’ve seen this chip before, but now Seeed Studios is selling it as a Raspberry Pi Hat. Is it an add-on board for a Pi, or is it its own standalone thing? Who knows.

The Grove AI Hat for Edge Computing, as this board is called, is built around the Sipeed MAix M1 AI Module with a Kendryte K210 processor. This is a dual-core 64-bit RISC-V chip and it is obviously the star of the show here. In addition to this chip you’ve also got a few Grove headers for digital I/O, I2C, PWM, and a UART. There’s a a USB Type C for power (finally we’re getting away from USB micro power plugs), and of course a 40-pin Raspberry Pi-style header.

This board is essentially a breakout board for the Sipeed M1 chip, which is one of the most interesting new microcontrollers we’ve seen since it launched late last year. There’s a lot of power here, and already people are emulating the Nintendo Entertainment System on this chip with great success. The problem with this chip is that apart from making your own breakout board, there aren’t many options to get it up and running quickly. This is the solution to that; at the very least it’s a Sipeed chip on a board with a power supply, and it’s also a co-processor that can be accessed with Linux and a Raspberry Pi.