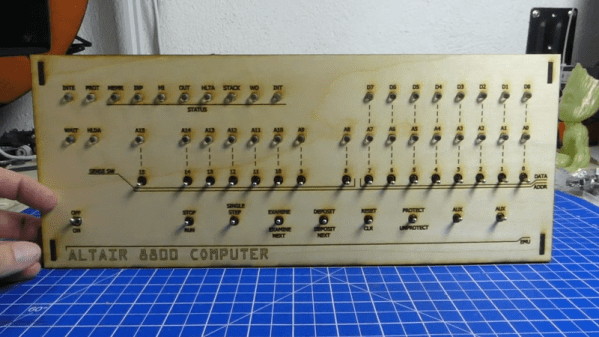
[Dirk] posted a video (you can see below) titled, “Mystery Retro Project Start.” That turned out to be the first of a multipart series on his Altair 8800 Again simulator. The front panel appears to be laser cut and in some future video episodes, we expect to see him simulate the CPU with a Teensy.
There have been plenty of 8800 clones ranging from projects that recreate the original PCBs, to those that just run a Raspberry Pi inside. The middle ground will use an Arduino or some other small CPU to simulate the 8080 CPU.
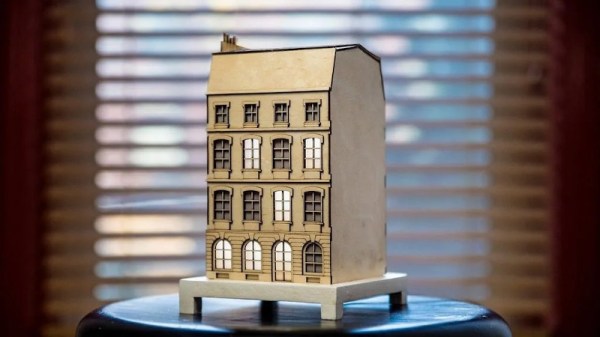
Binary clocks are often created as a programming exercise, or to display the time in a project with the minimal practical components. Displaying the time in binary needn’t always be for practicalities sake, however. The City Clock shows that it can be applied quite artfully, too.
The electronic side of things is simple – an Arduino Nano runs 13 LEDs, with a digital IO pin for each. Including a real time clock module is optional, though we imagine pretty essential if you wish the clock to keep accurate time. The LEDs are fitted into a grid, which is fitted behind the windowed facade of the building. This helps block light leaks between adjacent segments, giving a more polished look to the final design. The whole assembly is built out of lasercut wood, making it a quick and easy build if you’ve got such a tool handy.
It’s a simple concept, but one that is particularly striking in action. Even to those unaware of its horological abilities, it presents the appearance of a living building, with inhabitants switching lights on and off throughout the day. It would make an excellent bookshelf or coffee table piece, and we’re highly tempted to give building our own a go. Video after the break.
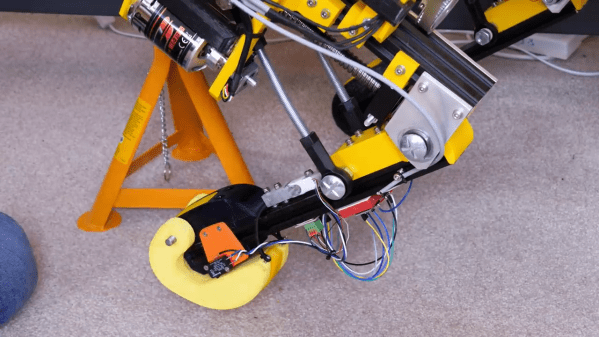
[James Bruton] OpenDog remains one of the most impressive home-built robotics projects we’ve seen here on Hackaday, and it’s a gift that just keeps on giving. This time he’s working on adding force sensing capabilities to OpenDog’s legs to allow for more dynamic movement control.
The actuators in the legs are three-phase outrunner motors that drive ball-screws via a belt. This configuration is non-backdrivable, meaning the legs cannot be moved when an external force is, which could lead to mechanical failures. He as tested other backdrivable leg configurations with other robots, but did not want to rebuild OpenDog completely. The solution [James] went with is a redesigned foot with an inbuilt switch, to confirm that the foot is touching the ground, and a load cell attached in the middle of the bottom leg segment. The load cell is bolted rigidly onto the leg segment, which allows it to sense when the leg is carrying load, without damaging the load cell itself.
Unfortunately all the serial ports on OpenDog’s main Teensy 3.6 controller are already used, so he converted the signal from the load cell to PWM, to allow it to be read by a normal GPIO pin. This works well in isolation, but when [James] switches on the motors, the PWM signal from the load sensor gets flooded by interference, making it unreadable. To solve this problem, he wants to implement a CAN bus, which will allow for more inputs and outputs and hopefully solve the interference problem. However, [James] has no experience with the CAN protocol, so learning to use it is going to be a project on its own.
OpenDog is turning into a very lengthy, time-consuming project, [James] says that the lessons learned from it have been invaluable for a number of other projects. This is something to keep in mind with everything we tackle. Choose projects were the experience gained and/or relationships developed are worth it on their own, even when the project fails in a conventional sense. This way you can never really lose.
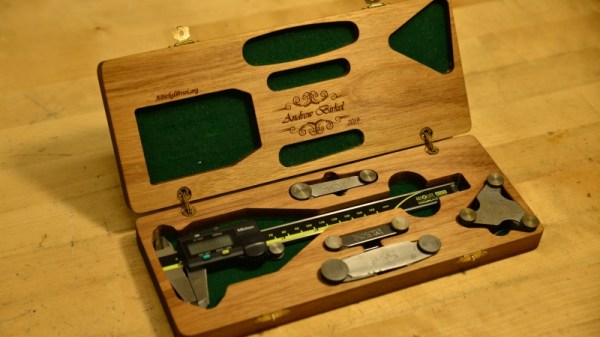
Every professional has a tool set that they would never part with. Likewise, for experimental physicists, mechanical engineers, and tinkerers, a caliper set can be unspeakably crucial to their work. That’s why [Andrew Birkel] designed his own personal caliper set to fit just the right proportions for his tools while adding a bit of personal flair.
The project uses CNC routing, Solidworks for CAD, laser engraving, and woodworking to design the custom case for a set of calipers, metric and English screw pitch gauges, fillet gauges, and radius gauges. It’s a practical build for a custom tool set that doesn’t already come with a case of its own. The particular tools were chosen for their use in particle physics experiments: for determining threads, inside and outside curvatures, and measuring length, depth, and width.
The box was made from an oversized piece of wood with holes drilled into the sides. After compiling the G-code program for the build, the two halves of the box was was milled from the wood. The first run on the CNC mill with aluminum managed to cause the grain to split, so [Birkel] went with a CNC router instead. Once the piece was sanded, hidden barrel hinges were added. The finished box was wiped down with mineral oil and teak oil to bring out the natural coloration of the wood as well as to add protection (lacquer mixed into the oil). To finish it off, the case was customized with a laser engraved name and email for identification.
It’s a pretty slick build to say the least, and certainly one that can be customized to the dimensions of whatever tools your personal caliper set happens to have.
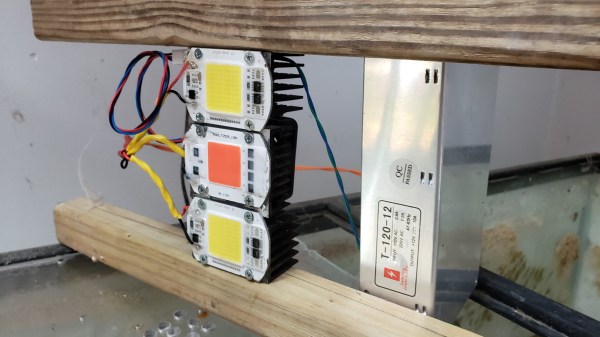
As we know from news around the word, reefs are delicate systems prone to damage from just about any imaginable threat. Escaped aquarium fish, sunscreen, and the wayward feet of well meaning tourists to name a few. So it’s no wonder that aquarium hobbyists sometimes go to incredible lengths to simulate the natural environments these creatures live in.
While [Phillip] is still tinkering with his designs for this project, we found the data he included really interesting. His goal is to be able to plug in any coordinate on the earth and have the lights replicate the location. That includes not just the sun, but also the light from the moon as many corals seem to only spawn during certain tides. Of course no LED is perfect so he’s even experimenting with putting light sensors under the water to provide a feedback loop to make it perfect.
We really like the ambition of this project and we hope he continues.
Nowadays, we still rely on medical records to tell when our last vaccinations were. For social workers in developing countries, it’s an incredibly difficult task especially if there isn’t a good standard in place for tracking vaccinations already.
A team at the Massachusetts Institute of Technology may be providing a solution – they’ve developed a safe ink to be embedded into the skin alongside the vaccine, only visible under a special light provided by a smartphone camera app. It’s an inconspicuous way to document the patient’s vaccination history directly into their skin and low-risk enough to massively simplify the process of maintaining medical records for vaccines.
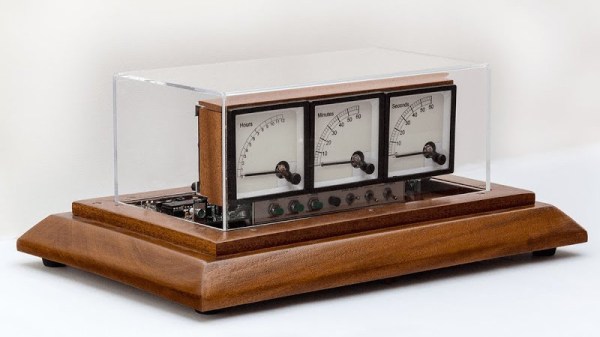
Voltmeters are cheap, and have a great industrial aesthetic about them. This makes them prime candidates for hackers looking to do a clock build. [Brett Oliver] went down this very road, and built a very stylish timepiece along the way.
[Brett] initially wanted to go with 240-degree voltmeters, however the cost was prohibitive, so settled for the more common 90-degree models. New dials were produced by first sanding down the old dials, repainting in an old-fashioned off-white, and then applying the new graphics with inkjet transfer paper.
The attention to detail continues with the case. [Brett] aimed to build the clock with an old-school lab equipment aesthetic. A large piece of mahogany was crafted into the base. A clear plastic cover was sourced from eBay, which really makes the piece. Large buttons and toggle switches were chosen to complete the look.