Hackaday Prize 2023: Universal Tensile Testing Machine

Material testing is important in big industry, where manufacturers must be able to trust the properties of the raw materials they’re using. The rest of us generally take a supplier’s word for it that they’re giving us what we’ve paid for. However, you could always take on material testing yourself with the Universal Tensile Testing Machine from [Xieshi Zhang].

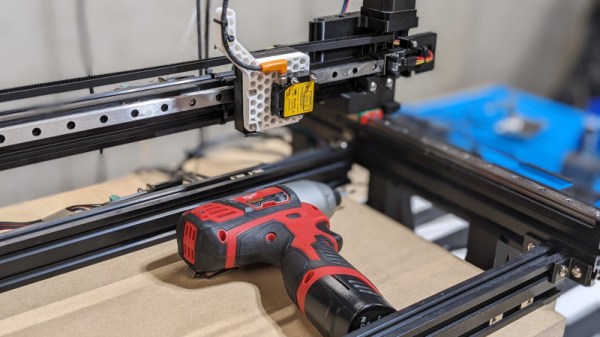
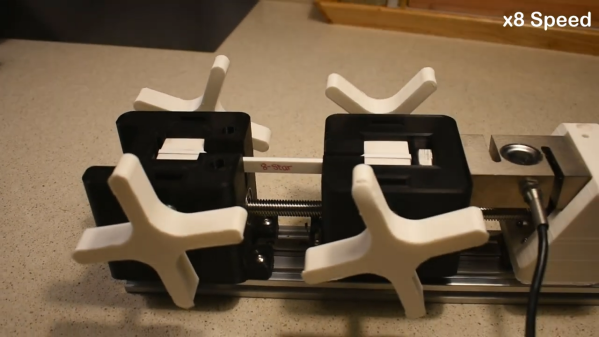
Unlike a six-figure industrial machine, this build is much more affordable, costing on the order of $300 to build. It uses an Arduino to read a tensile strain gauge, and is capable of applying up to a kilonewton of force. To achieve this, it uses a NEMA 17 stepper motor driving a lead screw to apply tensile strain or compression to the specimen under test.  The test fixture is assembled from 3D-printed components, and built on top of a piece of aluminium extrusion.

Fundamentally, it’s a smaller version of a machine most engineering undergraduates will see in a materials lab experiment. It could be highly useful for anyone wanting to experiment with 3D printed structures; it would be more than capable of testing various filaments and infill types for their tensile and compression performance. Video after the break.

Continue reading “Hackaday Prize 2023: Universal Tensile Testing Machine”

A Digital Camera For The 1984 Market

Digital cameras are a ubiquitous consumer and professional product here in 2023, and because of the wide availability of parts it’s relatively straightforward to construct one for yourself. Four decades ago though, film was king, but that hasn’t stopped [Georg Lukas] from building a digital camera for the 1984 market. The hardware is definitely from recent years, the extremely affordable ESP32-cam board that many of us will have worked with already. Meanwhile the 1984 part lies in the recording format, it makes EGA 16-colour low-res pictures and stores them in the archaic TGA file format.

A low-res camera is fun, but there are two other angles on this which are definitely worth some time. The first is that his description and code are worth a read for anyone with an interest in programming an ESP32 camera, while the second invites us to consider whether such a camera could have been made using parts available in 1984. We remember camera peripherals for 8-bit microcomputers which were a C-mount lens positioned over a decapped RAM chip, and thus we can’t help wondering whether an RGB split to three of those sensors could have been constructed. Whether a 6502 or a Z80 with 64k of memory could have processed the three images into one is another matter, but at least if any of you want to try there’s a handy 1984 computer still popping up on eBay.

This 3D Scanner Uses A Sensor You Might Not Know About

The huge diversity of sensors and other hardware which our community now has access to seems comprehensive, but there remain many parts which have made little impact due to cost or scarcity. It’s one of these which [Enginoor] has taken for the sensor in a 3D scanner, an industrial laser displacement sensor.

This sensor measures distance, but it’s not one of the time-of-flight sensors we’re familiar with. Instead it’s similar to a photographic rangefinder, relying on the parallax angle as seen from a sensor a distance apart from the laser. They are extremely expensive due to their high-precision construction, but happily they can be found at a more affordable level second-hand from decommissioned machinery.

In this case the sensor is mounted on an X-Y gantry, and scans the part making individual point measurements. The sensor is interfaced to a Teensy, which in turn spits the data back to a PC for processing. By their own admission it’s not the most practical of builds, but for us that’s not the point. We hope that bringing these parts to the attention of our community might see them used in other ways.

We’ve featured huge numbers of 3D scanners over the years, including a look at how not to make one.

Bench Power Supply Turned Realistic Flight Sim Panel

Flight simulator software has been available for about as long as desktop PCs have been a thing, but modern incarnations such as 2020’s Microsoft Flight Simulator have really raised the bar — not only graphically, but in terms of interactivity. There’s a dizzying array of switches and buttons that you can fiddle with in your aircraft’s virtual cockpit, but doing it with the same keyboard that you use to hammer out code or write Hackaday articles doesn’t do much for immersion.

Looking to improve on the situation without having to shell out for an expensive sim panel, [Michael Fitzmayer] decided to convert a broken Manson SSP-8160 lab power supply into a fairly good approximation of the KAP 140 autopilot system which is used in one of his favorite aircraft, the Pilatus PC-6 Turbo-Porter.

[Michael] gutted the piece of equipment pretty thoroughly, only leaving behind the case itself and the illuminated button panel on the front. The original displays were replaced with TM1637 seven-segment LEDs, and a pair of new rotary encoders are mounted where the stock knobs were. The whole show is run by a STM32F103 Blue Pill, which conveys the button pressing and knob spinning to the game by mimicking a USB Human Interface Device.

A fascia applied to the front of the power supply blocks the original text and labels, and really makes the finished unit look the part. [Michael] admits it’s not 100% accurate to the layout of the real hardware, but it’s certainly better than trying to enter heading and altitude information with the controller.

Oh that’s right, did we mention he’s actually using this on the Xbox Series S? While we generally see this sort of sim hardware hooked up to a tricked out gaming computer, we appreciate that he’s trying to bring some of that same experience to the console world. While the one-way communication of USB HID does bring with it some limitations — for example the hardware needs to be manually reset at the beginning of each flight to make sure the physical displays match what’s shown in the virtual cockpit– there’s still a lot of potential here.

For example, you could design and build your own flight yoke, pedals, and throttles rather than spending hundreds on a commercial version. It sounds like [Michael] is just getting started in the world of affordable console-based flight simulation, and we’re very eager to see where he goes from here.

Pedal Car Vs Ministry Of Transport

[Tim] from the “Way Out West” Youtube channels has started a fun project — building a wooden pedal-car heavily inspired by “Bugsy Malone”. The kids-sized gangsters in that movie got around in kid-sized pedal cars. Apparently kid-sized [Tim] just loved the idea, but just didn’t have the skills or tools to try to build one. But the time has come, and he has spent years putting together a workshop, tools, and skills.

The goal is a 4-wheeled vehicle that can actually be enclosed, to keep the driver out of the rain. It would be petal powered, with an optional electric assist. It should be made of simple materials, like plywood and epoxy. The design would be freely shared, and the overall cost hopefully kept low. Come back after the link to find the rest of the story, including the monkey wrench thrown into the works.
Continue reading “Pedal Car Vs Ministry Of Transport”

STM32 Oscilloscope Uses All The Features

[jgpeiro] is no slouch when it comes to building small, affordable oscilloscopes out of common microcontrollers. His most recent, based on an RP2040 with two channels that ran at 100 MSps, put it on the order of plenty of commercially-available oscilloscopes at this sample rate but at a fraction of the price. He wanted to improve on the design though, making a smaller unit with a greatly reduced bill-of-materials and with a more streamlined design, so he came up with this STM32-based oscilloscope.

The goal of this project was to base as many of the functions around the built-in capabilities of the STM32 as possible, so in addition to the four input channels and two output channels running at 1 MHz, the microcontroller also drives a TFT display which has been limited to 20 frames per second to save processor power for other tasks. The microcontroller also has a number of built-in operational amplifiers which are used as programmable gain amplifiers, further reducing the amount of support circuitry needed on the PCB while at the same time greatly improving the scope’s capabilities.

In fact, the only parts of consequence outside of the STM32, the power supply, and the screen are the inclusion of two operational amplifiers included to protect the input channels from overvoltage events. It’s an impressive build in a small form factor, and we’d say the design goal of keeping the parts count low has been met as well. If you do need something a little faster though, his RP2040-based oscilloscope is definitely worth checking out.

Continue reading “STM32 Oscilloscope Uses All The Features”

Tensioning 3D Prints For Lightweight, Strong Parts

Desktop 3D printers have come a long way over the past decade. They’re now affordable for almost anyone, capable of printing in many diverse materials, and offer a level of rapid prototyping and development not feasible with other methods. That said, the fact that they are largely limited to printing different formulations of plastic means there are inherent physical limitations to what the machines are capable of, largely because they print almost exclusively in plastic. But augmenting prints with other building techniques, like this method for adding tensioning systems to 3D printed trusses can save weight and make otherwise unremarkable prints incredibly strong.

The build from [Jón Schone] of Proper Printing consists of printed modular sections of truss which can be connected together to make structural components of arbitrary length. To add strength to them without weight, a series of Kevlar threads are strung from one end of the truss to the other on the interior, and then tensioned by twisting the threads at one end. Similar to building with prestressed concrete, this method allows for stronger parts, longer spans, less building material, and lighter weight components. The latter of which is especially important here, because this method is planned for use to eventually build a 3D printer where the components need to be light and strong. In this build it’s being used to make a desk lamp with a hinged joint.

For other innovative 3D printer builds, [Jón] has plenty of interesting designs ranging from this dual extrusion system to this 3D printed wheel for a full-size passenger vehicle. There’s all kinds of interesting stuff going on at that channel and we’ll be on the edge of our seats waiting to see the 3D printer he builds using this tensioned truss system.

Continue reading “Tensioning 3D Prints For Lightweight, Strong Parts”