DIY Cassette Tape Guitar Delay

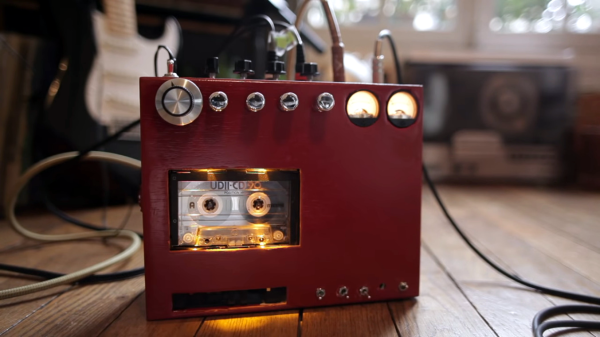
Digital delay pedals are pretty good nowadays and even the cheaper ones do a pretty good job at emulating the sound of old analog delay effects. And that’s good, because the original delay effects can run you a pretty penny. If you’re in to DIY electronics, though, analog delay effects can still be built without breaking the bank, and, as an example, [Matsound] has made a tape delay using an old tape deck and regular cassette tapes.

The core of the build is a portable 3-head cassette recorder, in this case a Marantz PMD430. The circuit has been around for a while – it was originally found in an issue of Stompboxology in the 90’s. The basic idea is that with a three-head recorder (erase, record, play) the distance between the record and play heads creates a delay and you increase this delay by slowing down the recorder’s motor. You combine the output from the recorder with the dry signal from your input and, viola, tape delay.

[Matsound] added a cool feature where you can control the speed of the motor with a control voltage, so if you connect it to a keyboard and produce different voltages from different keys, you get weird, spacey effects. The video gives an overview of the features and some details of the build process are in the video’s description.

A nice build built into a nice case and a great effect! Maybe you wouldn’t take it out gigging with you, but it sure sounds pretty good!  Other delay pedals have been mentioned on the site before, like this digital delay pedal and here’s another take on the cassette tape delay.

Continue reading “DIY Cassette Tape Guitar Delay”

Eth0 Autumn 2019: Tiny Camp, Creative Badge

The Dutch organisation eth0 has run a series of informal small camps over the years, never with an attendance too far into three figures, and without pre-planned events or entertainment. What happens is at the instigation of the attendees, and the result is a weekend of much closer socialising and working together on projects than the large camps where you spend your time running around to catch everything.

The largest of hacker camps offer all the lights, robots, tschunk, and techno music you can stomach; they can be a blast but also overwhelming. I made my way eth0 over the past week weekend, enjoying the more intimate size and coming away having made friendships from spending time with great people at a large private camping hostel near Lichtenvoorde. This is in the far east of the country near the German border, to which in the company of a British hardware hacker friend I traveled in the tiny European hatchback. Netherlands roads are so easy to navigate!

A prototype tensegrity structure. Image: Igor Nikolic.

At the event was the usual array of activities, though since it was a restricted photography affair I’m short on wider shots that would include people. This year’s hit came from surplus flipdot displays from retired German buses, with plenty of glitches as their quirks were figured out by our friends Lucy Fauth and Jana Marie Hemsing. Something tells me I’ll be seeing a lot of those fluorescent circles in the future.

I’d brought along the nucleus of a textile village, and RevSpace in the Hague had added their embroidery machine to my overlocker and sewing machines. Its operator was Boekenwuurm from Hackalot in Eindhoven who was kind enough to embroider a Wrencher for me, and now I want one of these 600-Euro machines even if I can’t afford one. She and RevSpace’s Igor Nikolic were experimenting with inflatables and tensegrity structures, creating prototypes with an eye to more impressive installations at future camps.

An entertaining tale of a couple of days hanging out with friends in the Netherlands countryside could probably be spun into a reasonable tale, but there was something more interesting still at this camp. It had a badge, courtesy of the prolific badge.team Dutch badge crew. It didn’t come with their trademark ESP32 firmware though, instead in keeping with the budget of the event it was a prototyping board on which attendees could create their own badges. What came forth from that was extremely impressive, and continued after the event.

Continue reading “Eth0 Autumn 2019: Tiny Camp, Creative Badge”

Intercontinental Radio Communications With The Help Of Fly Fishing Reels

All of us have experience in trying to explain to a confused store assistant exactly what type of kitchen implement you’re looking for, and why it is a perfectly suitable part for your autonomous flying lawn mower. Or in the case of [MM0OPX] trying to find fly fishing reels that are suitable for his  Adjustiwave multi-band VHF-HF  ham radio antenna.

HF radios allow intercontinental communication but require very large antennas which can be tricky to tune properly, and this antenna helps ease both these problems. The basic configuration is quarter wave, linear loaded (folded), vertical antenna. A quarter wave length radiator wire runs up a fibreglass pole, folds over the top, and comes back down, to form a shorter, more practical antenna while remaining the required length. Ground plane radial wires are usually added to improve performance by helping to reflect signals into antenna.

[MM0OPX] expanded this concept by using two pairs of fly fishing reels to quickly adjust the length of the radiators and radials. One reel holds the actual antenna wire while the second holds fishing braid, which is tied to the end of the wire to provided tension. The radials wire is exactly the same, it just runs across the ground.

The four reels are mounted to a plastic junction box, which houses the feed line connector and matching transformer, which is attached to the base of a fibreglass pole with hydraulic pipe clamps. Each wire is marked with heat shrink at defined points to allow quick tuning for the different frequencies. [MM0OPX] tried a couple of wire types and found that 1 mm stainless steel cable worked best.

This being Hackaday, we are big fans of repurposing things, especially when the end product is greater than the sum of its parts, as is the case here. Check out the walk around and build discussion videos after the break. Continue reading “Intercontinental Radio Communications With The Help Of Fly Fishing Reels”

The $5 FPGA

You ever wonder exactly what’s inside that cheap stuff you get from China? Sometimes it is cheap parts you’ve never heard about. Case in point: if you are willing to import, you can score an FPGA board for about $5. The downside? You’ve probably never heard of the GOWIN Semi GW1N  — one of the Little Bee FPGAs — that’s onboard.

There is some English documentation which leaves room for interpretation and you’ll have to use their IDE. Then again, it might be a fun puzzle to get one of these working. Looks like Seeed has them available for $4.90.

According to the Wiki, the onboard chip is GW1N-LV1QN48C6/I5, equipped with 1152 LUT4 logic resources, 1 PLL and a total of 72Kbit SRAM. The development board brings out all I/O interfaces. There’s also 64 Mbits of PSRAM. The board also has an RGB interface for a display, a 24 MHz clock, and the USB programming/debugging interface.

We didn’t try it, but the development tool looks to be available for Windows or Linux. Browsing through the wiki gives the impression it is usable, although probably simple — which could be an advantage compared to some other tool suites.

Worth a try? The Lattice chips are not that expensive and are well supported by open source tools. Then again, people want to try the very cheap (under a dime) CPU that is in a lot of products. So why not FPGAs, too?

Massive 3D-Printed Ridable Tank Boggles The Mind

Anyone who has used an FDM 3D printer knows just how long the process can take, especially when you really start filling up the available print volume. Apparently [Ivan Miranda] has absolutely zero fear of insanely long print times, and is in the process of building a massive ridable tank (YouTube playlist of the whole build) that is almost completely 3D printed.

[Ivan] is no stranger to large prints, but this tank is on a different level altogether. The chassis, which is reinforced with aluminium and steel square tubing, took around 1200 hours to print and each of the wheels took 6 days! The rolling chassis with wheels and track weighs close to a 100 kg.  Having built a few smaller 3D printed tracked vehicles before, [Ivan] used a lot of that knowledge to design the latest monster.

Connecting the tracked section together has always proven challenging for [Ivan]. This time he used plastic fish tape (wire puller) for the pins, and blocked off the end holes with screws. The bogies (wheel sets) are also interesting, with 3D printed springs that sit parallel to the ground. Almost all the parts are printed in PLA, which can be quite brittle, so it would be interesting to see how it holds up.

[Ivan] has been working on this project since the start of 2019, and we can’t wait to see it completed. We’ve featured his signature red prints a few times, including a RC car that drives on the ceiling and a water jet drive. If you’re keen to build your own tank on the opposite side of the size spectrum, check out this tiny tank for your crawl space. Watch [Ivan] finish the rolling chassis after the break. Continue reading “Massive 3D-Printed Ridable Tank Boggles The Mind”

Rarely Adjusted Slicer Setting Makes A Difference

When you 3D print something, you probably adjust the layer height based on your desired print quality. Speed is another parameter that many people adjust. But what about extrusion width? The parameter is there, but most people leave it at the defaults. [Stephan] wondered about it, and after running some tests, made a video you can see below trying to determine if it affected strength and print quality.

The tests were pretty straightforward. Some Benchys and other test pieces at each setting were observed and — in some cases — destroyed. He ranged the width from 90% to 250% of a 0.4mm nozzle. Important to note, his results are from a nozzle that has a flat lip around the aperture. If yours doesn’t look like that, you will see different results.

Continue reading “Rarely Adjusted Slicer Setting Makes A Difference”

A New Method For Growing Watch Springs

Scientists at the Swiss Federal Laboratories for Materials Science and Technology (Empa) recently developed a new technique for growing watch springs to tiny specifications. As it turns out, the creation of watch springs is ripe with opportunity for new materials research.

The technique involves using photo-etching and electrochemical deposition into cold, aqueous solutions. Compared to drawing and winding Nivarox wires, this is a fairly unconventional method for manufacturing. For as long as watchmaking has been around, creating the balance springs has been one of the most difficult parts of the job. The wires must be drawn to a thickness in the hundredths of millimeters and wound and tempered to the exact hardness, ductility, and elasticity while compensating for environmental factors. Many substances change their properties during fabrication, so the Empa team decided to look to pure materials research as a way to find a means for fabricating balance springs that would remain stable.

They took silicon wafers (the same kind used for solar panels and computer chips), covered them in gold and a thin layer of light sensitive paint, and etched the shape of a spring into the wafer. The wafer was then dipped into a galvanic bath containing a salt solution from a metallic alloy — the spring acts as a cathode so that when an electric current passes through the bath, metal is deposited at the base of the spring. Once the spring is built up, it is dissolved from the mold and examined. After a bit of smoothing, the final spring is washed and sent to a lab for prototype production.

The electroplated springs are currently on display at the Laboratory for Mechanics of Materials and Nanostructures at the Empa campus in Thun, Switzerland. In the meantime, the first pilot tests are being wrapped up, and the team is beginning to work with Swiss watchmakers to see if their springs can hold up inside watch mechanisms.

[Thanks to Qes for the tip!]