Add-On Lets FDM 3D Printer Wash And Cure Resin Parts

The dramatic price reductions we’ve seen on resin 3D printers over the last couple of years have been very exciting, as it means more people are finally getting access to this impressive technology. But what newcomers might not realize is that the cost of the printer itself is only part of your initial investment. Resin printed parts need to be washed and cured before they’re ready to be put into service, and unless you want to do it all by hand, that means buying a second machine to do the post-printing treatment.

Not sure he wanted to spend the money on a dedicated machine just yet, [Chris Chimienti] decided to take an unusual approach and modify one of his filament-based 3D printers to handle wash and cure duty. His clever enclosure slips over the considerable Z-axis of a Anet ET5X printer, and includes banks of UV LEDs and fans to circulate the air and speed up the drying process.

Looking up into the curing chamber.

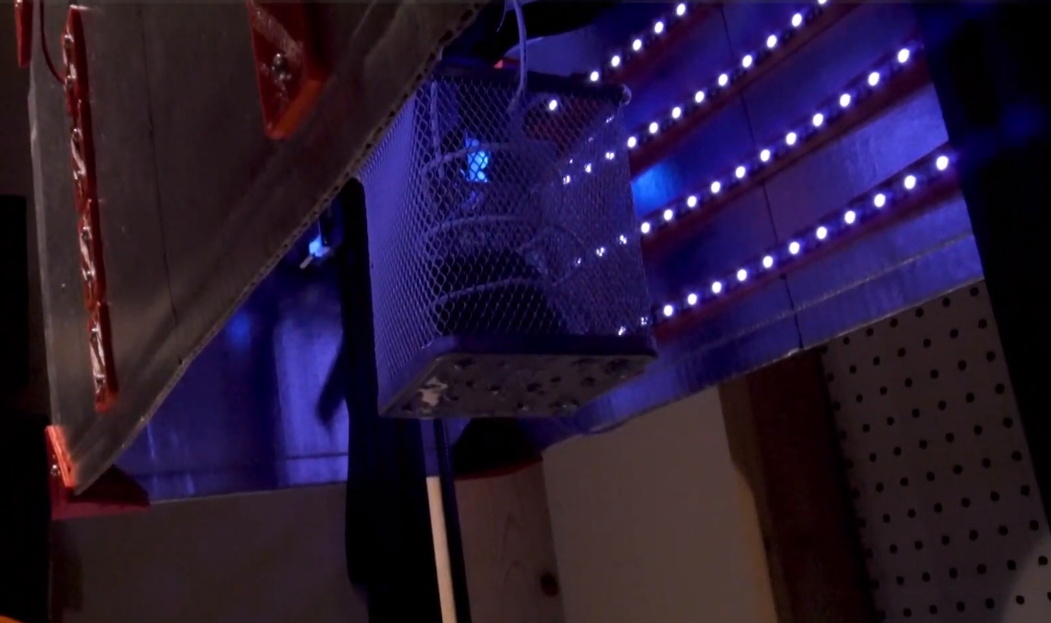
The curing part is easy enough to understand, but how does it do the washing? You simply put a container of 70% isopropyl alcohol (IPA) on the printer’s bed, and place the part to be washed into a basket that hangs from the printer’s extruder. Custom Python software is used to generate G-code that commands the printer to dip the part in the alcohol and swish it back and forth to give it a good rinse.

Once the specified time has elapsed, the printer raises the part up into the enclosure and kicks on the LEDs to begin the next phase of the process. The whole system is automated through an OctoPrint plugin, and while the relatively low speed of the printer’s movement means the “washing” cycle might not be quite as energetic as we’d like, it’s definitely a very slick solution.

[Chris] provides an extensive overview of the project in the latest video on his YouTube channel, Embrace Racing. In it he explains that the concept could certainly be adapted for use on printers other than the Anet ET5X, but that it’s considerable build volume makes it an ideal candidate for conversion. Of course it’s also possible to use the foam board enclosure by itself as a curing chamber, though you’ll still need to wash the part in IPA ahead of time.

This is perhaps one of the most unusual wash and cure systems we’ve seen here at Hackaday, but we appreciate the fact that [Chris] based the whole thing on the idea that you’ve probably got a FDM printer sitting nearby that otherwise goes unused when you’re working with resin. If that’s not the case for you, putting together a more traditional UV curing chamber is an easy enough project.

Continue reading “Add-On Lets FDM 3D Printer Wash And Cure Resin Parts”

A smartphone with a robot vacuum in the background

Hacking A Robot Vacuum To Write A Replacement App

While internet-connected devices can be very useful around the house, and it is pretty cool to be able to monitor your dishwasher from half a world away, it’s important to be mindful of privacy and security issues. For instance, the Cecotec Conga 1490 robot vacuum [Rastersoft] bought came with an Android app, which upon installation asked for near-total access to the user’s phone. Not content with such an invasion of privacy, let alone the potential security implications, [Rastersoft] set to work trying to reverse engineer the robot’s communications (translated) to find out what exactly it was doing when online. He did this by configuring a Raspberry Pi as an access point, letting the vacuum connect to it, and logging all the data flowing through.

As it turned out, the robot phoned home to its manufacturer, reporting its serial number and some configuration settings. The server then passed control to the mobile app, but not without routing all subsequent commands through the remote server. Not only is this creepy, it also means that if the manufacturer were to shut down the server, the app would stop working entirely. [Rastersoft] therefore got the idea to write custom software to control the robot. He began by reconfiguring the Pi’s network setup to fool the vacuum into thinking it was connecting to its manufacturer’s server, and then wrote some Python code to emulate the server’s response. He was now in control of all data flowing back and forth.

After a lot of experimentation and data analysis, [Rastersoft] managed to decipher the commands sent by the app, enabling him to write a complete replacement app seen in the video after the break that includes control of all the vacuum’s standard actions, but also a new feature to manually control the vacuum’s movement. All code is available on GitHub for those who would like to hack their Congas too.

We think this is a great example of software hacking to future-proof devices that you own, while also mitigating many of the dangers to your security and privacy posed by the default software. The fact that the commands you send from your phone to your vacuum go all the way around the world, potentially being stored and read by others, is rather ridiculous in the first place. After all, we’ve already seen how robot vacuums could spy on you.

Continue reading “Hacking A Robot Vacuum To Write A Replacement App”

This Week In Security: Breaking Apple ID, Political Hacktivism, And Airtag Tracking

Have you ever thought about all the complexities of a Single Sign On (SSO) implementation? A lot of engineering effort has gone into hardened against cross-site attacks — you wouldn’t want every site you visit to be able to hijack your Google or Facebook account. At the same time, SSO is the useful ability to use your authentication on one service to authenticate with an unrelated site. Does SSO ever compromise that hardening? If mistakes are made, absolutely, as [Zemnmez] discovered while looking at the Apple ID SSO system.

Continue reading “This Week In Security: Breaking Apple ID, Political Hacktivism, And Airtag Tracking”

Raspberry Pi Real-Time HAT

New Part Day: Raspberry Pi HAT For IEEE1588 Precision Time Protocol

The new Real-Time HAT by InnoRoute adds IEEE1588 PTP support in hardware to a Raspberry Pi 4 nestled beneath. Based around a Xilinx Artix-7 FPGA and a handful of gigabit Ethernet PHY devices, the HAT acts as network-passthrough, adding accurate time-stamps to egress (outgoing) packets and stripping time-stamps from the ingress (incoming) side.

This hardware time-stamping involves re-writing Ethernet packets on-the-fly using specialised network hardware which the Raspberry Pi does not have. Yes, there are software-only 1588 stacks, but they can only get down to 10s of microsecond resolutions, unlike a hardware approach which can get down to 10s of nanoseconds.

1588 is used heavily for applications such as telecoms infrastructure, factory equipment control and anything requiring synchronisation of data-consuming or data-producing devices. CERN makes very heavy use of 1588 for its enormous arrays of sensors and control equipment, for all the LHC experiments. This is the WhiteRabbit System, presumably named after the time-obsessed white rabbit of Alice In Wonderland fame. So, if you have a large installation and a need for precisely controlling when stuff happens across it, this may be just the thing you’re looking for.

IEEE1588 PTP Synchronisation

The PTP client and master device ping a few messages back and forth between themselves, with the network time-stamper recording the precise moment a packet crosses the interface. These time-stamps are recorded with the local clock. This is important. From these measurements, the time-of-flight of the packet and offset of the local clock from the remote clock may be calculated and corrected for. In this way each client node (the hat) in the network will have the same idea of current time, and hence all network packets flowing through the whole network can be synchronised.

The beauty of the system is that the network switches, wiring and all that common infrastructure don’t need to speak 1588 nor have any other special features, they just need to pass along the packets, ideally with a consistent delay.

The Real-Time HAT configures its FPGA via SPI, straight from Raspberry Pi OS, with multiple applications possible, just by a change on the command line. It is possible to upload custom bitstreams, allowing the HAT to be used as a general purpose FPGA dev board should you wish to do so. It even stacks with the official PoE HAT, which makes it even more useful for hanging sensors on the end of a single wire.

Of course, if your needs are somewhat simpler and smaller in scale than a Swiss city, you could just hack a GPS clock source into a Raspberry Pi with a little soldering and call it a day.

USB Mouse Hack For Pachyderm Protection

When most of us think of seismometers, our minds conjure up images of broken buildings, buckled roads, and search and rescue teams digging through rubble. But when [Subir Bhaduri] his team were challenged with solving real world problems as frugally as possible as part of the 2020 Frugal Science course, he thought of farmers in rural India for whom losing crops due to raiding elephants is a reality. Such raids can and have caused loss of life for humans and elephants alike. How could he apply scientific means to prevent such conflicts, and do it on the cheap?

Whether inspiration came from using a computer mouse with the cursor speed turned up to “orbital velocity” is debatable, but [Subir] set forth to find out if such sensitivity could be leveraged for the seismic detection of the aforementioned elephants. His proof of concept is a fantastically frugal low cost seismograph using an optical mouse and some cheap PVC pipe and fittings.

We invite you to watch the video below the break to find out how it works. You’ll be impressed as we were by [Subir]’s practical application of engineering principles. And keep your eyes open for the beautiful magnetic damper hack. It’s a real treat!

If pontificating pesky pachyderms p-waves piques your interest, perhaps you’ll appreciate previous projects which produce data with piezo pickups and plumbing parts.

Continue reading “USB Mouse Hack For Pachyderm Protection”

The Man-Machine

This week we saw a couple DIY tools for small-run manufacturing at home that help make your life easier if you’re climbing out of the happy bucket and into the pit of despair — when you’re making enough of the item that it’s not fun any more, but you still don’t have the volume to leave the manufacturing to someone else.

The first was an automatic through-hole soldering machine made from a 3D printer. This actually makes sense even if you’re getting boards assembled for you, because through-hole pads are a lot more expensive than SMT parts, and they usually charge per pin. Put a 2×20 pin header on your project, and it can end up costing a lot. Or you can robotificate the solution.

This week’s second solution really caught my eye. PnPassist is machine that turns your PCB around, locates a laser crosshair over the next SMT piece that you need to place, and even has an OLED screen that tells you what to put there. There are many great mechanical design choices here, but what really drew my attention is how well this machine fills a gap between manual and fully automatic pick-and-place.

I know you hate looking back and forth between the board and the schematic or parts list, trying to find just where Q23 is on the darn board, or looking up resistor values. With PnPassist, you still have to do the placing, but with machine guidance. If you don’t have the money or the space for a fully automatic PnP, this is an obvious win, but also for short runs when loading up the reels takes more time than populating the board, this could be a huge win.

I love this kind of human-capability-enhancing machine, and I’m always happy to see a design like this. It reminds me of the very clever Shaper Origin, or even just this handy automatic XY table for drilling many precise holes. In all these cases, there’s some part of the problem that would be hard to solve, require extremely bulky or expensive machinery, or can just be more simply accomplished by a meatbag. But combining machine precision with the human element produces something more than the sum of the parts.

What’s your favorite human-enhancing tool?

How To Modify Your Car Stereo For Bluetooth Or Aux-In

If you’re an automotive enthusiast of taste, you can’t stand the idea of fitting a janky aftermarket stereo into your nice, clean ride. Flashy, modern head units can spoil the look of a car’s interior, particularly if the car is a retro, classic, or vintage ride.

Thus, we’re going to look at how to modify your existing stock car stereo to accept an auxiliary cable input or even a Bluetooth module. This way, you can pump in the latest tunes from your smartphone without a fuss, while still maintaining an all-original look on the dash.

Fundamentals

A simple Bluetooth module designed for wiring into car audio systems. There are two wires for 12 V power from the vehicle, and the audio signal is sent out over the RCA plugs. The RCA plugs can be cut off and the module hard wired inside your stereo if you have room. Cutting off the plastic case can help too.

Depending on your choice of audio player, you may prefer a 3.5 mm aux jack, or you might want to go with Bluetooth audio if your smartphone no longer has a headphone port. Whichever way you go, the process of modifying the stereo is largely the same. To achieve your goal, you need to find a way of injecting the audio signal into the head unit’s amplifier stage, while making sure no other audio sources are getting sent there as well.

Whether that audio source is a 3.5 mm jack or a Bluetooth module doesn’t matter. The only difference is, in the latter case, you’ll want to buy a Bluetooth module and hardwire it in to the auxiliary input you create, while also splicing the module into the stereo’s power supply. In the case of a simple headphone jack input, you simply need to wire up an aux cord or 3.5 mm jack somewhere you can get to it, and call it done.

This guide won’t cover every stereo under the sun, of course. Edge cases exist and depending on the minute specifics of how your original car radio works, these exact methods may or may not work for you. However, this guide is intended to get you thinking conceptually about how such mods are done, so that you can investigate the hardware in front of you and make your own decisions about how to integrate an external audio input that suits your usage case. Continue reading “How To Modify Your Car Stereo For Bluetooth Or Aux-In”