Gigantic Working Arduino Uses 1/4″ Cables

What is it about larger-than-life versions of things that makes them so awesome? We’re not sure exactly, but this giant working Arduino definitely has the ‘it’ factor, whatever that may be. It’s twelve times the size of a regular Uno and has a Nano embedded in the back of it. To give you an idea of the scale, the reset button is an arcade button.

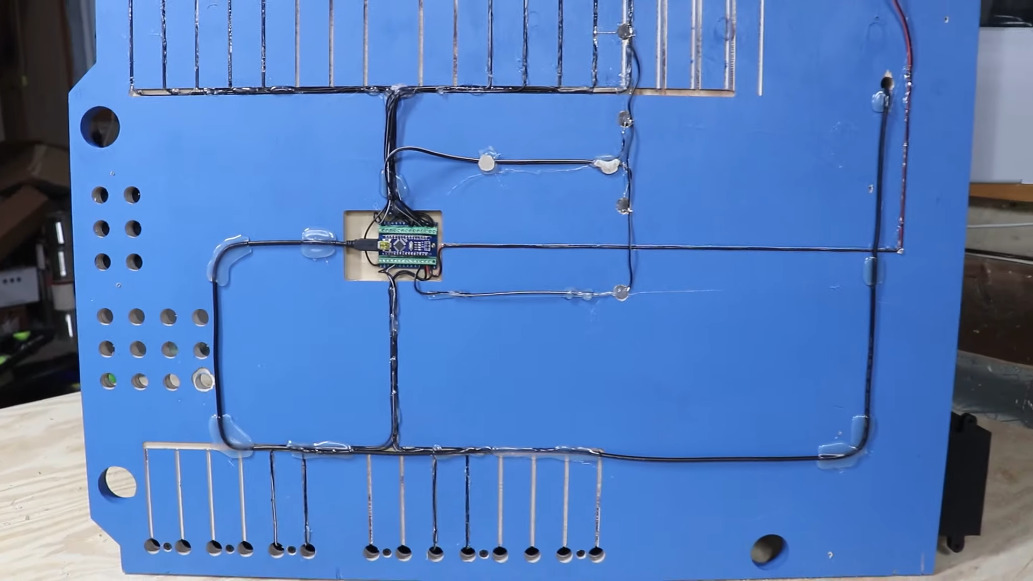
The Arduino Giga’s PCB is made of 3/4″ plywood, and the giant components represent a week and a half of 3D printing. The lettering and pin numbers are all carved on a CNC and filled in with what appears to be caulk. They didn’t get carved out deeply enough the first time around, but [byte sized] came up with a clever way to perfectly re-register the plywood so it carved in exactly the same places.

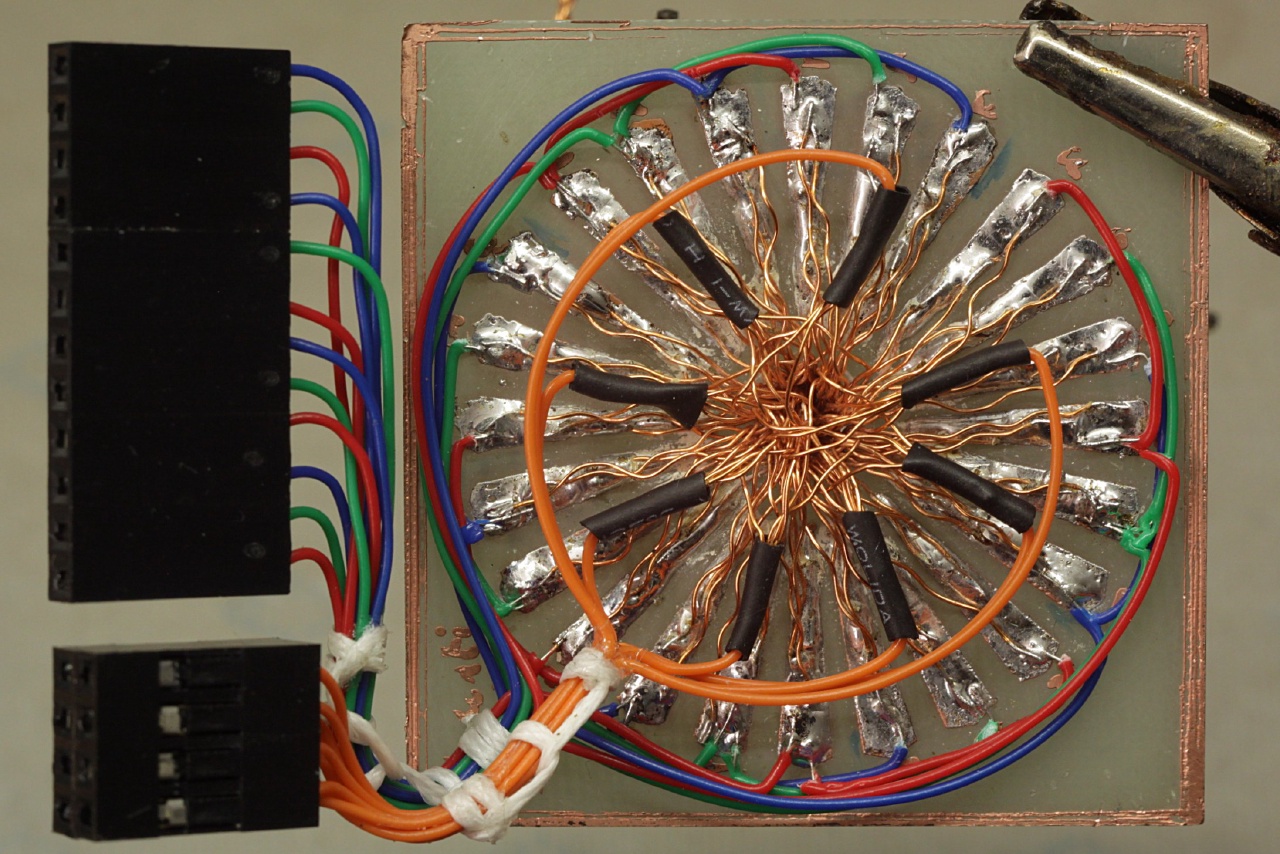
Although we love everything about this build, our favorite part has to be the way that [byte sized] made the female headers work. Each one has a 1/4″ audio jack embedded inside of it (a task which required a special 3D printed tool), so patch cables are the new jumper cables. [byte sized] put it to the test with some addressable RGB LEDs on his Christmas tree, which you can see in the build video after the break.

You can buy one of those giant working 555 timer kits, but why not just make one yourself?

Continue reading “Gigantic Working Arduino Uses 1/4″ Cables”

Sierpinski PCB Christmas Tree

It’s holiday time again! And that means it’s time to break out the soldering iron and the RGB LEDs! If you’re going to make a custom PCB to put those LEDs on, you’ll notice that you get few copies of your PCB in your order, so, might as well design it such that you can combine them all together into a single Sierpinski Christmas Tree, just like [Landon Carter] did.

Each PCB “tree” has three connections which can be used as either inputs or outputs by soldering one of two bridge connections on the PCB. The power and signal goes up and down through the tree, rather than across, so the connections go one on the top of the tree and two on the bottom. This way, each tree in the triangle can easily be connected, and each triangle can be easily connected to another. Each individual tree has three WS2812b-mini addressable RGB LEDs and the tree is controlled by an external Arduino.

The first order of 10 PCBs came in, which makes a 9 member tree – next up is a 27 member tree. After that, you’re going to need some pretty high vaulted ceilings in order to put these on the wall. On the upside, though, once the holidays are over, everything can be easily disconnected and packed away with the rest of the decorations. If you, too, are interested in RGB LED decorations, there are a few on the site for your perusal.

A Microwave Repair Even Mechanical Keyboard Fans Will Love

Microwave oven design and manufacturing have been optimized to the point where the once-expensive appliances are now nearly disposable. Despite the economics, though, some people can’t resist fixing stuff, especially when you get a chance to do it in style. Thus we present this microwave repair with its wholly unnecessary yet fabulous adornments.

The beginning of the end for [dekuNukem]’s dirt cheap second-hand microwave started where many of the appliances begin to fail first — the membrane keyboard. Unable to press the buttons reliably anymore, [dekuNukem] worked out the original keypad’s matrix wiring arrangement and whipped up a little keypad from some pushbutton switches and a scrap of perfboard. Wired into the main PCB, it was an effective and cheap solution, if a bit on the artless side.

To perk things up a bit, [dekuNukem] turned to duckyPad, a hot-swappable macropad with mechanical switches and, of course, RGB LEDs. Things got interesting from here; since duckyPad outputs serial data, an adapater was needed inside the microwave. An STM32 microcontroller and a pair of ADG714 analog switches did the trick, with power pulled from the original PCB.

The finished repair is pretty flashy, and [dekuNukem] now has the only microwave in the world with a clicky keypad. And what’s more, it works.

Continue reading “A Microwave Repair Even Mechanical Keyboard Fans Will Love”

Illuminated 3D Printed Guitar Is Ready To Rock

When we think of 3D printed parts for our projects, most of us imagine little bits like brackets and mounting plates. Perhaps the occasional printed project enclosure. But if you’ve got a big custom printer as [Joshendy] does, plus plenty of time, it opens up a whole new world of large scale projects. Take for example the gorgeous RGB LED guitar body he recently completed.

Despite the considerable 300 x 300 mm build area of his custom 3D printer, [Joshendy] still had to design the guitar body in sections that could be bolted together after being printed in ABS. It took around 60 hours to run off all the parts, with the large central section taking the longest to print at 28 hours. With the generous application of heat-set inserts, the assembled guitar should be plenty strong.

The white ABS of the guitar body helps diffuse the LEDs.

While the skeletal plastic body of the guitar is certainly visually interesting in itself, it only makes up for half of the final look. Inside the central cavity, [Joshendy] has embedded two strips of RGB LEDs, a 128×64 OLED screen, and a custom PCB that plays host to a STM32L4 microcontroller the appropriate voltage regulators necessary to run it all on a battery pack.

The board taps into the audio being produced by the guitar and uses a fast Fourier transform (FFT) to get the LEDs reacting to the beat. As demonstrated in the video after the break, you can use the screen to navigate through the different lighting modes in real-time right on the instrument itself.

We covered the equally impressive large-format 3D printer that [Joshendy] used to produce this guitar earlier in the month, and it’s quite exciting to see the sort of things he’s printing on it already. This project has already set the bar very high, and we can’t wait to see what he comes up with next.

Continue reading “Illuminated 3D Printed Guitar Is Ready To Rock”

Infinity Mirror Guitar Shreds Forever

Just when we thought there was nothing left to make into an infinity mirror, [Burls Art] goes and builds something that seems obvious now that it exists — an infinity mirror guitar. Check out the build video after the break, where [Burls Art] gets right to it without wasting any time.

He started by making a 3/4″ wood frame for the body and the one-piece neck and headstock. The acrylic on the top has two-way mirror film, and the back piece is painted with mirror paint to get the infinity effect going. [Burls Art] also fashioned acrylic boxes for the pickup and the electronics. Those are both buffed to be frosty, so the lights reflect nicely off of them.

There’s nothing super-fancy going on with the electronics, just some app-controlled RGB LEDs. We would love to see a version where the LEDs respond in real time to the music. The effect is still quite cool, so if you don’t want to watch the whole build, at least check out the demo at the end where [Burls Art] plays a riff. Never has a delay pedal been so appropriate.

If you’re not much of a luthier, don’t fret about not being able to make a cover version. We’ve seen plenty of infinity mirrors, but if you want something useful, whip up some infinity drink coasters.

Continue reading “Infinity Mirror Guitar Shreds Forever”

Bonsai LED Matrix Has Chaotic Roots

Most people don’t hand solder their surface mount LED matrices these days, and they certainly don’t do it with RGB LEDs. [fruchti] isn’t most people, has managed to grow his electronic hobby into the art form know as Bonsai.

The organic shapes of miniature trees grown over the course of decades is the ultimate indicator of patience and persistence. For those who prefer bending copper to their will rather than saplings, producing an LED tree that looks and functions this well is an accomplishment that signals clever planning and patient fabrication. The animated result is a masterpiece that took about eighteen months to complete.

There are 128 enamel-coated wires that twist into branches holding 32 RGB light-emitting diodes. Tapping into each at the base of the tree is a chaotic mess made a bit easier by a cleverly designed circuit board.

A circular petal pattern was laid out in Inkscape that includes a hole at the center for the “trunk” to pass through. The LED matrix is designed with 8 rows and 12 columns, but 24 pads were laid out so that only four wires would need to be soldered to each copper petal. Even so, look at the alligator clip holding up this PCB to get an idea of the scale of this job!

The angular base is itself made of copper clad board soldered on the inside of the seams and painted black on the outside. This hides the “petal” PCB, as well as a breakout board for an STM32 microcontroller and a power management circuit that lets you use your choice of USB or a lithium battery.

We wonder if [fruchti] has thought about adding some interactivity to his sapling. While we haven’t seen such a beautiful, tiny, creation as this, we have seen an LED tree whose lights can be blown out like birthday candles. Wouldn’t this be an excellent entry in our Circuit Sculpture challenge? There’s still a few weeks left!

Lo-Fi Art On A 32×32 Matrix

Display technology has improved by leaps and bounds over the last few years, thanks in no small part to the smartphone revolution. High-resolution LCD panels are dirt cheap and easy to interface with. There’s absolutely no logical reason to try and show images on a 32×32 array of RGB LEDs. But that didn’t stop [Felix Spöttel] from doing it anyway.

The project, which he calls thirtytwopixels, was designed to work in conjunction with MPD (Music Player Daemon) to show the album art for whatever is currently playing. The ultra-low resolution display added a certain element of abstractness to the artwork, which [Felix] said made it an interesting conversation starter. Guests would try and guess what the album art was depicting given the sparse rendition shown on the matrix.

[Felix] gives an excellent explanation of how to get the server and client-side software up and running should you want to recreate his setup, but his Python scripts also have a function where you can push an arbitrary image to the display if you don’t want to connect everything up to the MPD backend.

On the hardware side, thirtytwopixels uses the Raspberry Pi Zero W, a Adafruit RGB Matrix Bonnet, and a 32×32 LED matrix that uses the HUB75 interface. Even a relatively small LED matrix like this can get pretty thirsty, so [Felix] is using a 5 volt power supply that can deliver 4 amps to keep the electronics happy.

If you wanted to keep the low resolution aesthetic but make the display larger, we’ve seen WS2812B LED strips and 3D printed frames used to make a custom jumbo matrix which could surely be adapted for this concept.