If you need a reflow oven, you can very easily head down to Walmart or Target and pick up a toaster oven for fifteen bucks or so. Even without any control electronics, a bone-stock toaster oven works well enough for reflow soldering, but if you want to do it right you’ll also want to add a themocouple, a microcontroller, and maybe a fancy display. That’s option one.
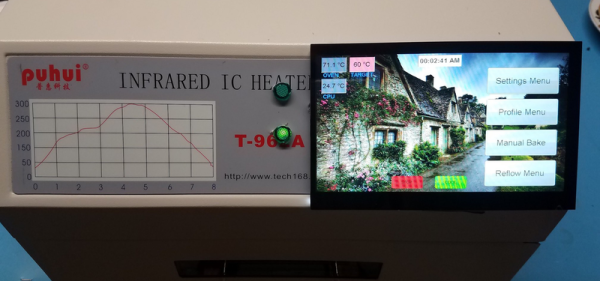
If you value your time more than your money, you’ll probably just plonk down a few hundred bucks for a T-962A reflow oven, the standard infrared oven that’s meant for reflowing solder. It’s a good oven, but as with all bargain basement tools from China, the user interface isn’t great. [PhillyFlyers] is working on a drop-in controller for what is probably the most popular reflow oven on the planet, and this thing looks good.
This is a controller for the T-962A oven that includes all the connectors as the stock control board. We’ve seen a few of these projects to improve cheap tools, from 3D printer controllers to a replacement board for the ubiquitous K40 laser cutter. Now the most popular reflow oven is getting the same treatment.
The specs for this replacement board include a five-inch, 800 x 480 display, powered by an STM32H7 microcontroller. All of the usual functionality of the oven is retained, but it adds the ability to hand-draw reflow profiles, save reflow profiles to an SD card, and support for four K-type thermocouples. Basically, it’s what you would expect from an upgraded version of the T-962 oven.
Most importantly, this is a direct drop-in replacement for the stock electronics. Grab one of these boards, and all you have to do for installation is break out a screwdriver. It makes a great tool even better, which is exactly what this very popular reflow oven needs.