Utterly Precise Light Painting, Thanks To CNC And Stop Motion

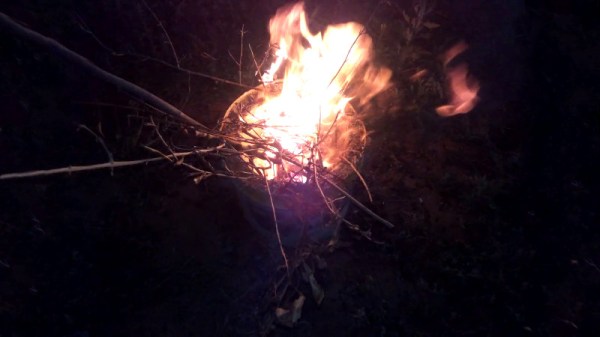
Light painting is the process of moving a light while taking a long-exposure photograph, which creates a sort of drawing from the path of the light source. It’s been done in one way or another since at least the early-to-mid 1900s, but modern hardware and methods have allowed for all kinds of new spins on this old idea. [Josh Sheldon] demonstrates just how true this is with the light painting he did for a gum ad, showing what’s possible with a single multicolor LED under CNC control combined with stop-motion animation techniques. The rest of the magic comes from the software. [Josh] designs the animations in Blender, and the paths are then exported and used as the instructions for his self-made Light Painting Machine. The machine therefore recreates the original animation with lights and camera and not a single computer-generated graphic.

[Josh] is no stranger to light painting in this way. We’ve seen his fantastic machine at work before and we’re glad he shared the details behind his latest work. Embedded below is a concise video that shows the whole process, but if you’re in a hurry and just want to see the end product, here’s a shortcut to the results.

For those of you who would like to know more, there are plenty of details on [Josh]’s Light Painting Machine on GitHub along with a more in-depth description of the workflow and software, so check it out.

Continue reading “Utterly Precise Light Painting, Thanks To CNC And Stop Motion”

How To Build A Small Metal Furnace At Home

Casting is a great way to make your own custom metal parts. However, casting requires some manner of furnace capable of generating high enough temperatures to melt the metal in question. Few of us have these just lying around, but never fear. It’s possible to build a basic gas-powered furnace at home, with commonly available materials (Youtube link, embedded below).

This furnace is the work of [Ahmed Ghr], and is as simple a build as they come. The idea is to produce a mold in which to cast concrete to create the furnace. A steel bucket is cut up and used as the outside of the mold, with a pipe inserted in the base to act as a feeder for air and gas. A plastic bucket is then inserted within the steel bucket and held in place with spacers, to create the inner combustion cavity. Concrete is poured in and allowed to set. Once finished, the steel bucket is cut away, and a fire is built over the furnace to melt away the plastic inside. Similar techniques are used to produce the lid, and the furnace is completed.

It’s a build that is executed with the most basic of tools, and should serve as a capable furnace for lower melting point metals at the very least. We’ve seen a lot of cement projects lately, as it turns out. Video after the break.

Continue reading “How To Build A Small Metal Furnace At Home”

Rotary Phone Gets Bluetooth Upgrade

Rotary dial phones have a certain romantic charm about them; something never quite captured in the post-Touch Tone era. With landline phone services less popular than ever, these old workhorses aren’t really cut out for daily use anymore. However, with a modern brain transplant, they can still get the job done just fine.

[Xabier Zubizarreta] has undertaken to retrofit his FeTAp-611 rotary phone with a Bluetooth rig, allowing it to be used with smartphones to place and receive calls. A Raspberry Pi Zero W serves as the brains of the operation, chosen for its compact size and onboard Bluetooth and WiFi. Getting the Pi to work effectively with an Android phone as a Bluetooth audio device requires some trickery, but it’s nothing that can’t be fixed by custom compiling a few off-the-shelf tools. [Xabier]’s next big hurdle is finding a tidy way to generate a 30 VAC signal to drive the original ringer, something that proves difficult for most similar projects.

We love to see these telecommunication relics kept ticking, so if you happen to be building a vintage telephone exchange in your garden shed – be sure to let us know.

Swiss Cheese Metamaterial Is An Analog Computer

If you have had trouble with ordinary calculus, you may not be pleased to hear about “photonic calculus” — a recent idea from [Nader Engheta] of the University of Pennsylvania. The idea is that materials with certain properties could manipulate an electromagnetic wave in a way to solve a specific mathematical equation. [Engheta] proposed this idea back in 2014 and recently announced that he and his team have a demonstration device that proves the concept. The analog computer is about twice the size of an airplane’s tray table and made of CNC-shaped polystyrene. It solves Fredholm integral equations of the second kind.

The analog computer uses microwaves for the input and the polystyrene acts as a dielectric full of air holes. The team likens its structure to that of Swiss cheese. The shape is generated through an inverse design process which builds the shapes from known solutions to the equations. That means a particular set of shapes will do one specific equation. The equation could, for example, model the sound volume in a concert hall. You can encode certain parameters in the input wave and the output would specify the volume at different locations. However, a change to the actual equation would require a new set of plastic pieces.

The computation is very fast. Using microwaves, the answer comes out in a few hundred nanoseconds — a speed a conventional computer could not readily match. The team hopes to scale the system to use light which will speed the computation into the picosecond range. Creating a new optical analog computer could be similar to how we burn a CD or DVD today.

Analog computers predate digital ones by a lot. We really want to build one like [Bill Schweber’s]. Then again, we wouldn’t mind finding a Donner 3500 at a hamfest, either.

Full Earth Disc Images From GOES-17 Harvested By SDR

We’ve seen lots of hacks about capturing weather images from the satellites whizzing over our heads, but this nicely written how-to from [Eric Sorensen] takes a different approach. Rather than capturing images from polar satellites that pass overhead a few times a day, this article looks at capturing images from GOES-17, a geostationary satellite that looks down on the Pacific Ocean. The fact that it is a geostationary satellite means that it captures the same view all the time, so you can capture awesome time-lapse videos of the weather.  Continue reading “Full Earth Disc Images From GOES-17 Harvested By SDR”

Add A Bit Of Soviet-Era Super-Computing To Your FPGA

The MESM-6 project is focused on bringing the 1960s Soviet BESM-6 computer to the modern age of FPGAs and HDLs. At the moment the team behind this preservation effort consists out of [Evgeniy Khaluev], [Serge Vakulenko] and [Leo Broukhis], who are covering the efforts on the Russian-language project page.

The BESM-6 (in Russian: БЭСМ-6, ‘Bolshaya Elektronno-Schetnaya Mashina’ or ‘large electronic computing machine’) was a highly performing Soviet super computer that was first launched in 1968 and in production for the next 19 years. Its system clock ran at 9 MHz using an astounding number of discrete components, like 60,000 transistors and 170,000 diodes, capable of addressing 192 kB of memory in total. Of the 355 built, a few survive to this day, with one on display at the London Science Museum (pictured above). Many more images and information can be found on its Russian Wikipedia page.

For those not gifted with knowledge of the Russian language, the machine-translated summary reveals that the project goal is to make a softcore in SystemVerilog that is compatible with user mode BESM-6, using the same Pascal compiler as originally used with that system. Further goals include at least 24 kB of data memory, 96 kB of command memory and the addition of modern peripherals such as SPI and I2C.

The system is meant to be integrated with the Arduino IDE, using the Pascal compiler to make it highly accessible to anyone with an interest in programming a system like this. Considering the MIT license for the project, one could conceivably use a bit of Soviet-era computing might in one’s future FPGA efforts.

If after watching the BESM-6 video — included below — you feel inspired to start your own Soviet-computing project, we’d like to wish you luck the Russian way: Ни пуха ни пера!

Continue reading “Add A Bit Of Soviet-Era Super-Computing To Your FPGA”

Play Tetris On A Transistor Tester, Because Why Not?

[Robson] had been using the same multimeter since he was 15. It wasn’t a typical multimeter, either. He had programmed it to also play the Google Chrome jumping dinosaur game, and also used it as a badge at various conferences. But with all that abuse, the ribbon cable broke and he set about on other projects. Like this transistor tester that was just asking to have Tetris programmed onto its tiny screen.

The transistor tester is a GM328A made for various transistor testing applications, but is also an LCR meter. [Robson]’s old meter didn’t even test for capacitance but he was able to get many years of use out of that one, so this device should serve him even better. Once it was delivered he set about adding more features, namely Tetris. It’s based on an ATmega chip, which quite easy to work with (it’s the same chip as you’ll find in the Arduino Uno but [Robson’s] gone the Makefile route instead of spinning up that IDE). Not only did he add more features, but he also found a mistake in the frequency counter circuitry that he fixed on his own through the course of the project.

If you’ve always thought that the lack of games on your multimeter was a total deal breaker, this project is worth a read. Even if you just have a random device lying around that happens to be based on an ATmega chip of some sort, this is a good primer of getting that device to do other things as well. This situation is a fairly common one to be in, too.

Continue reading “Play Tetris On A Transistor Tester, Because Why Not?”