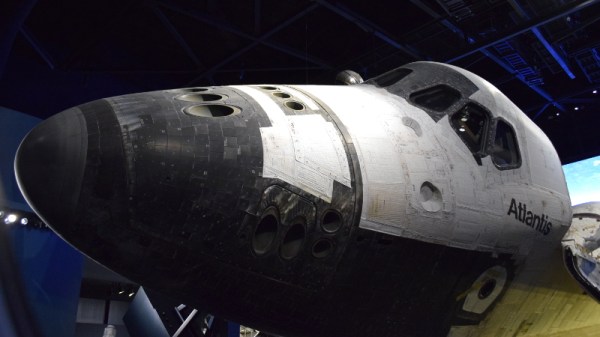
CRT Monitor Recyling Center

Retrotechtacular: Some Of The Last CRTs From The Factory Floor

It seems crazy having to explain what a piece of technology was like to someone who is barely fifteen years your junior, but yet we have reached that point when it comes to CRTs. There may still be remnants of CRT televisions and monitors left out in the wild, however, the chances that a kid preparing to enter high school has encountered one is slim. While there may be no substitute for the real thing, there is this raw video from [Glenn] who shared his tour of the Sony Trinitron assembly line in the early 2000s. Sony Trinitron Television

Sony Electronics’ cathode ray tube manufacturing facility was located alongside headquarters in Rancho Bernado, CA. The facility was shuttered in 2006 when Sony transitioned wholly onto digital displays like the flat-panel LCD line of Bravia televisions. [Glenn]’s video shows that the manufacturing process was almost entirely automated from end to end. A point that was made even more clear with the distinct lack of human beings in the video.

The Trinitron line of televisions first appeared in 1968. At a time where most manufacturer’s were offering black and white picture tubes, Sony’s Trinitron line was in color. That name carried through until the end when it was retired alongside tube televisions themselves. Sony’s focus on technological innovation (and proprietary media formats) made them a giant in the world of consumer electronics for over forty years in the United States, but in the transition to a digital world saw them seeding market share to their competitors.

A quick word of warning as the video below was shot directly on Sony’s factory floor so the machinery is quite loud. Viewers may want to reduce the volume prior to pressing play.

Continue reading “Retrotechtacular: Some Of The Last CRTs From The Factory Floor”

Building Portable Linux Devices: Never Been Easier, But Still Hard

We live in a Golden Age of single-board computers. There was a time when a portable computer that was any good was a relatively rare and expensive device, certainly not something you could expect to replicate for yourself. A Psion, or later a Palm or perhaps a WinCE device would have been a lot more than an impulse purchase, and could not easily have been replicated using the components then available to the experimenter.

Thanks to spin-offs from technology developed for set-top boxes and mobile phones we can now buy any one of a pile of different boards that have almost equivalent power to a desktop computer. The experimenter can leverage that computing power to create their own small portables. Zerophone creator Arsenijs Picugins spoke about the tricky parts of designing a LInux portable at the recent Hackaday Superconference. You’ll find his talk below the break, which makes for a fascinating primer for those tempted to walk in his footsteps.

Zerophone – a Raspberry Pi Smartphone

Minor Details of Portables are the Majority of the Build

In theory, it’s pretty easy to use one of these boards to make a portable computer. Take one of the smaller members of the Raspberry Pi or Beaglebone families, add a battery and a display, and away you go. But as always the devil is in the detail, and for a truly successful build there are a wealth of variables to attend to.

In his talk, Arsenijs takes us through the challenges of power supplies, connectors, and interfaces. In particular there is considerable challenge to running an SBC from a battery small enough to be portable, as efficiency concerns and the ability to easily recharge make for a critical set of choices. Then we learn of another pitfall, that of using USB as a default interface. Power loss in converting 5V to 3.3V that is inconsequential for a desktop computer is a battery-killer in a small device, so we’re pointed at the array of alternatives.

Zerophone screen menu [via @ZeroPhoneOSHW]

Screen Size is a Tricky Spec to Settle

If you’ve been tempted by one of those cheap Raspberry Pi touch screens, you’ll certainly understand that while a full desktop on a screen the size of a playing card looks cool, the reality is almost unusable. Your device will require a user interface that fits its form factor, which from his experience, Arsenijs suggests is best achieved through the medium of buttons rather than a touchscreen on smaller screens. There are a variety of UI and display libraries he introduces us to which make the whole process significantly easier.

Arsenijs’ Zerophone Raspberry Pi smartphone was a finalist in the 2017 Hackaday Prize, and remains an exemplary portable project from which many others can gain inspiration. We are privileged that he was able to bring his experience to speak at the Superconference, and his talk makes for a fascinating watch.

Continue reading “Building Portable Linux Devices: Never Been Easier, But Still Hard”

Extreme Pi Overclocking With Mineral Oil

Liquid cooling is a popular way to get a bit of extra performance out of your computer. Usually this is done in desktops, where a special heat sink with copper tubing is glued to the CPU, and the copper tubes are plumbed to a radiator. If you want dive deeper into the world of liquid cooling, you can alternatively submerge your entire computer in a bath of mineral oil like [Timm] has done.

The computer in question here is a Raspberry Pi, and it’s being housed in a purpose-built laser cut acrylic case full of mineral oil. As a SoC, it’s easier to submerge the entire computer than it is to get a tiny liquid-cooled heat sink for the processor. While we’ve seen other builds like this before, [Timm] has taken a different approach to accessing the GPIO, USB, and other connectors through the oil bath. The ports are desoldered from the board and a purpose-built header is soldered on. From there, the wires can be routed out of the liquid and sealed off.

One other detail used here that  we haven’t seen in builds like this before was the practice of “rounding” the flat ribbon cable typically used for GPIO. Back in the days of IDE cables, it was common to cut the individual wires apart and re-bundle them into a cylindrical shape. Now that SATA is more popular this practice has been largely forgotten, but in this build [Timm] uses it to improve the mineral oil circulation and make the build easier to manage.

Continue reading “Extreme Pi Overclocking With Mineral Oil”

Packing Decimal Numbers Easily

While desktop computers have tons of computing power and storage, some small CPUs don’t have a lot of space to store things. What’s more is some CPUs don’t do multiplication and division very well. Same can be said for FPGAs. So suppose we are going to grab a bunch of three-digit decimal numbers from, say, a serial port. We want to store as many as we can, and we don’t want to do a lot of math because we can’t, it is slow, or perhaps it keeps our processor awake longer and we want to sleep to conserve power. We want a way to pack the numbers as close to the theoretical maximum as we can but with little or no math.

The simple approach is to store the numbers as ASCII. Great for processing since they are probably in ASCII already. If they aren’t, you just add 30 hex to each digit and you are done. That’s awful for storage space, though, since we can store 999 in 10 bits if it were binary and now we are using 24 bits! Storing in binary isn’t a good option, if you play by our rules, by the way. You need to multiply by 10 and 100 (or 10 twice) to get the encoding. Granted, you can change that to two shifts and an add (8x+2x=10x) but there’s no easy way to do the division you’ll have to do for the decode.

Of course, there’s no reason we can’t just store decimal digits. That’s call binary coded decimal or BCD and that has some advantages, too. It is pretty easy to do math on BCD numbers and you don’t get rounding problems. Some CPUs even have specific instructions for BCD manipulation. However, three digits will require 12 bits. That’s better than 24, we agree. But it isn’t as good as that theoretical maximum. After all, if you think about it, you could store 16 distinct codes in 4 bits, and we are storing only 10, so that 6 positions lost. Multiply that by 3 and you are wasting 18 codes.

But there is a way to hit that ten-bit target without doing any math. Its called DPD or densely packed decimal. You can convert three decimal digits into ten bits and then back again with no real math at all. You could implement it with a small lookup table or just do some very simple multiplexer-style logic which means it is cheap and easy to implement in software or onboard an FPGA.

Continue reading “Packing Decimal Numbers Easily”

New Part Day: The Twenty Five Cent USB Microcontroller (With A Toolchain!)

Last year, Jiangsu Yuheng Co., Ltd introduced a new microcontroller. The CH554 is a microcontroller with an E8051 core with a 24 MHz clock, a little more than 1 kB of RAM, and a bit more than 14 kB split between the code and data Flash. In short, it’s nothing too spectacular, but it makes up for that with peripherals. It’s got SPI and ADCs and PWM, UARTs, and even a few capacitive touch channels. It’s also a USB device, with some chips in the series able to function as a USB host. You can buy this chip for a quarter through the usual retailers.

Normally, this isn’t huge news. The 8051 is the most copied microcontroller on the planet, and there are probably billions produced each year. Cheap parts are only cheap if your time is free; you’ll usually spend ages trying to digest the datasheet and get a toolchain up and running. That’s where this chip is a little different. There are multiple efforts to bring an Open Source toolchain to this chip. And they’re doing it in Windows and Linux. Someone really cares about this chip.

The current best option for an SDK for this chip comes from Blinkinlabs, with a port of the CH554 SDK from Keil to SDCC. There are real, working code examples for this chip using an Open Source toolchain. Sure, it might just blink a LED, but it’s there. If you can blink a LED, you can do just about anything from there. Programming the chip happens over USB with the ‘official’ WCHISPTool (Windows) or LibreCH551 (command line). The end result is a completely Open Source toolchain to program and upload a hex file to a cheap chip.

There are a few more chips in the CH554 series, ranging from the CH551 in an SOP-16 package to the CH559 in an LQFP48 package, with more features available as the chips get bigger. It’s an interesting chip, with some somehow implementing a USB hub, and could be a very cool chip for some low-level USB hacking.

Buy Or Build An Autonomous Race Car To Take The Checkered Flag

Putting autonomous vehicles on public roads takes major resources beyond most of our means. But we can explore all the same general concepts at a smaller scale by modifying remote-control toy cars, limited only by our individual budgets and skill levels. For those of us whose interest and expertise lie in software, Amazon Web Services just launched AWS DeepRacer: a complete package for exploring machine learning on autonomous vehicles.

At a hardware level, the spec sheet makes it sound like they’ve bolted their AWS DeepLens machine vision computer on an 1/18th scale monster truck chassis. But the hardware is only the tip of the iceberg. The software behind DeepRacer is AWS RoboMaker, a set of tools for applying AWS to robot development. Everything from running digital simulations on AWS to training neural networks on AWS. Don’t know enough about machine learning? No problem! Amazon has also just opened up their internal training curriculum to the world. And to encourage participation, Amazon is running a DeepRacer League with races taking place both digitally online and physically at AWS Summit events around the world. They’ve certainly offered us a full plate at their re:Invent conference this week.

But maybe someone prefers not to use Amazon, or prefer to build their own hardware, or run their own competitions. Fortunately, Amazon is not the only game in town, merely the latest entry in an existing field. The DeepRacer’s League’s predecessor was the Robocar Rally, and the DeepRacer itself follows the Donkey Car. A do-it-yourself autonomous racing platform we first saw at Bay Area Maker Faire 2017, Donkey Car has since built up its documentation and software tools including a simulator. The default Donkey Car code is fairly specific to the car, but builders are certainly free to use something more general like the open source Robot Operating System and Gazebo robot simulator. (Which is what AWS RoboMaker builds on.)

So if the goal is to start racing little autonomous cars, we have options to buy pre-built hardware or enjoy the flexibility of building our own. Either way, it’s just another example of why this is a great time to get into neural networks, with or without companies like Amazon devising ways to earn our money. Of course, this isn’t the only Amazon project trying to build a business around an idea explored by an existing open source project. We had just talked about their AWS Ground Station offering which covers similar ground (sky?) as our 2014 Hackaday Prize winner SatNOGS.

An Englishman And 48 Gameboys Walk Into A Bar…

The original Nintendo Gameboy is perhaps one of the most revered platforms for the music known as chiptune. Primarily, artists will use the console with software like LSDJ or Nanoloop to produce their compositions. Some artists will even use two consoles when performing live. However, that’s all fairly quaint as far as [LOOK MUM NO COMPUTER] is concerned.

Back in 2016, a rig was constructed with three Gameboys. With each console having 3 oscillators and a noise channel, this gave plenty of scope. There was even a facility to detune the oscillators for a fatter sound.

Yet there remains a universal human philosophy – more is always better. In this vein, the plan is to create a monster machine consisting of 48 Gameboy consoles. This offers a somewhat maddening 144 oscillators and 48 noise channels to play with. The plan is to produce a massive synthesizer capable of producing incredibly thick, dense tones with up to six note polyphony.

The hardware side of things is at once simple and ingenious. Buttons on the consoles are connected together for remote control using ribbon cables and transistors. System clocks for the consoles are provided by a LTC1799 oscillator chip, which allows the clock to be modulated for audio effects. Initial tests with up to six Gameboys running from a single clock source have been remarkably successful.

Any mad scientist could see the genius involved in this project, and we can’t wait to see the full rig in operation. If you’re just getting started with Gameboy music, check out this primer on modding your Gameboy for hi-fi sound. Video after the break.

Continue reading “An Englishman And 48 Gameboys Walk Into A Bar…”