Second Life UPS Mark II: A UPS For Low-Voltage DC Applications

When you have a whole stack of devices and appliances that all have an AC to DC adapter and which you’d like to put on an uninterruptable power supply (UPS), you could do the obvious thing and get an off-the-shelf UPS with myriad AC outputs. In the case of a 19″ rack this means wrangling a power strip or two and any combination of differently sized AC/DC adapters into the rack, with questionable efficiency and waste heat dumped into the rack. This is where a DC-only UPS like [Maciej Grela]’s Second Life UPS Mark II provides an interesting alternative.

At its core it’s a pretty simple concept: A single 400Watt power supply handles the AC/DC conversion from mains to 24 VDC, which feeds the battery charger as well as the outputs. These outputs include 5 VDC, 12 VDC and Vrail, with the latter being either the output from the PSU, or the battery voltage. In case of AC power failure, an LT4416 dual power path controller handles the switch-over from the PSU output to the internal batteries. In the article, [Maciej] covers how the buck modules for the 12 & 5 VDC rails were sized, along with the conversion of an old rack-mounted network switch into a UPS. Continue reading “Second Life UPS Mark II: A UPS For Low-Voltage DC Applications”

USB-C For Hackers: Program Your Own PSU

Last time, I showed off a few ways you can convert an existing PSU to USB-C duty, and zoomed in on a particular way you can use to convert one of the ever-abundant 18 V – 20 V laptop PSUs to USB-C. All we have left is to write software for it, and I’ll explain how it works. There’s also that one cool USB-C secret I’ve found out, but you’ll have to read on to find out more.

From the last article, we have a board that has an RP2040 and FUSB302 combo on it, which takes a 20 V DC PSU input from a laptop brick, and can switch either 5 V, 20 V or 0 V to its USB-C socket using FETs. The USB-C communication firmware is simple enough, but there’s caveats, especially regarding safety. Let’s go through those!

The Code Logic

VBUS has to be non-powered by default – we only supply 5 V when the FUSB302 detects a 5.1 kΩ pulldown on one of the CC lines. After supplying 5 V, we send out PSU capability advertisements, of the kind that we’ve learned to parse in the Replying PD article – and whenever we get a Request, we have to switch to the requested profile, connecting the voltage rail requested to the FET. I opt to not do any current consumption control in this design, assuming a well-behaved device, but you theoretically should do that. It wouldn’t be hard to add a high-side current sensor, say, something from Analog Devices – I just don’t want to do that now, especially given that I’m already using two of the exposed ADC pins to do Lenovo/HP PSU capability detection instead, one is used up for VBUS measurement, and the fourth is used for VIN (20 V rail) measurement – that’s four ADCs, which is as much as the RP2040 has got. However, if I ever need more ADCs, I can add an analog mux like 4051 in the next version! Continue reading “USB-C For Hackers: Program Your Own PSU”

Build Yourself A Screw Propelled Robot To Tackle The Dirt

Wheels and tracks are common choices for robot propulsion, but they’re not the only game in town. You can do some nifty things with long extruded screws , and they work pretty well in soft terrain. [gokux] set about building a small robot using this propulsion method using 3D printed parts.

The build uses a Seeed Studio XIAO ESP32S3 as the brains of the operation. This provides wireless connectivity for remote control, as well as a way to get a low-latency video feed out of the robot from the OV2640 camera. The ESP32 controls a pair of brushed DC gearmotors via a DRV8833 motor driver. Each drives one of the two screws on the robot. By driving the two screws separately, the robot has simple skid steering. Two 18650 lithium-ion cells provide power for the robot, and are charged via a TP4056 battery charger module.

If you want to build a small robot that can handle soft terrain well, screw drives could be just the solution you’re looking for. They’re usually a bit slow, though, especially for human-scale conveyances, so don’t write off wheels or tracks if you don’t have to. And, of course, when your build is done, don’t forget to put it online and tell us all about it!

Hackaday Podcast Episode 246: Bypassing Fingerprint Readers Is Easy, Killing Memory Chips Is Hard, Cell Phones Vs Sperm

It’s the week after Thanksgiving (for some of us) and if you’re sick of leftovers, you’re in luck as Elliot and Dan get together to discuss the freshest and best inter-holiday hacks. We’ll cue up the “Mission: Impossible” theme for a self-destructing flash drive with a surprising sense of self-preservation, listen in on ET only to find out it’s just a meteor, and look for interesting things to do with an old 3D printer. We’ll do a poking around a little in the basement at Tektronix, see how easy it is to spoof biometric security, and get into a love-hate relationship with both binary G-code and bowling balls with strings attached. What do you do with a box full of 18650s? Easy — make a huge PCB to balance them the slow way. Is your cell phone causing a population crisis? Is art real or AI? And what the heck is a cannibal CME? Tune in as we dive into all this and more.

Check out the links below if you want to follow along, and as always, tell us what you think about this episode in the comments!

Grab a copy for yourself if you want to listen offline.

Continue reading “Hackaday Podcast Episode 246: Bypassing Fingerprint Readers Is Easy, Killing Memory Chips Is Hard, Cell Phones Vs Sperm”

A 48 Volt Battery Pack With Carefully Balanced Cells

Many readers will have at some time or another built their own lithium-ion battery packs, whether they are using tiny cells or the huge ones found in automotive packs. A popular choice it to salvage ubiquitous 18650 cylindrical cells, as [limpkin] has with this 48 volt pack. It’s based around an off-the-shelf kit aimed at the e-bike market, but it’s much more than a simple assembly job.

Faced with a hundred salvaged cells of unknown provenance, the first thing to do was ensure that they were all balanced and showed the same voltage. Some might do this the inefficient way by hooking each one up to a charger and a programmable load, but in this case a much more radical route was taken. A huge PCB was designed with sockets for all hundred cells, connected in parallel through individual series resistors. This allowed them to balance to a common voltage before being discharged to a safe voltage for assembly. Their individual ESRs were the measured, and the best performing examples were then spot-welded into the final 13s-6p final pack.

We all use lithium-ion batteries, but how many of us know how they work?

CinePi Project Promises Open Source Movie Making

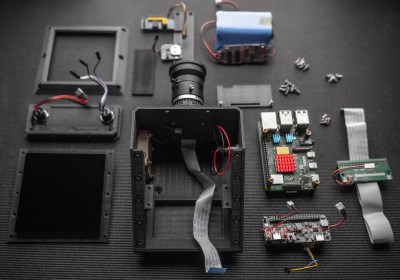
Today, there’s open source options for pretty much anything mainstream, but that doesn’t mean there aren’t still some niches out there that could benefit from the libre treatment. The CinePi project is a perfect example — before today we didn’t even know that an open hardware and software cinema-quality camera was out there. But now that we do, we can’t wait to see what the community does with it.

Inside the 3D printed enclosure of the CinePi, there’s a Raspberry Pi 4 with HQ camera module, a four-inch touch screen, a Zero2Go power supply with four 18650 cells, and a Notcua fan to keep it all cool. The design intentionally favors modules that are easy to source from the usual online sources. You’ll need to be handy with a soldering iron to follow along with the beautifully photographed assembly guide, but there’s nothing that needs to be custom fabricated to complete the build.

The software was clearly developed with the user experience in mind, and in the video below, you can see how its touch interface makes it easy to change settings on the fly. While an amateur auteur might need to enlist the assistance of their geeky friend to build the CinePi, it doesn’t look like they’ll need them around to help operate it.

Of course, the big question with a project like this: what does the video actually look like? Well the technical answer is that, in terms of raw performance, the CinePi is able to capture 3840 x 2160 CinemaDNG video to an external device such as a NVME SSD or a CFExpress Card at 25 frames per second. But what that actually looks like is going to depend on what kind of post-processing you do to it. For the more practical answer, check out the short film TIMEKEEPER which was shot partially on a CinePi.

If this all looks a bit high-tech for your liking, don’t worry. You could always 3D print yourself a 35 mm movie camera instead.

Continue reading “CinePi Project Promises Open Source Movie Making”

2023 Halloween Hackfest: This Year’s Spooky Winners

With the zombies, ghouls, and ghosts now safely returned to their crypts until next October, it’s time to unveil this year’s winners for the 2023 Halloween Hackfest.

For this contest, sponsors DigiKey and Arduino challenged the community to come up with their best creations for what’s arguably the most hacker-friendly of holidays. Pretty much everything was fair game, from costumes to decorations. The top three winners will get $150 credit from DigiKey and some treats from Arduino — just don’t try to eat them.

Continue reading “2023 Halloween Hackfest: This Year’s Spooky Winners”