Optics Laboratory Made From LEGO

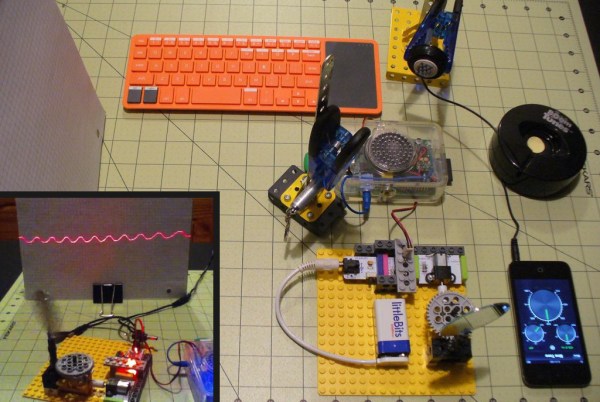
16A lot of engineers, scientists, builders, makers, and hackers got their start as children with LEGO. Putting those bricks together, whether following the instructions or not, really brings out the imagination. It’s not surprising that some people grow up and still use LEGO in their projects, like [Steve] who has used LEGO to build an optics lab with a laser beam splitter.

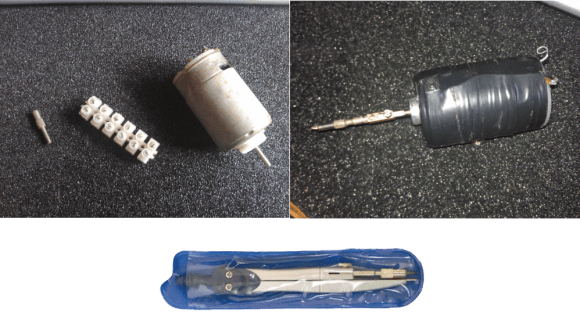
[Steve] started this project by salvaging parts from a broken computer projector. Some of the parts were scorched beyond repair, but he did find some lenses and mirrors and a mystery glass cube. It turns out that this cube is a dichroic prism which is used for combining images from the different LCD screens in the projector, but with the right LEGO bricks it can also be used for splitting a laser beam.

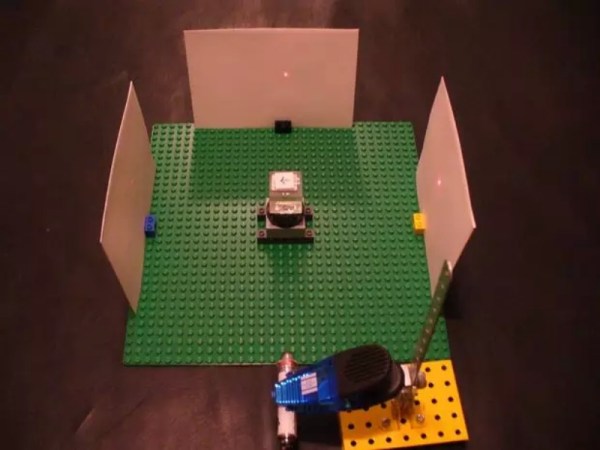
The cube was set on a LEGO rotating piece to demonstrate how it can split the laser at certain angles. LEGO purists might be upset at the Erector set that was snuck into this project, but this was necessary to hold up the laser pointer. This is a great use of these building blocks though, and [Steve] finally has his optics lab that he’s wanted to build for a while. If that doesn’t scratch your LEGO itch, we’ve also featured this LEGO lab which was built to measure the Planck constant.

Lasersaur That Cuts 1/2″ Plywood And 10mm Acrylic (Pew-Pew)

Remember when building your own 3D printer was a big deal? We’re starting to think that building your own laser cutter might be the next hot topic.

Boasting a 16,000 square-foot facility, the Dallas Makerspace is an impressive collaboration of local artists, engineers, makers, and thinkers. Recently they embarked on building a serious laser cutting machine. They chose to go with the an open-hardware design rather than buying an off-the-shelf unit. What they built is based on the Lasersaur plans. (Another popular open-source build is the buildlog.net unit.)

They ended up with a huge 24″ by 48″ cutting bed and with a laser tube rated for 100 watts continuous output. It can cut 1/2″ plywood and 10mm acrylic with ease. The entire machine is built from 20mm Misumi aluminum t-slot extrusions, making more like a giant erector set then a commercial built machine. We hadn’t seen too many of the Lasersaur builds out in the wild, so we thought you might like to see one too.

Now, before you start ordering parts to build your own, you should know that a top of the line build like this will run you about $7-10k. But by comparison if you were to go with something with the same cutting area and power, you’d be looking at something like the “Epilog Fusion 40” at a whopping $40k. With that said, we expect to see more budget laser cutter builds. Cost can be cut dramatically when you go for a smaller machine, with less cutting area, and less power. With that, you can use less expensive steppers, drivers, and frame. We suspect a little as $700 for a smart shopper could yield a very respectable laser cutter.

If you’re interested in learning more about the Dallas Makerspace, we took a video tour back in early 2014.

DIY Oscilloscope With A Scanning Laser

If you’ve ever used an old-school analog oscilloscope (an experience everyone should have!) you probably noticed that the trace is simply drawn by a beam that scans across the CRT at a constant rate, creating a straight line when there’s no signal. The input signal simply affects the y-component of the beam, deflecting it into the shape of your waveform. [Steve] wrote in to let us know about his home-built “oscilloscope” that works a lot like a simple analog oscilloscope, albeit with a laser instead of  a CRT.

[Steve]’s scope is built out of a hodgepodge of parts including Lego, an Erector set, LittleBits, and a Kano Computer (based on a Raspberry Pi). The Pi generates a PWM signal that controls the speed of a LittleBits motor. The motor is hooked up to a spinning mirror that sweeps the laser across some graph paper, creating a straight laser line.

After he got his sweep working, [Steve] took a small speaker and mounted a mirror to its cone. Next he mounted the speaker so the laser’s beam hits the mirror on the speaker, the spinning sweep mirror, and finally the graph paper display. The scope’s input signal (in this case, audio from a phone) is fed into the speaker which deflects the laser beam up and down as it is swept across the paper, forming a nice oscilloscope-like trace.

While [Steve]’s scope might not be incredibly usable in most cases, it’s still a great proof of concept and a good way to learn how old oscilloscopes work. Check out the video after the break to see the laser scope in action.

Continue reading “DIY Oscilloscope With A Scanning Laser”

Hackaday Links Column Banner

Hackaday Links: February 1, 2015

It’s Sunday evening, and that means Hackaday Links, and that means something crowdfunded. This week it’s UberBlox. It’s a modular construction system based on Al extrusion – basically a modern version of an Erector set. Random musings on the perceived value UberBlox offers in the comments, I’m sure.

[Trevor] sent in something from his Etsy shop. Normally we’d shy away from blatant self-promotion, but this is pretty cool. It’s reproductions of 1960s Lockheed flying saucer plans. We’re not sure if this is nazi moon base/lizard people from the inner earth flying saucer plans or something a little more realistic, but there you go.

3D computer mice exist, as do quadcopters. Here’s the combination. It looks like there’s a good amount of control, and could be used for some aerobatics if you’re cool enough.

Who doesn’t love LED cubes? They’re awesome, but usually limited to one color. Here’s an RGB LED cube. It’s only 4x4x4, but there’s a few animations and a microphone with a beat detection circuit all powered by an ATMega32u4.

A while ago we had a post about a solar powered time lapse rig. Time lapse movies take a while, and the results are finally in.

DIY Mini-Drill Would Make Mad Max Proud

mini-drill

That’s not a prison tattoo gun up there, it’s [Szabolcs] DIY mini drill. Hackaday has been on a bit of a DIY tool kick lately – with improvised saws, grinders, and grinders converted to saws, among other things. We haven’t had any DIY drills yet, though. [Szabolcs] needed a drill for his home-made printed circuit boards. Usually a Dremel or similar rotary tool is pressed into service for drilling PCBs. However, for some reason he didn’t have access to one. [Szabolcs] called upon his inner MacGyver and built a drill from parts he had on hand.

Every drill needs a chuck, or at least a collet holder. This drill’s chuck is sourced from a drafting compass. Long ago in the dark ages before CAD, mechanical drawings were manually drawn up. Companies employed entire drafting departments to draw designs, blueprints, and schematics. These draftsmen used the compass to create accurate circles and arcs. [Szabolcs] re-used the lead holder from the compass as a chuck for his drill. A 540 or 550 brushed sealed endbell can motor, common to the R/C cars spins the drill up. We originally thought [Szabolcs] used an Erector or Meccano set piece as a shaft coupling. The truth is it’s the internals of a Euro style terminal strip. A small tactile button is used to activate the motor. Some electrical tape wrapped around the motor holds the button in place. The tape also makes sure that the user isn’t cut by the sheet metal field ring wrapped around the can. Power for the system can come from just about anywhere, though [Szabolcs] says he uses the 12v rail of an old ATX power supply.

Hola! From A Spanish Speaking Drawing Arm

[Acorv] wrote in to tell us about his latest hack, a robotic arm that writes with a marker. In the video after the break, the arm is set to copy whatever someone writes in a touchpad. As you might guess from this video, the hack is written up in Spanish, but it’s nothing your favorite translator can’t handle if you don’t speak the language.

This robot it the result of improvements on his first drawing arm ‘bot featured here. The basic kinematics stayed the same in the arm’s second iteration, but the resolution was greatly improved by using belts to achieve a gear reduction. The second build also features mechanical reinforcement with an Erector-set style building set known as [Mekanex].

A simple hobby servo moves the marker up or down, and control is achieved through, you guessed it, an Arduino with a motor shield! Although from a different time, the way this arm is used is reminiscent of a mechanical writing automaton from long ago. Continue reading “Hola! From A Spanish Speaking Drawing Arm”

Steam-powered Pickup Winder

[Valve Child] has been building a few three-string cigar box guitars. Of course he’ll need a few pickups, but three-string guitar pickups aren’t exactly easy to come by. To solve this problem, he’s built a guitar pickup winder powered by a steam engine.

The pickup winder is powered by a Wilesco D20 model steam engine, connected to the actual winding mechanism via a rubber belt. To the right of the bobbin bracket is a mechanism built out of Meccano – Erector sets for us americans – that provides a mechanical counter for the number of wire turns and a wire traverse to keep each layer of wire somewhat even across the width of the bobbin.

Previously, we’ve seen [Valve Child]’s really sweet sounding lap steel build from a log using a hand-wound pickup and a preamp tube as the bridge. It’s questionable if the guitar signal came from this lap steel via the pickup or the microphonic tube, but now [Valve Child] has a really, really good method of improving his pickup production abilities.

Video after the break.

Continue reading “Steam-powered Pickup Winder”