[Huan] Liberates A Router

[Huan Truong] was given a WiFi router and thought he’d improve it by installing a free firmware on it. Unfortunately, the router in question is a bit old, and wasn’t ever popular to begin with, which meant that it was unsupported by the usual open firmware suspects. The problem was that it only had a 4 MB flash to boot off of, but [Huan] was determined to make it work. (Spoiler: he did it, and documented it fully.)

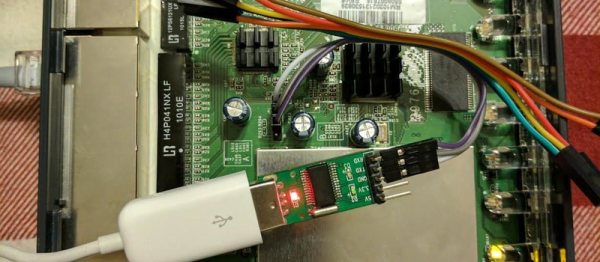
The flash workaround consisted basically of repartitioning the space, and then telling u-boot where to find everything. On a router like the WNR2000 that [Huan] had, the flash is memory-mapped, which meant adding an offset to the flash start (0xbf000000 instead of 0x00000000) and remembering to do this consistently so that he doesn’t overwrite things like the MAC address.

[Huan] went for the LEDE fork of OpenWRT, and rebuilt it from source because he needed a small version to fit inside his limited flash. With this task completed, it worked. All done? Nope, [Huan] then submitted a pull request to LEDE, and now you can enjoy the fruits of his labor without replicating it. But if you’ve got another low-flash, obscure router, you’ve got a head start in getting LEDE up and running on it.

Routers are perhaps the most-hacked device that we see here, and they can be made pretty darn useful with the right firmware. Sometimes getting a custom firmware running is relatively easy, as it was here, and sometimes it requires some deep reverse engineering. But it’s good to keep up your router-hacking chops, because they may not always be as open as they are now.

Harrowing Story Of Installing Libreboot On ThinkPad

As an Apple user, I’ve become somewhat disillusioned over the past few years. Maybe it’s the spirit of Steve Jobs slowly vanishing from the company, or that Apple seems to care more about keeping up with expensive trends lately rather than setting them, or the nagging notion Apple doesn’t have my best interests as a user in mind.

Whatever it is, I was passively on the hunt for a new laptop with the pipe dream that one day I could junk my Apple for something even better. One that could run a *nix operating system of some sort, be made with quality hardware, and not concern me over privacy issues. I didn’t think that those qualities existed in a laptop at all, and that my 2012 MacBook Pro was the “lesser of evils” that I might as well keep using. But then, we published a ThinkPad think piece that had two words in it that led me on a weeks-long journey to the brand-new, eight-year-old laptop I’m currently working from. Those two words: “install libreboot”.

Continue reading “Harrowing Story Of Installing Libreboot On ThinkPad”

Inside The Printrbot Printrhub

A new version of the Printrbot Simple was released this summer, and this sleek new model includes a few highly desirable features. The metal enclosure was improved, linear rails added, a power switch was thrown in, and the biggest feature — a touch screen — makes headless printing easy.

Adding a usable display and achieving reliable WiFi are big engineering challenges, and thanks to the Internet of Things it’s only going to become more common to expect those features. How did the Printrbot team implement this? [Philip Shuster] recently released a write-up of how the Printrbot Printrhub came together.

The story of the display and WiFi module in the newest Printrbot begins about a year ago with a post on Hackaday. [Philip] built the Little Helper, a little electronic Swiss Army knife capable of basic IO, sending out PWM pulses, sniffing I2C, and a few other handy features. The Printrbot team reached out to [Philip], and after a few conversations, he was roped into the development team for the Printrhub.

Departing slightly from the Little Helper, the Printrhub features the same microcontroller found in the Teensy 3, a 2.8 inch TFT display, capacitive touch sensor, microSD card slot, and an ESP-12 module to handle the WiFi connection. The display system was tricky, but the team eventually got it working. Using an ESP8266 as the WiFi module for a printer is more difficult than you would think, but that works too.

One of the more interesting challenges for 3D printers in the last few years is the development of a good printer display with wireless connectivity. Yes, those graphic LCDs attached to an Arduino still work, but a display from 1980 doesn’t sell printers. In just a few months, the Printrbot team came up with a relatively simple, very elegant display that does everything and they’re releasing all the hardware as open source. That’s great news, and we can’t wait to see similar setups in other makes of 3D printers.

Anti-Entropy Machine Satiates M&M OCD

College engineering projects are great, because they afford budding engineers the opportunity to build interesting things without the need for financial motivation. Usually, some basic requirements are established, but students are free to get creative and build something that appeals to them personally. For our readers, mechatronics courses are ripe for these kinds of projects, as the field combines electrical engineering, mechanical engineering, and programming.

[Ethan Crane] is in just such a course, and had a final project due with only one real requirement: it had to use a PICAXE. Obviously, this gave [Ethan] quite a bit of freedom to build something unique, and what he came up with is an “Anti-Entropy Machine” designed to sort M&M candies by color. The electronics are as simple as [Ethan] could make them (a good philosophy for an engineering student to adhere to). There is an IR sensor to determine if a candy is in the hopper, an RGB sensor to determine its color, and servos to position the delivery chute based on color and operate the hopper.

Continue reading “Anti-Entropy Machine Satiates M&M OCD”

Zeroing CNC Mills With OpenCV

For [Jay] and [Ricardo]’s final project for [Dr. Bruce Land]’s ECE4760 course at Cornell, they tackled a problem that is the bane of all machinists. Their project finds the XY zero of a part in a CNC machine using computer vision, vastly reducing the time it take to set up a workpiece and giving us yet another reason to water down the phrase ‘Internet of Things’ by calling this the Internet of CNC Machines.

For the hardware, [Jay] and [Ricardo] used a PIC32 to interface with an Arducam module, a WiFi module, and an inductive sensor for measuring the distance to the workpiece. All of this was brought together on a PCB specifically designed to be single-sided (smart!), and tucked away in an enclosure that can be easily attached to the spindle of a CNC mill. This contraption looks down on a workpiece and uses OpenCV to find the center of a hole in a fixture. When the center is found, the mill is zeroed on its XY axis.

The software is a bit simpler than a device that has OpenCV processing running on a microcontroller. Detecting the center of the bore, for instance, happens on a laptop running a few Python scripts. The mill attachment communicates with the laptop over WiFi, and sends a few images of the downward-facing camera over to the laptop. From there, the laptop detects the center of the bore in the fixture plate and generates some G-code to send over to the mill.

While the device works remarkably well, and is able to center the mill fairly quickly and without a lot of user intervention, there were a few problems. The camera is not perfectly aligned with the axis of the spindle, making the math harder than it should be. Also, the enclosure isn’t rated for being an environment where coolant is sprayed everywhere. Those are small quibbles, and these problems could be fixed simply by designing and printing another enclosure. The device works, though, and really cuts down on the time it takes to zero out a mill.

You can check out the video description of the build below.

Continue reading “Zeroing CNC Mills With OpenCV”

Arduino Lighting Controller With Remote Twist

The time for putting up festive lights all around your house is nigh, and this is a very popular time for those of us who use the holiday season as an excuse to buy a few WiFi chips and Arduinos to automate all of our decorations. The latest in this great tradition is [Real Time Logic]’s cloud-based Christmas light setup.

In order to give public access to the Christmas light setup, a ESP8266 WiFi Four Relay board was configured with NodeMCU. This allows for four channels for lights, which are controlled through the Light Controller Server software. Once this is setup through a domain, all anyone has to do to change the lighting display is open up a web browser and head to the website. The creators had homeowners, restaurants, and church displays in mind, but it’s not too big of a leap to see how this could get some non-holiday use as well.

The holidays are a great time to get into the hacking spirit. From laser-projected lighting displays to drunk, animatronic Santas, there’s almost no end to the holiday fun, and you’ve still got a week! (Or 53!)

Build This Barn Door Tracker Today, Take Stunning Shots Of The Galaxy Tonight

Think you need some fancy equipment to get stunning shots of the night sky? Surely those long-exposure shots that show the Milky Way in all its glory take expensive telescopes with complicated motor-driven equatorial mounts, right? Guess again – you can slap together this simple barn door tracker for a DSLR for a couple of bucks and by wowing people with your astrophotography prowess tonight.

Those stunning, deeply saturated shots of our galaxy require a way to cancel out the Earth’s movement, lest star trails ruin your long exposure shots. Enter the barn door tracker, a simple device to let you counter the Earth’s rotation. [benrules2]’s version of the tool is ridiculously simple – two boards connected by a hinge. A short length of threaded rod with a large handle passes through a captive nut in the upper board.

A little trig allows you to calculate how much and how often to turn the handle (by hand!) to counter the planet’s 0.25°/minute diurnal rotation. Surprisingly, the long exposure times seem to even out any jostling introduced by handling the rig, but we’d still imagine a light touch and a sturdy tripod would be best. Those of you with less patience might automate this procedure.

It seems a lot to ask of a rig that you could probably throw together in an hour from scrap, but you can’t argue with [benrules2]’s results. His isn’t the only barn door tracker we’ve covered, but it looks like the simplest by far and would be a great project to build with kids.

[via r/DIY]