A small internet radio in 3D-printed case with a knob and an OLED screen.

GlobeTune Will Widen Your Musical Horizons

Are you tired of the same old music, but can’t afford any new tunes, even if they’re on dead formats? Boy, do we know that feeling. Here’s what you do: build yourself a GlobeTune music player, and you’ll never want for new music again.

The idea is simple, really. Just turn what we assume is a nice, clicky knob, and after a bit of static (which is a great touch!), you get a new, random radio station from somewhere around the globe. [Alexis D.] originally built this as a way to listen to and discover new music while disconnecting from the digital world, and we think it’s a great idea.

[Alexis D.] has production in mind, so after a Raspberry Pi Zero W prototype, they set about redesigning it around the ESP32. The current status seems to be hardware complete, software forthcoming. [Alexis D.] says that a crowdfunding campaign is in the works, but that the project will be open-sourced once in an acceptable state. So stay tuned!

Speaking of dead-ish formats, here’s an Internet radio in a cassette form factor.

Internals of the Blu-ray player, showing both the blu-ray drive and the custom PCBs

An Ingenious Blu-Ray Mini-Disk Player

[befi] brings us a project as impressive as it is reminiscent of older times, a Blu-Ray mini disk player. Easily fitting inside a pocket like a 8 cm CD player would, this is a labour of love and, thanks to [befi]’s skills both in electronics and in using a dremel tool.

A BluRay drive was taken apart, for a start, and a lot of case parts were cut off; somehow, [befi] made it fit within an exceptionally tiny footprint, getting new structural parts printed instead, to a new size. The space savings let him put a fully custom F1C100S-powered board with a number of unique features, from a USB-SATA chip to talk to the BluRay drive, to USB pathway control for making sure the player can do USB gadget mode when desired.

There’s an OLED screen on the side, buttons for controlling the playback, power and battery management – this player is built to a high standard, ready for day-to-day use as your companion, in the world where leaving your smartphone as uninvolved in your life as possible is a surprisingly wise decision. As a fun aside, did you know that while 8 cm CDs and DVDs existed, 8 cm BluRay drives never made it to market? If you’re wondering how is it that [befi] has disks to play in this device, yes, he’s used a dremel here too.

Everything is open-sourced – 3D print files, the F1C100S board, and the Buildroot distribution complete with all the custom software used. If you want to build such a player, and we wouldn’t be surprised if you were, there’s more than enough resources for you to go off. And, if you’re thinking of building something else in a similar way, the Buildroot image will be hugely helpful.

Want some entertainment instead? Watch the video embedded below, the build journey is full of things you never knew you wanted to learn. This player is definitely a shining star on the dark path that is Blu-Ray, given that our most popular articles on Blu-Ray are about its problems.

Continue reading “An Ingenious Blu-Ray Mini-Disk Player”

Screenshot of Microsoft Flight Simulator with the Dune expansion, and in the top right corner, the mod's author is shown using their phone with an attached gamepad for controlling a Dune ornithopter.

Take Control Of MS Flight Sim With Your Smartphone

Anyone with more than a passing interest in flight simulators will eventually want to upgrade their experience with a HOTAS (Hands On Throttle-And-Stick) setup that has buttons and switches for controlling your virtual aircraft’s assorted systems, which are well supported by games such as Microsoft Flight Simulator (MSFS). But a traditional HOTAS system can be a bit of an investment, so you might want to thank [Vaibhav Sharma] for the virtualHOTAS project that brings a configurable HOTAS interface to your phone — just in time to try out that Dune expansion for MSFS.

The phone’s orientation sensors are used as a joystick, and on the screen, there’s both sliders and buttons you can use as in-game controls. On the back-end there’s a Python program on the computer which exposes a webserver that the phone connects to, translating sensor and press data without the need for an app. This works wonderfully in MSFS, as [Vaibhav] shows us in the video below. What’s more, if you get tired of the touchscreen-and-accelerometer controls, you can even connect a generic smartphone-designed game controller platform, to have its commands and movements be translated to your PC too!

All the code is open source, and with the way this project operates, it will likely work as a general-purpose interface for other projects of yours. Whether you might want to build an accessibility controller from its codebase, use it for your robot platform, maybe simply repurpose this project for any other game, [Vaibhav]’s creation is yet another reminder that we’re carrying a sensor-packed platform, and it might just help you build a peripheral you didn’t know you needed.

Don’t have a phone handy? Perhaps an Xbox controller could work with just a few 3D printed upgrades, or you could stock up on buttons and build your own joystick from scratch. Oh, and keeping HOTAS principles in mind can be pretty helpful — you might get to redesign the venerable computer mouse, for instance!

Continue reading “Take Control Of MS Flight Sim With Your Smartphone”

Sometimes It’s Not The Solution

Watching a video about a scratch-built ultra-precise switch for metrology last week reminded me that it’s not always the projects that are the most elegant solutions that I enjoy reading about the most. Sometimes I like reading about hackers’ projects more for the description of the problem they’re facing.

A good problem invites you to brainstorm along. In the case of [Marco Reps]’s switches, for instance, they need to be extraordinarily temperature stable, which means being made out of a single type of metal to avoid unintentional thermocouple joints. And ideally, they should be as cheap as possible. Once you see one good solution, you can’t help but think of others – just reading the comments on that article shows you how inspiring a good problem can be. I’m not worried about these issues in any of my work, but it would be cool to have to.

Similarly, this week, I really liked [Michael Prasthofer]’s deep dive into converting a normal camera into a spectrometer. His solutions were all very elegant, but what was most interesting were the various problems he faced along the way. Things that you just wouldn’t expect end up mattering, like diffraction gratings being differently sensitive across the spectrum when light comes in from different angles. You can learn a lot from other people’s problems.

So, hackers everywhere, please share your problems with us! You think that your application is “too niche” to be of general interest? Maybe it’s another example of a problem that’s unique enough to be interesting just on its own. Let’s see what your up against. A cool problem is at least as interesting as a clever solution.

Inside A Mystery Aerospace Computer With [Ken Shirriff]

When life hands you a mysterious bit of vintage avionics, your best bet to identifying it might just be to get it in front of the biggest bunch of hardware hounds on the planet. After doing a teardown and some of your own investigation first, of course.

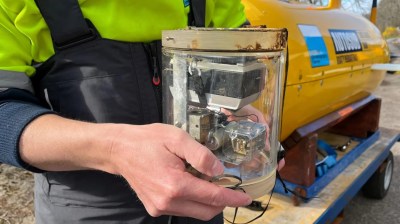
The literal black box in question came into [Ken Shirriff]’s custody courtesy of [David] from Usagi Electric, better known for his vacuum tube computer builds and his loving restoration of a Centurion minicomputer. The unit bears little in the way of identifying markings, but [Ken] was able to glean a little by inspecting the exterior. The keypad is a big giveaway; its chunky buttons seem optimized for use with the gloved hands of a pressure suit, and the ordinal compass points hint at a navigational function. The layout of the keypad is similar to the Apollo DSKY, which might make it a NASA artifact. Possibly contradicting all of that is the oddball but very cool electromechanical display, which uses reels of digits and a stepper-like motor to drive them.

Inside, more mysteries — and more clues — await. Unlike a recent flight computer [Ken] looked at, most of the guts are strictly electronic. The instrument is absolutely stuffed with PCBs, most of which are four-layer boards. Date codes on the hundreds of chips all seem to be in the 1967 range, dating the unit to the late 60s or early 70s. The weirdest bit is the core memory buried deep inside the stacks of logic and analog boards. [Ken] found 20 planes with the core, hinting at a 20-bit processor.

In the end, [Ken] was unable to come to any firm conclusion as to what this thing is, who made it, or what its purpose was. We doubt that his analysis will end there, though, and we look forward to the reverse engineering effort on this piece of retro magic.

The end result of the build, a supersized ultrasonic sensor, held in a person's hands

A Super-Size Functional Tribute To An Ultrasonic Sensor

Sometimes, it’s time to shut down the oscilloscope, and break out the cardboard and paints. If you’re wondering what for, well, here’s a reminder of an Instructable from [CrazyScience], that brings us back to cardboard crafts days. They rebuild one of the most iconic components for an electronics tinkering beginner — an ultrasonic distance sensor, and what’s fun is, it stays fully functional after the rebuild!

This project is as straightforward as it gets, describing all the steps in great detail, and you can complete it with just a hot glue gun and soldering iron. With materials being simple cardboard, aluminum foil, popsicle sticks, some mesh, and a single ultrasonic sensor for harvesting the transmitter and receiver out of, this is the kind of project you could easily complete with your kids on a rainy day.

Now, the venerable ultrasonic sensor joins the gallery of classics given a size change treatment, like the 555 timer we’ve seen two different takes on, or perhaps that one Arduino Uno. Unlike these three, this project’s cardboard skeleton means it’s all that simpler to build your own, what’s with all the shipping boxes we accumulate.

Continue reading “A Super-Size Functional Tribute To An Ultrasonic Sensor”

How To Cram 945 LEDs Into A Teeny Tiny Vegas-Style Sphere

[Carl Bugeja] finds the engineering behind the Las Vegas Sphere fascinating, and made a video all about the experience of designing and building a micro-sized desktop version. [Carl]’s version is about the size of a baseball and crams nearly a thousand RGB pixels across the surface.

A four-layer flexible PCB is the key to routing data and power to so many LEDs.

Putting that many addressable LEDs — even tiny 1 mm x 1 mm ones — across a rounded surface isn’t exactly trivial. [Carl]’s favored approach ended up relying on a flexible four-layer PCB and using clever design and math to lay out an unusual panel shape which covers a small 3D printed geodesic dome.

Much easier said that done, by the way. All kinds of things can and do go wrong, from an un-fixable short in the first version to adhesive and durability issues in later prototypes. In the end, however, it’s a success. Powered over USB-C, his mini “sphere” can display a variety of patterns and reactive emojis.

As elegant and impressive as the engineering is in this dense little display, [Carl] has some mixed feelings about the results. 945 individual pixels on such a small object is a lot, but it also ends up being fairly low-resolution in the end. It isn’t very good at displaying sharp lines or borders, so any familiar shapes (like circles or eyes) come out kind of ragged. It’s also expensive. The tiny LEDs may be only about 5 cents each, but when one needs nearly a thousand of them for one prototype that adds up quickly. The whole bill of materials comes out to roughly $250 USD after adding up the components, PCB, controller, and mechanical parts. It’s certainly a wildly different build than its distant cousin, the RGB cube.

Still, it’s an awfully slick little build. [Carl] doubts there’s much value in pursuing the idea further, but there are plenty of great images and clips from the build. Check out the video, embedded below.

Continue reading “How To Cram 945 LEDs Into A Teeny Tiny Vegas-Style Sphere”