[Robin Reiter] had a powered TV stand that only rotates around 20°, because who really needs their TV to rotate fully? He wanted to turn it into a motorized turntable for shooting videos, but first he had to hack it.
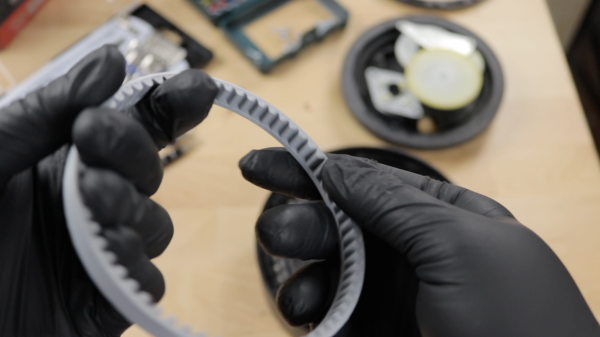
After opening it up [Robin] discovered that there was a surprising amount of electronics in the base. In addition to a DC motor, there was a potentiometer attached to a gear to give feedback, but it was set up for partial rotation so it had to be yanked out.
There was also a plastic gear with teeth around just part of the interior. [Robin] took a picture of the gear and dropped it into Fusion360, using the photo as a reference image while he re-created the gear. The new piece had teeth all around the periphery. After printing it out he glued it into the old gearbox, and now he had turned his TV stand into a motorized turntable.
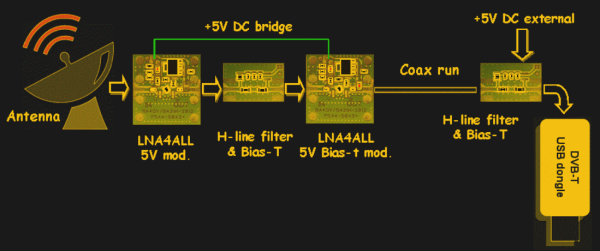
It may not be the radio station with all the hits and the best afternoon drive show, but 1420.4058 MHz is the most popular frequency in the universe. That’s the electromagnetic spectral line of hydrogen, and it’s the always on the air. But studying the H-line is a non-trivial task unless you know how to cascade low-noise amplifiers and filters to use an SDR for radio astronomy.
Because the universe is mostly made of hydrogen, H-line emissions are abundant, and their distribution can tell us a lot about the structure of galaxies. The 21-cm emission line is so characteristic and so prevalent that we used it as a unit of measurement on the plaques aboard the Pioneer probes as well as in the instructions for playing back the Voyager recordings. But listening in on 21-cm here on Earth requires a special setup, which [Adam (9A4QV)] describes in a detailed paper on the subject (PDF). [Adam] analyzes multiple configurations of LNAs and filters, both of which he sells, to determine the optimum front-end for 21-cm work. His analysis is a good primer on LNAs and explains why the front-end gear needs to be as close to the antenna as possible. Using his LNAs and filters and an SDR dongle, a reasonable 21-cm rig can be had for about $200 or so, less the antenna. He promises a follow-up paper on homebrew 21-cm antennas; we’ll be looking forward to that.
Not keen on the music of the spheres and prefer to listen to our own spacecraft instead? Then read up on the Deep Space Network and how you can snoop in.
Q: What do you call 8000 dead mosquitoes in a Mason jar?
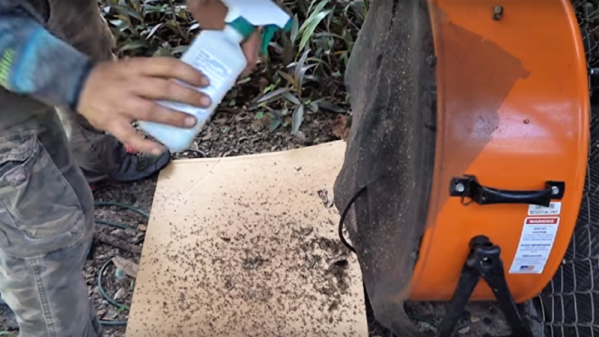
A: A good start. And [Dan Rojas]’s low-tech mosquito trap accomplished the feat in two nights with nothing fancier than a fan and a bottle of seltzer.
We know what you’re thinking: Where’s the hack? Why not at least use a laser sentry gun to zap skeeters on the fly? We agree that [Dan]’s mosquito trap, consisting of a powerful fan to create suction and a piece of window screen to catch the hapless bloodsuckers, is decidedly low-tech. But you can’t argue with results. Unless he’s fudging the numbers, a half-full Mason jar of parasite cadavers is pretty impressive. And you have to love the simplicity of the attractant he’s using. Mosquitoes are attracted to the CO2 exhaled by tasty mammals, but rather than do something elaborate with a paintball gun cartridge or the like, [Dan] simply cracks a bottle of seltzer and lets it outgas. Dead simple, and wickedly effective. The trapped bugs quickly desiccate in the strong air stream, aided by a few spritzes of isopropyl alcohol before cleaning the screen, which leaves them safely edible to frogs and insects.
Simple, cheap, and effective. Sounds like a great hack to us. And it’s really just a brute-force implementation of this mosquito-killing billboard for areas prone to Zika.
It’s always great to see people who haven’t had the opportunity to work with hardware like the Raspberry Pi before come up with a great project and have fun putting it together. [Katja]’s company has a two-day hackfest where employees can work on some cool non-work-related projects. [Katja]’s team decided to use a Raspberry Pi and some buttons and LEDs to create a ‘happiness tracker‘ for the company.
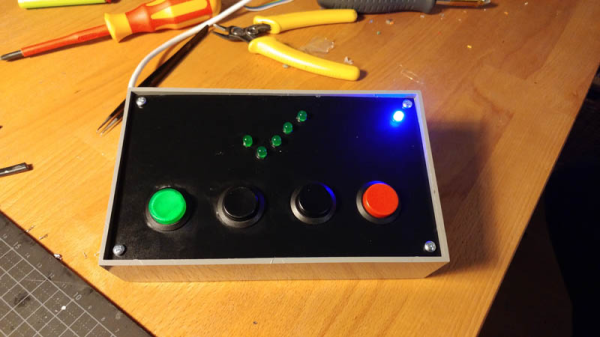
The resulting project is mounted near the entrance to the office and when they come in or leave, an employee can push one of four buttons to indicate their mood at the time, ‘bad,’ ‘not so good,’ ‘good’ or ‘super.’ The result is tracked and an overall impression of the office’s happiness is the result.
The project consists of the aforementioned Raspberry Pi, four push buttons, five LEDs that animate when a button is pressed and another LED that shows the system is currently up and working. When a user presses a button, the five LEDs animate in the shape of a check mark to show that the button press was successful. A Python script running at startup on the Pi takes care of detecting button pressing, lighting LEDs and sending a message to the server which monitors the level of happiness.
It’s a simple project, but that’s exactly what you need when you start with hardware you haven’t worked with before. It seems like [Katja]’s team had fun building the project and they hope that this can help gauge the overall wellbeing of the office. [Katja]’s blog post has an embedded video of the project in action. In the meantime, check out this bit of facial recognition software that determines how happy you are based on your smile, or this project that lets you know how happy your plant is.
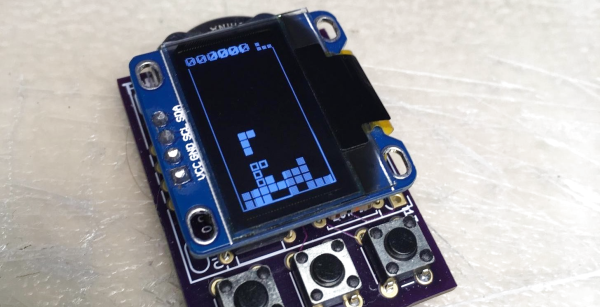
[dombeef] originally built pocketTETRIS as a Father’s Day gift for his Tetris-loving pops. However, having finished the project he’s decided to share it with the universe, and it’s looking rather sweet.
He made the game the smallest he could make, with size limitations imposed by a 0.96” OLED display, the coin-cell battery pack, and his desire for a durable 3D-printed case. It uses a ATtiny85 for the brains, mounted on a custom PCB that [dombeef] designed in KiCad. The Arduino code was modified from Andy Jackson’s ATtinyArcade code, giving it three-button capability instead of two. [dombeef] has details on the project page on Hackaday.io as well as 3D-design and PCB-design files on the project’s code repository on GitHub.
There’s a world of difference between building one of something and building multiples of something. The effort that goes into manufacturing does not scale linearly, and manufacturing is a skill in itself. This Friday, we’re going to be talking all about PCB manufacturing and assembly over on Hackaday.io
On deck for this Hack Chat will be [Jonathan Hirschman], the brains behind PCB:NG, a turnkey electronics manufacturing startup based around NYC. Jonathan is a self-taught hardware guy, proficient in PCB layout, 3D CAD, and manufacturing tech. PCB:NG is, essentially, taking oldskool manufacturing and making it into more of a digital process. PCB:NG makes it easy for anyone to get their designs manufactured, and to do it in the most cost-effective manner.
What is this Hack Chat going to be about? We’re going to talk about how to get started in PCB creation. What is the the best tool for the job? What is the best tool that doesn’t cost as much as a car? What are the pros and cons of each tool, and what should you know about RF before designing a board that blinks a LED?
This isn’t a Hack Chat that’s just about PCBs, though. We’re also going to be talking about manufacturing. Specifically, design for manufacturing, how to panelize boards, what happens when you forget fiducials, how to keep your designs cheap to manufacture, what happens when you put SMD components on both sides of a board.
We’re taking questions from everyone, so feel free to add something to the question sheet for the discussion.
We’re Looking For Hack Chat Hosts!
If PCB manufacturing and design isn’t your thing — or even if it is — we’re on the lookout for Hack Chat hosts. If you have some expertise in an area, give us a ring. We’ve already had a few chats with Raspberry Pi engineers, one of the brilliant people behind the ESP32, a talk on ASIC design for mixed signal oscilloscopes, and high-end audio amplifiers. We’re taking all callers, and if you have something you’d like to share with the community, send us an email. I would like to mention that it’s Burner season, and a few chats with the artists on the playa would be great, especially if they can tell us how to move the fuselage of a 747 a few hundred miles.
Here’s How To Take Part:
Our Hack Chats are live community events on the Hackaday.io Hack Chat group messaging. This Hack Chat will take place at noon Pacific time on Friday, August 4th. Confused about where and when ‘noon’ is? Here’s a time and date converter!
Log into Hackaday.io, visit that page, and look for the ‘Join this Project’ Button. Once you’re part of the project, the button will change to ‘Team Messaging’, which takes you directly to the Hack Chat.
You don’t have to wait until Friday; join whenever you want and you can see what the community is talking about.
In less than a month, on August 21, 2017, the Moon will cast its shadow upon the Earth, a relative pinprick at only 60 miles across. The shadow will begin in the Pacific Ocean off North America, make landfall south of Portland, Oregon, and rake diagonally across the United States. Charging southeastward at about 2000 miles an hour, the path of totality will touch 12 states before racing off into the Atlantic Ocean around Charleston, South Carolina.
Those are the dry facts of the eclipse, the wheres and the whens of an event that hasn’t been visible to a majority of the US population in 47 years. But beyond the science and the natural wonder of the celestial alignment lies a simple question: Where will you be when the sun goes away?
An Eclipse from a Volcano
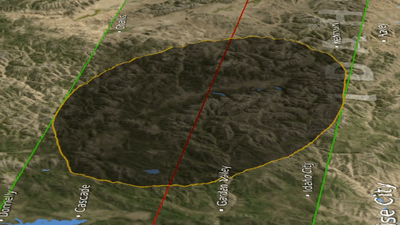
Bullseye! The center of totality passes right through North Menan Butte in Rexburg, ID.
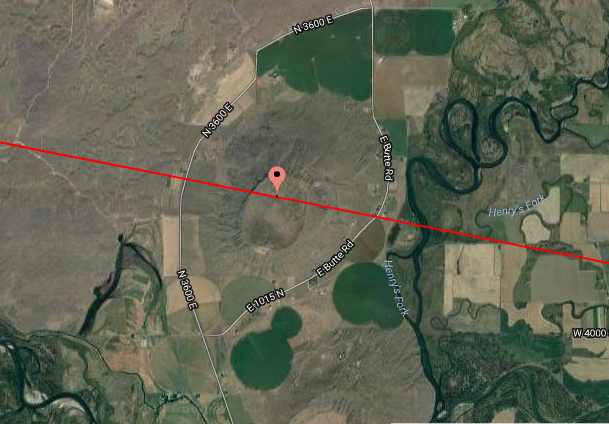
For me, the answer is simple: I’ll be smack dab in the middle of totality on top of an extinct volcano in eastern Idaho. To see an eclipse is pretty cool; to watch the mechanics of the heavens work above you while standing in a unique geological feature will be far cooler.
It will take me eight hours to drive to Menan Buttes with my family from our home in the Panhandle; Idaho is an enormous state. We’ll be camping on private land outside the southern butte, probably in pretty rustic conditions and without a lot of rough camping experience. OK, none. But I don’t care because I want to see totality, and the 92% totality we’d see if we stayed home just won’t cut it.
While most people will likely have their eyes cast heavenward with their cheap cardboard and plastic eclipse glasses or shade 14 welding lens when the big moment arrives, my eyes will be locked on the ground to the west of our vantage point. Menan Butte stands about 500′ above the flat, featureless Snake River plain, and I intend to watch the moon’s shadow racing across the planet toward us. That’s the draw for me, and I hope I get to see it.
That’s not to say I won’t look skyward once the shadow is upon us, gazing in wide wonder at the incandescent dance of our sun’s atmosphere against the suddenly dark sky. I’ll bask in the unnatural twilight, listen to the gasps and cheers of my fellow watchers, and feel the sudden temperature drop, which should be quite marked in the east Idaho drylands. We’ll have about two minutes of totality before the shadow races east toward the vast majority of the US population, and I plan to enjoy every second of it.
Hackaday Eclipse Meetups
Aside from just watching the eclipse, there’s plenty else to do. Hackaday.io members across the country are hosting Hackaday Eclipse Meetups, where like minded folks can mix and mingle before the eclipse. If you know where you’ll be to watch the eclipse — like an extinct volcano, for instance — and you don’t mind sharing the experience with some of your fellow enthusiasts, be sure to post a meetup on the Eclipse Meetups page. Make your event page and we’ll send you some eclipse glasses with the Jolly Wrencher on the side of them for you and your guests.
Have you started thinking of what you’re going to bring with you to the viewing? There are a lot of eclipse projects, from pinhole cameras to watch the eclipse safely, to the Ham operators who will be taking advantage of localized ionospheric changes to make long-distance contacts. Those of us with telescopes might want to build a low-cost solar filter. Someone will likely be trying to prove General Relativity somewhere along the path of totality, and we’d love to see the rig for that. And there will no doubt be petabytes of photographs and videos taken with everything ranging from smartphones to professional cinematic cameras. We’d love to hear what you’re planning and see your setups. And even if you’ve got something cool that’s not eclipse related, bring it along. It’s always a good time to talk shop for hackers.