Illustrated Kristina with an IBM Model M keyboard floating between her hands.

Keebin’ With Kristina: The One With The Pocket Cyberdeck

When you find something you love doing, you want to do it everywhere, all the time. Such is the case with [jefmer] and programming. The trouble is, there is not a single laptop or tablet out there that really deals well with direct sunlight. So, what’s a hacker to do during the day? Stay indoors and suffer?

Image by [jefmer] via Hackaday.IO
The answer is a project like Pocket Pad. This purpose-built PDA uses a Nice! Nano and a pair of two very low-power ST7302-driven monochrome displays. They have no backlight, but they update much faster than e-paper displays. According to [jefmer], the brighter the ambient light, the more readable the displays become. What more could you want? (Besides a backlight?)

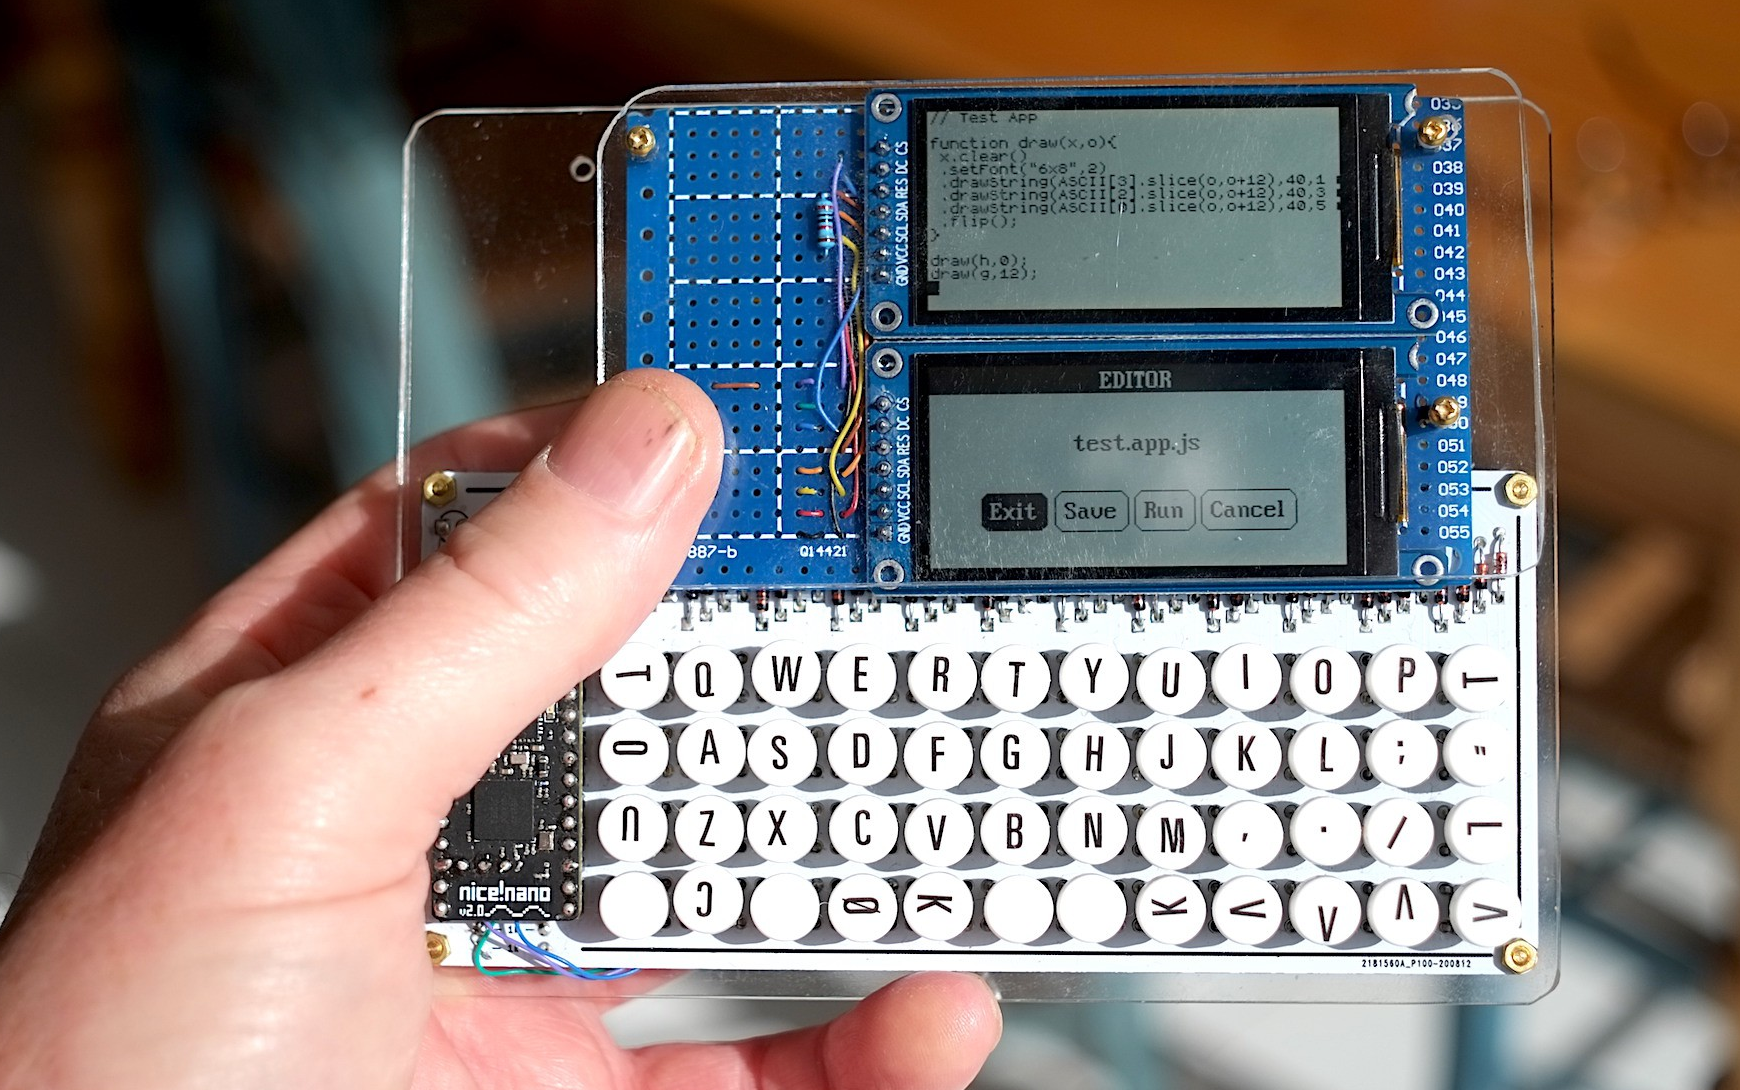
The miniature PocketType 40% is a little small for touch typing, but facilitates thumbs well. [jefmer] added those nice vinyl transfer legends and sealed them with clear nail polish.

All of the software including the keyboard scanner is written in Espruino, which is an implementation of JavaScript that targets embedded devices. Since it’s an interpreted language, [jefmer] can both write and execute programs directly on the Pocket Pad, using the bottom screen for the REPL. I’d sure like to have one of these in my pocket!
Continue reading “Keebin’ With Kristina: The One With The Pocket Cyberdeck”

Unusual Port Combines DisplayPort And HDMI

Everyone knows you can’t plug an HDMI cable into a DisplayPort… port, and yet a recent video from [Jon Bringus] challenges that seemingly obvious assumption. The hardware in question is a variant of the 2013-era Xi3 X7A mini PC, code-named ‘Piston’ and also known as a ‘Steambox’, from back when that was still something that Valve was working on. Although the physical format here is definitely quaint, it might be implementing DisplayPort Dual-Mode (DP++), which was introduced around the same time.

With DP++ the DP port can detect when a DVI or HDMI adapter is connected and then transmit DVI/HDMI TMDS signals rather than DP signals. Since DP and HDMI/DVI use a different signaling scheme, normally an active adapter would be required. One disadvantage of DP++ is that the HDMI signal will be limited to e.g. 1920×1080 @ 120 Hz and 4K only at 30 Hz.

Normally a DP++ port is marked as such, and requires an adapter that works with the DP++ port. What Xi3 did in this case to make regular DP and HDMI connectors work seems to be somewhat of a mystery, with any information on this type of port being rather scarce. [Jon] thinks he may have found the part itself listed on Mouser, but isn’t completely sure.

Feel free to leave your thoughts and any information you have on this oddity in the comments.

Continue reading “Unusual Port Combines DisplayPort And HDMI”

Stressless Shortwave Reviewed

[Dan Robinson] picked up a shortwave receiver known as the “stressless” receiver kit. We aren’t sure if the stress is from building a more complicated kit or operating a more complicated receiver. Either way, it is an attractive kit that looks easy to build.

Presumably to reduce stress, the VFO and receiver boards are already built, so assembly is just a few hours connecting large components and boards. As kits go, this is a fairly simple one. We were surprised to read that the supplier says you can’t upgrade the firmware. We, of course, wonder if that’s true.

For technical specs, the receiver is AM only and can operate from 100 kHz to 30 MHz. It uses a double conversion with intermediate frequencies of 21.4 MHz and 455 kHz. There’s a BNC connector on the back, and the radio requires 11 to 15V on the input. Apparently, the frequency generator inside is an SI5351. The sensitivity and selectivity numbers look very good for an AM radio.

We were surprised to see the radio didn’t have provisions for SSB since AM-only makes it not as useful for hams or others interested in non-broadcast transmissions. If we are doing our conversions correctly, the kit is fairly pricey, too, especially considering that it is AM only.

Still, we like that you could easily assemble a nice-looking radio kit. We were interested in hearing it perform, and [Dan’s] video lets us virtually try it out without the effort. We’ve seen the SI5351 on a carrier if you want to roll your own. Come to think of it, we’ve seen several.

Continue reading “Stressless Shortwave Reviewed”

Playing ZX Spectrum’s Manic Miner On The Arduino Uno

Composite output shield with audio driver and controller inputs for Arduino Uno (Credit: Scott Porter)

Although it seems many have moved on to 32-bit MCUs these days for projects, there is still a lot of fun to be had in the 8-bit AVR world, as [Scott Porter] demonstrates with a recent Arduino Uno project featuring his game engine running a port of the Manic Miner game that was originally released in 1983 for the ZX Spectrum. For the video and audio output he created an add-on board for the Uno that creates a composite signal using two resistors, along with an audio driver circuit and control inputs either from the onboard buttons or from a NES controller. Audio can be sent either over the composite output or via the audio jack.

A demonstration of the game is provided in a number of videos on [Scott]’s YouTube account, which shows off a few levels, at 256×256 resolution. It contains all 20 original levels, with a few quality of life upgrades with animation. It also features original music, which may or may not work for you, but music can be turned on or off in the main menu. Compared to the 3.5 MHz Z80 MPU in the ZX Spectrum, the 16 MHz AVR of the Uno is a lot beefier, which raises the hope that a color version like the ZX Spectrum one is also in the future, even if it may require an add-on board with a framebuffer. As [Scott] notes, the weakness of the Uno is that the ZX Spectrum has significantly more RAM, which limits what can be done.

Thanks to [256byteram] for the tip.

Continue reading “Playing ZX Spectrum’s Manic Miner On The Arduino Uno”

Share Your Projects: KiCad Automations And Pretty Renders

I have a pretty large GitHub repository, with all of my boards open-sourced there. Now, I’m finally facing the major problem it has – it can be uncomfortable for others to work with. I don’t store Gerber files in the repository because that will interfere with how Git functions – you’re supposed to only have source files in the repo. Yet, when someone needs Gerbers for my PCB, or a schematic PDF, or just to see how the board looks before they clone the entire repository, I often don’t have a good option for them.

In my experience as a hacker, being able to find others’ PCBs on GitHub is simply wonderful, but a PCB repository without a README feels barren, and a PCB README without pictures makes me sad. On the other hand, not having these files autogenerate is uncomfortable – updating a picture every time is a major drawback in particular.

Let’s take a look at some KiCad Git integrations, and see what they have to offer.

kicad_cli

We’ve mentioned kicad_cli back when KiCad 7 got released, and in the recently released KiCad 8, it’s only become more powerful. Before, it could do gerbers and schematic PDFs, but now, it can even do DRC checks – which is ideal if you want to add a hook for any pull requests you might encounter.

Continue reading “Share Your Projects: KiCad Automations And Pretty Renders”

On An Aging Space Station, Air Leaks Become Routine

Anyone who’s ever owned an older car will know the feeling: the nagging worry at the back of your mind that today might be the day that something important actually stops working. Oh, it’s not the little problems that bother you: the rips in the seats, the buzz out of the rear speakers, and that slow oil leak that might have annoyed you at first, but eventually just blend into the background. So long as the car starts and can get you from point A to B, you can accept the sub-optimal performance that inevitably comes with age. Someday the day will come when you can no longer ignore the mounting issues and you’ll have to get a new vehicle, but today isn’t that day.

Looking at developments over the last few years one could argue that the International Space Station, while quite a bit more advanced and costly than the old beater parked in your driveway, is entering a similar phase of its lifecycle. The first modules of the sprawling orbital complex were launched all the way back in 1998, and had a design lifetime of just 15 years. But with no major failures and the Station’s overall condition remaining stable, both NASA and Russia’s Roscosmos space agency have agreed to several mission extensions. The current agreement will see crews living and working aboard the Station until 2030, but as recently as January, NASA and Roscosmos officials were quoted as saying a further extension isn’t out of the question.

Still, there’s no debating that the ISS isn’t in the same shape it was when construction was formally completed in 2011. A perfect case in point: the fact that the rate of air leaking out of the Russian side of the complex has recently doubled is being treated as little more than a minor annoyance, as mission planners know what the problem is and how to minimize the impact is has on Station operations.

Continue reading “On An Aging Space Station, Air Leaks Become Routine”

Reducing Seams In FDM Prints With Scarf Joint Seams

One unavoidable aspect of FDM 3D printing is that each layer consists out of one or more lines that have a beginning and an end. Where these join up, a seam is formed, which can be very noticeable if the same joint exists on successive layers. Taking a hint from woodworking, a possible solution is now being worked on that involves scarf joints. This research is covered by [Michael Laws] in a recent Teaching Tech video on YouTube, where he also details his own printing attempts with a custom 3D model, and a guide by [psiberfunk/Adam L].

The idea for a scarf joint was pitched practically simultaneously by [vgdh] on the PrusaSlicer GitHub, and [Noisyfox] on the OrcaSlicer GitHub. The basic idea follows the woodworking and metalworking version of a scarf joint, with the overlap between two discrete parts across two heavily tapered ends. As with the woodworking version, the FDM scarf joint is not a silver bullet, and with the under development OrcaSlicer builds a lot of the parameters are still being tweaked to optimize the result.

If it can be made to work, it could mean that scarf joints will soon be coming to an OrcaSlicer and PrusaSlicer release near you. Theoretically it should mean faster prints than with randomized seams as fewer print head adjustments are needed, and it may provide a smoother result. Definitely an interesting development that we hope to see come to fruition.

Continue reading “Reducing Seams In FDM Prints With Scarf Joint Seams”