PicoDebugger Makes Development Easier

Debugging a Raspberry Pi Pico is straightforward enough; it simply involves hooking up something up to the USB and SWD pins. [Mark Stevens] whipped up the PicoDebugger to make this job easier than ever before.

The Raspberry Pi Foundation developed the Picoprobe system to allow a RP2040 to act as a USB to SWD and UART bridge for debugging another Pico or RP2040. The problem is that hooking it up time and time again can be fussy and frustrating.

To get around this, [Mark] whipped up the PicoDebugger board, which directly connects most of the important pins for you. Drop a Pico into the “Target” slot, and you can hook up the PicoDebugger to its UART lines with the flick of a DIP switch. The SWD pins can then also be connected via jumpers if so desired.  It also features a 2×20-pin header to allow the target to be wired into other hardware as necessary.

It’s a neat project, and it certainly beats running a bird’s nest of jumper wires every time you want to debug a Pico project. Simply dropping a board in is much more desirable.

We’ve seen some other neat debug tools over the years, too. If you’ve got your own development productivity hacks in the works, don’t hesitate to let us know!

Building A Digital Compass With An Arduino

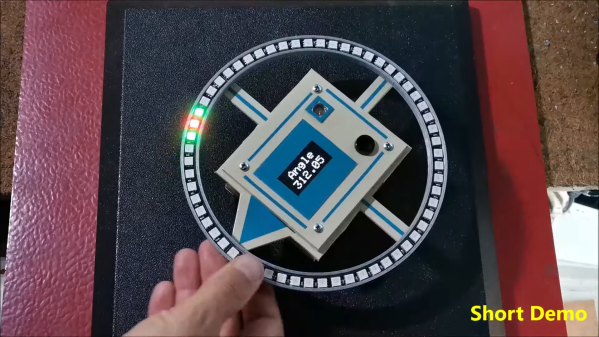
The magnetic compass has been a crucial navigational tool for around a thousand years or so, perhaps longer. While classical versions still work perfectly well, you can now get digital magnetometers that work in much the same way. [mircemk] decided to whip up a digital compass to demonstrate the value of these parts.

The build uses a HMC5883L magnetometer. While this can detect magnetic fields in three axes, just one is necessary for building a device that operates akin to a traditional compass. The output of the device is read by an Arduino Nano, which is hooked up to a string of WS2812B LEDs and a small OLED display. The LEDs display the bearing of magnetic north, while the OLED screen shows the current angle between the compass’s arrow and magnetic north.

It’s a tidy build that would be a great educational resource for teaching both electronics and navigational skills. We’ve seen similar projects before, like the hilarious Pizza Compass. Video after the break.

Continue reading “Building A Digital Compass With An Arduino”

Discussing The Tastier Side Of Desktop 3D Printing

Not long after the first desktop 3D printers were created, folks started wondering what other materials they could extrude. After all, plastic is only good for so much, and there’s plenty of other interesting types of goop that lend themselves to systematic squirting. Clay, cement, wax, solder, even biological material. The possibilities are vast, and even today, we’re still exploring new ways to utilize additive manufacturing.

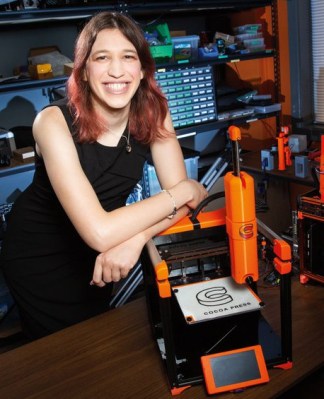
Ellie Weinstein

But while most of the research has centered on the practical, there’s also been interest in the tastier applications of 3D printing. Being able to print edible materials offers some fascinating culinary possibilities, from producing realistic marbling in artificial steaks to creating dodecahedron candies with bespoke fillings. Unfortunately for us, the few food-safe printers that have actually hit the market haven’t exactly been intended for the DIY crowd.

That is, until now. After nearly a decade in development, Ellie Weinstein’s Cocoa Press chocolate 3D printer kit is expected to start shipping before the end of the year. Derived from the Voron 0.1 design, the kit is meant to help those with existing 3D printing experience expand their repertoire beyond plastics and into something a bit sweeter.

So who better to host our recent 3D Printing Food Hack Chat? Ellie took the time to answer questions not just about the Cocoa Press itself, but the wider world of printing edible materials. While primarily designed for printing chocolate, with some tweaks, the hardware is capable of extruding other substances such as icing or peanut butter. It’s just a matter of getting the printers in the hands of hackers and makers, and seeing what they’ve got an appetite for.

Continue reading “Discussing The Tastier Side Of Desktop 3D Printing”

Proper Decoupling Capacitors

If you’ve been building circuits for any length of time, you probably know you need decoupling capacitors to keep your circuits stable. But even though it’s a favorite technique of ours, just scattering some around your PCB and hoping for the best isn’t necessarily the best approach. If you want to dig deeper into the why and how of decoupling, check out [Stephen Fleeman’s] post on the topic.

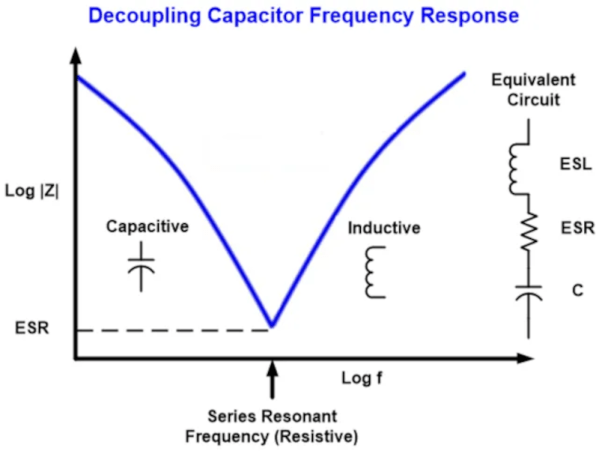
It is easy to think of capacitors as open circuits at DC and short circuits at high frequencies, shunting noise to ground. But the truth is more complex than that. Stray resistance and inductance mean that your simple decoupling capacitor will have a resonant frequency. This limits the high frequency protection so you often see multiple values used in parallel to respond to different frequencies.

Because the stray resistance and inductance plays a part, you may want to use fatter traces — less resistance — and shorter runs for less inductance. Of course, you can also use power and ground planes on the PCB as a form of decoupling. At the end of the post, [Stephen] talks a little about the importance of digital and analog ground that interact in a specific way.

If you want to do some empirical testing, you can build a test rig and do the work. Or check with [Bil Herd] about PCB inductance.

High School Student Builds Inexpensive Centrifuge

Having a chemistry lab fully stocked with all necessary equipment is the dream of students, teachers, and professors alike, but a lot of that equipment can be prohibitively expensive. Even in universities, labs are often left using old or worn-out equipment due to cost. So one could imagine that in high schools this is even a more pronounced problem. High school student [Aidan Miller] has solved this problem with at least one piece of lab equipment, bringing the cost for a centrifuge down to around $10 USD.

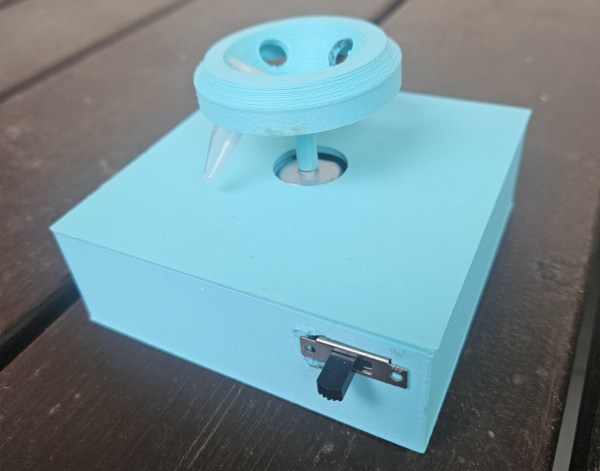
Part of the savings is due to the fact that [Aidan] has put together a smaller sized centrifuge, known as a micro-centrifuge. The function is still the same though, spinning samples to separate them out the constituents by weight. The 3D printed base of the centrifuge houses a switch and 9 V battery and also holds a small motor which spins the rotor. The rotor itself is also 3D printed, and needed to be a very specific shape to ensure that it could hold the samples properly at high RPM and maintain reasonable balance while spinning.

As a project it’s fairly simple and straightforward to build, but the more impressive thing here is how much it brings down the cost of lab equipment especially for high school labs that might otherwise struggle for funding. Of course it requires the use of a 3D printer but the costs of those have been coming down significantly as well, especially for things like this portable 3D printer which was also built by a high school student.

Continue reading “High School Student Builds Inexpensive Centrifuge”

Phone Thermal Cameras Get Open Source Desktop Tools

Whenever phone-based thermal cameras are brought up here on Hackaday, we inevitably receive some comments about how they’re a bad investment compared to a standalone unit. Sure they might be cheaper, but what happens in a couple years when the app stops working and the manufacturer no longer feels like keeping it updated?

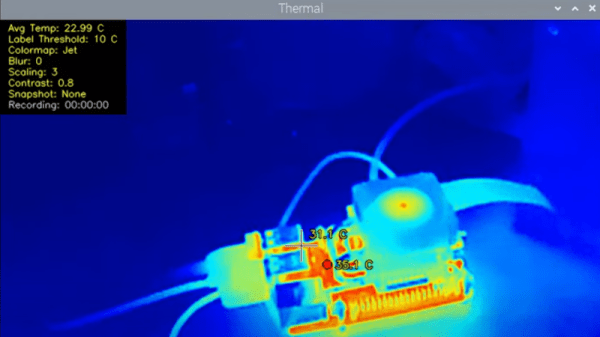
It’s a valid concern, and if we’re honest, we don’t like the idea of relying on some shady proprietary app just to use the camera in the first place. Which is why we’re so excited to see open source software being developed that allows you to use these (relatively) inexpensive cameras on your computer. [Les Wright] recently sent word that he’s been working on a project called PyThermalCamera which specifically targets the TOPDON TC001, which in turn is based on a project called P2Pro-Viewer developed by LeoDJ for the InfiRay P2 Pro.

Readers may recall we posted a review of the P2 Pro last month, and while the compact hardware was very impressive, the official Android software lacked a certain degree of polish. While these projects won’t help you on the mobile front in their current form, it’s good to know there’s at least a viable “Plan B” if you’re unwilling or unable to use the software provided from the manufacturer. Naturally this also opens up a lot of new possibilities for the camera, as being connected to a proper Linux box means you can do all sorts of interesting things with the video feed.

The two video feeds on the left are combined to produce the final thermal image.

Speaking of the video feed, we should say that both of these projects were born out of a reverse engineering effort by members of the EEVblog forums. They figured out early on that the InfiRay (and other similar models) were picked up as a standard USB video device by Linux, and that they provided two video streams: one being a B&W feed from the camera where the relative temperature is used as luminance, and the other containing the raw thermal data cleverly encoded into a green-tinted video. With a little poking they found an FFmpeg one liner that would combine the two streams, which provided the basis for much of the future work.

In the video below, you can see the review [Les] produced for the TOPDON TC001, which includes a demonstration of both the official Windows software and his homebrew alternative running on the Raspberry Pi. Here’s hoping these projects inspire others to join in the effort to produce flexible open source tools that not only unlock the impressive capabilities of these new thermal cameras but save us from having to install yet another smartphone application just to use a device we purchased.

Continue reading “Phone Thermal Cameras Get Open Source Desktop Tools”

An Open-Source Antikythera Mechanism

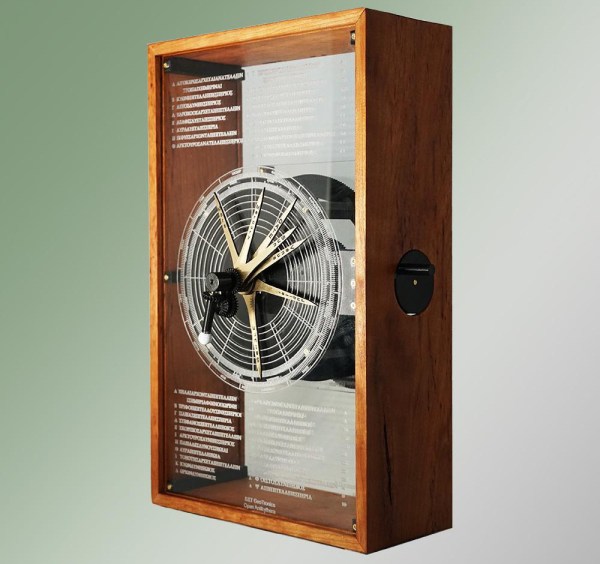
When the Antikythera Mechanism was first discovered, it wasn’t viewed as the wonder that we know it today. Originally the divers who found the device and the first scientists to look at it wrote it off as an astrolabe or other some other common type of clock. It wasn’t until decades later when another set of scientists x-rayed the device and surveyed more of the shipwreck where it was found that it began to become one of the more important archaeological discoveries in history. There have been plenty of attempts to recreate this device, and this replica recreates the mechanisms of the original but is altered so it can be built in a modern workshop.

The build, which took the creators several years of research and development to complete, started off with the known gear schemes found on the original device. However, the group wanted to make it with modern technology including 3D printers and laser cutters, so although they worked from an understanding of the original 2000-year-old device there are some upgrades and changes to accommodate those who want to build this in a modern workshop. Gears made from plastic instead of brass have more friction, which needed to be reduced by building custom bearings machined out of brass. And to complete the machine a number of enclosures of various styles are available to use as well.

Additionally, all of the designs and schematics for this build are open source for anyone to build or modify as they would like, although the group putting this together does plan to sell various parts for this as well. There will be some issues with use, as they point out, since the ancient Greeks didn’t have a full enough understanding of cosmology to get a machine like this to stay accurate for two thousand years, but it’s a fascinating build nonetheless. Reasearchers are still discovering new things about this device too, including the recent find of an earliest possible start date for the machine.