I was a bit of a lost soul after high school. I dabbled with electrical engineering for a semester but decided that it wasn’t for me – what I wouldn’t give for a do-over on that one. In my search for a way to make money, I stumbled upon radiologic technology – learning how to take X-rays. I figured it was a good way to combine my interests in medicine, electronics, and photography, so after a two-year course of study I got my Associates Degree, passed my boards, and earned the right to put “R.T.(R) (ARRT)” after my name.
That was about as far as that career went. There are certain realities of being in the health care business, and chief among them is that you really have to like dealing with the patients. I found that I liked the technology much more than the people, so I quickly moved on to bigger and better things. But the love of the technology never went away, so I thought I’d take a look at exactly what it takes to produce medical X-rays, and see how it’s changed from my time in the Radiology Department.
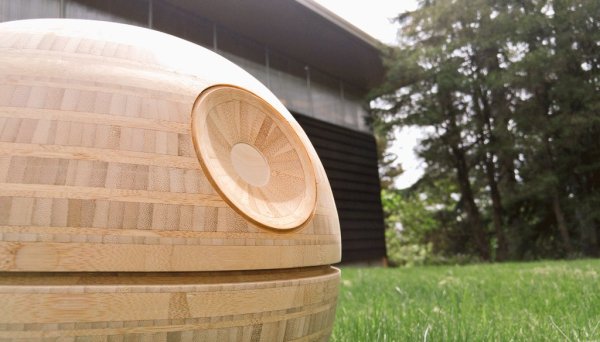
At first glance, [Frank Howarth]’s turned bamboo Death Star seems like a straight woodworking project. No Arduino controlled lights, no Raspberry Pi for audio clips of an X-wing attack or escaping TIE fighter. In other words: where’s the hack?
It’s a freaking bamboo Death Star!
If that’s not enough for you, check out the pattern on the surface of the finished model. That’s not painted on – those are the layers of the laminated bamboo lumber used to create the rings [Frank] used to form the structure. After lots of turning, sanding and polishing, the characteristic vascular bundles of the bamboo create light and dark panels for a convincing effect of the Death Star’s surface detail. And although we like the natural finish, we can imagine a darker stain might have really made the details pop and made for an effect closer to the original.
Still not hackish enough? Then feast your eyes on [Frank]’s shop. It’s a cavernous space with high ceilings, tons of natural light, and seemingly every woodworking machine known to man. While the lathe and tablesaw do a lot of the work for this build, the drool-worthy CNC router sees important duty in the creation of the multiple jigs needed for the build, and for making the cutout for the superlaser, in what must have been a tense moment.
Bamboo is an incredible material, whether for fun builds like this or for more structural uses, like a bamboo bike. All this bamboo goodness puts us in the mood to call on [Gerrit Coetzee] for a new installment on his “Materials You Should Know” series.
When I started boxing classes I was told, at my level, I could do just as much good for my form by doing core exercises such as crunches, running, push-ups, and pull-ups for a month as I could by doing the class. I consder habits like safety, cleanliness, and documentation to be habits that influence the quality of hacks much the same way. They’re not really related, and the work can get done without them, but their implementation alone improves the quality of everything you do at the workbench.
The best mechanic I’ve ever met had a well-organized shop. All of his employees wore nitrile gloves when they worked on engines to protect their hands from the chemicals inside. They used ear protection and safety glasses. His rates were low, and the car was always repaired fast. I never had to go back for the same repair twice. He knew exactly what repairs were done, and even kept the parts removed from my vehicle to show me if I desired. I got some of the most fantastic explanations of why parts failed from him. Two blocks down the street was a shop which was unorganized and had double rates. The employees were always sitting on the waiting chairs in the lounge. It took one trip there to never return.
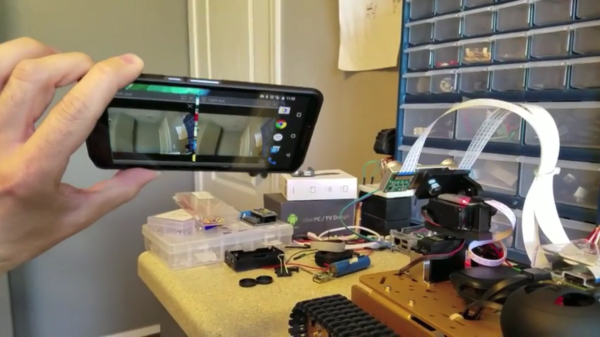
It’s great to see different kinds of hardware and software tossed into a project together, allowing someone to mix things that don’t normally go together into something new. [Freddy Kilo] did just that with a project he calls his VR Robot Tank. It’s a telepresence device that uses a wireless Xbox controller to drive a tracked platform, which is itself headed by a Raspberry Pi.
The Pi has two cameras on a pan-tilt mount, and those cameras are both aimed and viewed via a Google Cardboard-like setup. A healthy dose of free software glues it together, allowing things like video streaming (with U4VL) and steering via the wireless controller (with xboxdrv). A bit of fiddling was required for some parts – viewing the stereoscopic cameras for example is done by opening and positioning two video windows just right so as to see them through the headset lenses. It doesn’t warp the image to account for the lens distortion in the headset, and the wireless range might be limited, but the end result seems to work well enough.
The tank is driven with the wireless controller while a mobile phone mounted in a headset lets the user see through the cameras; motion sensing in the phone moves those cameras whenever you move your head to look around. Remote Control hobbyists will recognize the project as doing essentially the same job as FPV setups for model aircraft (for example, Drone Racing or even Snow Sleds) but this project uses a completely different hardware and software toolchain. It demonstrates the benefits of having access to open tools to use as virtual “duct tape”, letting people stick different things together to test a concept. It proves almost anything can be made to work if you have a willingness to fiddle!
How do you earn a place in a flower festival with a handful of Arduinos and a 3D printer? By building a water curtain that draws flowers. That’s exactly what Tecnoateneu Vilablareix, a hacking community in Spain did. They built this project specifically for Temps de Flors, a popular annual gathering in Girona, Spain. More than just a flower festival, the event opens gardens and courtyards of culturally importance to the general public that are closed the rest of the year.
A pile of nozzle fail.
The water curtain uses four Arduino Nanos to control the valves, which work in pairs to draw flowers, words, and patterns. A Mega provides a wifi connection to receive commands. Over 16 continuous days worth of print time went into the 128 valves and 64 nozzles that make up the water curtain. It took the group around 24 iterations to get the valve design just right—they have to be able to shut off quickly.
There’s an eight-video playlist after the break and a special video that shows how much we love pandering. Most of the ones in the playlist are quite short and demonstrate the final version of the water curtain. Others show the valve testing. The last is a time-lapse of the group setting it up at the festival. If you’re in the area, the festival runs until May 15th.
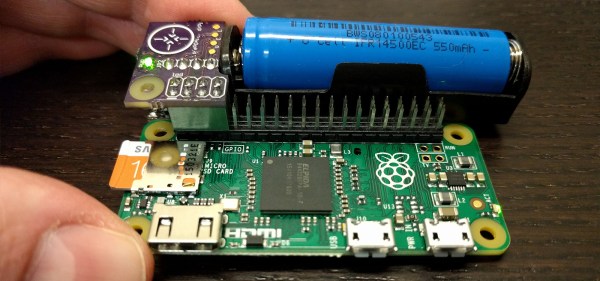
Knocking a microcontroller into sleep mode and waking it up on demand or in intervals is common practice in many low power applications, enabling devices to stay in operation for years on a single coin cell battery. Since there are tons of applications where you might want to do similar things with a Raspberry Pi, [Patrick Van Oosterwijck] created the LiFePO4wered/Pi. The module that snaps on to eight GPIO pins of a Pi, extending it by a long life LiFePO4 battery, a charging regulator, and a proper power management. Obviously, it also makes a great UPS.
[Patrick] realized this project by expanding his already available and equally useful LiFePO4wered/USB charging regulator module by a low power MSP430G2131 microcontroller and a load switch. A daemon on the Raspberry Pi speaks to the module over I2C, allowing you to schedule a wake-up timer, let your Pi autoboot after a power outage or just read out the current battery voltage through a command line tool. Once the Pi is safely shut down, the microcontroller will also go to sleep, resulting in a standby current of 8 uA for the whole system. Together with the 500 mAh LiFePo4 cell, that’s theoretically low enough to send your Pi-ncess into a seven-year-long sleep.
LiFePO4wered/Pi is not only good for sleeping, though. [Patrick’s] runtime tests show, that the 500 mAh cell will power a Raspberry Pi Zero and a WiFi dongle for about two hours. Because the Raspberry Pi and many USB peripherals won’t complain when only 3.2 V are present on the VBUS, [Patrick] was able to squeeze out even more runtime by dismissing the boost converter from the design and driving the Pi directly from the battery voltage. If that worries you, you can either read a detailed explanation on why that works so well or just have a look at the more compliant 5 V version.
Eventually, [Patrick] used his module to create a Raspberry Pi time-lapse camera. A little script lets the Pi take a picture on boot up, set a wake-up timer and go back to sleep again. Safely enclosed in a waterproof electric box and deployed into the wild, the camera took 120 pictures on a single charge.
We’re sure the module will find it’s way into many cool projects and we’re counting the hours until we can get one in [Patrick’s] tindie store. Until then, enjoy the time-lapse video:
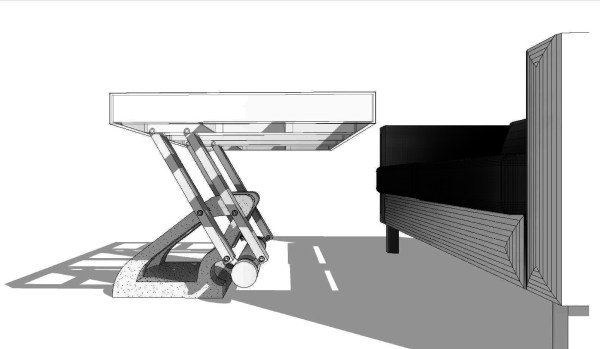
You need a coffee table, you need a dinner table. Do you really need two tables? [Shua] thinks the answer is “no”. That’s why he built this swinging countersink table out of concrete and a aluminum.
He started by making a simple half-scale prototype. Then a larger one. Through these explorations he learned how the table would be made, what kind of weight it needed, and how the mechanics needed to be constructed for the most stable table top.
Next he designed the final table in Autodesk Revit. This is software traditionally used for architecture. Since the table was to be made from concrete Revit’s useful set of concrete tools were useful for this project.
Most of the construction process was pretty standard. However, the use of CNC’d pink insulation as a mold for the concrete was interesting. The foam is closed cell, so it worked fine and gave a nice finish. The assembly was finished with a glass top and a carpeted base that contained a surge suppressor and two outlets. The table can be seen swinging between two positions in a video after the break.