One of my favorite conversation from Saturday’s Hackaday | Belgrade conference was about border crossing. This guy was saying the border station coming into Serbia needed a separate lane with the Skull and Wrenches on the digital sign since it was obvious the two cars in front of them were also packed with people coming to the con (and all the custom hardware that travels with the Hackaday crowd). The thought of caravans full of hardware hackers were on their way to this epic gathering.
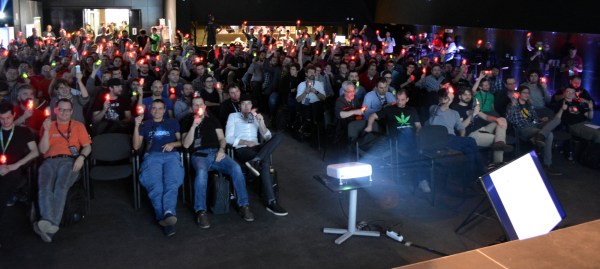
We packed the place, selling at least 50 tickets past our limit in the last few weeks to people who just wanted to get in and didn’t mind not being able to get their hands on one of the sweet badges. I recall meeting people who came from Romania, Bulgaria, Greece, Slovenia, Spain, Italy, Switzerland, USA, Germany, France, UK, and of course Serbia. If you were there and I missed your country let us know in the comments.

Obviously the main event is the incredible slate of talks that happen at our conferences. We had great presenters at last November’s SuperConference — our first every conference — so we’re delighted to say that our second was just as good. (We anticipate a third this fall.) Hackaday is so thankful for all of the speakers who donated their time and talent to share their knowledge and experience with our worldwide community.
Among my favorites were Seb Lee-Delisle’s talk on his many huge laser and projection mapping installations, Mike Harrison’s drilldown of the absolutely stunning engineering that went into Eidophor projector systems, Dejan Ristanovic’s fascinating talk about the on-again off-again history of Internet in Serbia, Sophi Kravitz’s collaborative work with polarizing materials, and Voja Antonic’s talk on the many trials of designing the conference badge which cleared out the world’s stock of more than one type of Kingbrite LED modules. If you missed the live stream of these talks don’t worry, we recorded all of them. It will take a bit of time to edit and post them so keep your eyes on the front page.
Continue reading “Hackaday Belgrade Was Hardware Center Of Universe On Saturday”

 I definitely made a cognitive error. I think a lot of people who get into hardware hacking from the hobby world have a beginning in software. It makes sense, they’re already reading blogs like this one. Maybe they buy an Arduino and start messing around. It’s not long before they buy a 3D printer, and then naturally want to contribute back.