Bela is a cape for the BeagleBone Black that’s aimed at artists and musicians. Actually, the cape is much less than half of the story — the rest is in some clever software and a real-time Linux distribution. But we’re getting ahead of ourselves. Let’s talk hardware first.
First off, the cape has stereo input and output as well as two amplified speaker outs. It can do all of your audio stuff. It also has two banks of analogue inputs and outputs, each capable of handling eight signals. In our opinion, this is where the Bela is cool. In particular, the analog outputs are not Arduino-style “analog outputs” where it’s actually a digital output on which you can do PWM to fake an analog signal. These are eight 16-bit outputs from an AD5668 DAC which means that you can use the voltages directly, without filtering.
Then there’s the real trick. All of these input and output peripherals are hooked up to the BeagleBone’s Programmable Realtime Units (PRUs) — a hardware subsystem that’s independent of the CPU but can work along with it. The PRU is interfaced with the real-time Linux core to give you sub-microsecond response in your application. This is a big deal because a lot of other audio-processing systems have latencies that get into the tens of milliseconds or worse, where it starts to be perceptible as a slight lag by humans.
The downside of this custom analog and audio I/O is that it’s not yet supported by kernel drivers, and you’ll need to use their “Heavy Audio Tools” which compiles Pd programs into C code, which can then drive the PRUs. Of course, you can write directly for the PRUs yourself as well. If you just want to play MP3s, get something you have a bunch of simpler, better options. If you need to do responsive real-time audio installations, Bela is a way to go.
The project is open-source, but we had to do a bunch of digging to find what we were looking for. The hardware is in zip files here, and you’ll find the software here. The demo projects look/sound pretty cool and their Kickstarter is long over-funded, so we’re interested to see what folks make with these.
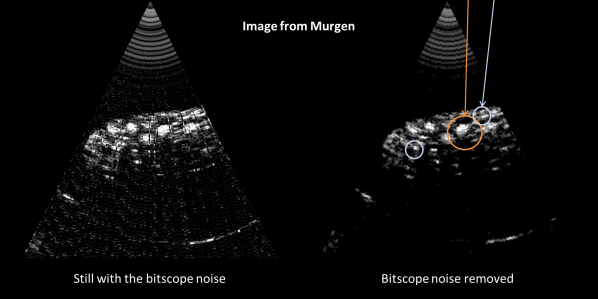
From watching a heart valve in operation to meeting your baby before she’s born, ultrasound is one of the most valuable and least invasive imaging tools of modern medicine. You pay for the value, of course, with ultrasound machines that cost upwards of $100k, and this can put them out of reach in many developing countries. Sounds like a problem for hackers to solve, and to help that happen, this 2016 Hackaday prize entry aims to create a development kit to enable low-cost medical ultrasounds.
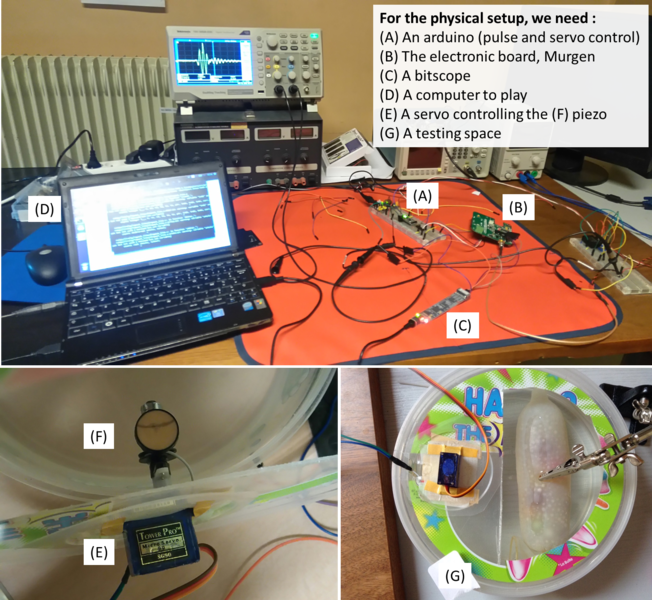
Developed as an off-shoot from the open-source echOpen project, [kelu124]’s Murgen project aims to enable hackers to create an ultrasound stethoscope in the $500 price range. A look at the test bench reveals that not much specialized equipment is needed. Other than the Murgen development board itself, everything on the test bench is standard issue stuff. Even the test target, an ultrasound image of which leads off this article, is pretty common stuff – a condom filled with tapioca and agar. The Murgen board itself is a cape for a BeagleBone Black, and full schematics and code are available.
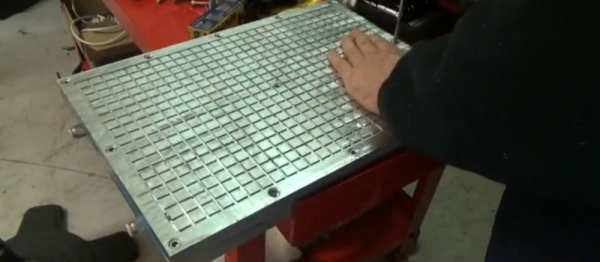
If you do a lot of one-off parts on your CNC machine you’ll know setup is the worst part of the process. Usually you’re using scrap material, you have to figure out how you’re going to clamp it, make sure the the piece is big enough to use, etc etc. Wouldn’t it be nice to just throw the material on the bed and start machining? Well, with a vacuum table as nice as this, you pretty much can!
[Stephen B.] kickstarted a MicroPython board. When he got it, he was pleasantly surprised to find that it worked great. His jaded soul balmed with a good experience, he found himself armed with a tool in search of a project. Then he remembered something that had stuck with him, which was a tide clock.
He lives 70 miles from the sea, but his stepmother had a birthday coming up. She went swimming daily, so he had his excuse to build. Unlike his inspiration project, a bunch of seven segment LEDs would not be received well by a technically disinclined stepmother with a well decorated home. So, instead of those, he went with an epaper display. It looks great.
He wanted to use the Kindle display to save money, but the weird power levels needed scared him off. He spent a bit more on a module, but it was probably worth it in time savings. Micropython board, an RTC, a battery, and e-paper display in hand, he had everything needed to build the clock but aesthetics.
Luckily a local frame shop entertained him by letting him pick up frames until he could find one that fit. He put a nice shoreline print together, installed the devices into the frame, and ended up with a really good looking clock. Sure it only tells time four times a day, but that’s enough if you live a life by the sea.
[Anthony Garofalo] has made a fancier plasma speaker. Not content with a simple spark, he uses a plasma vortex. To make the vortex, the spark gap is swapped out for an electrode placed in the centre of a ring magnet. The Lorentz force experienced by the arc causes it to rotate rapidly enough round the arc of the magnet’s centre to appear as a continuous sheet of plasma.
The speaker gets its power from an inverter using a flyback transformer driven through a MOSFET by a 555-based pulse width modulator. You can see the result in the video below the break, it’s very impressive to look at but probably not quite ready to sit in your hi-fi stack. The resulting sound isn’t quite as good as that from a stationary arc, but it looks a lot cooler.
In the open hardware world, we like to share 3D design files so that our friends and (global) neighbors can use and improve them. But we’ve all printed things from time to time that we’d like to keep secret. At least this is the premise behind this article in Science which proposes a novel method of 3D-printer-based industrial espionage: by recording the sound of the stepper motors and re-creating the toolpath.
Unfortunately, the article is behind a paywall so we’re short on the details, but everyone who’s played the Imperial March on their steppers has probably got the basic outline in their mind. Detecting the audio peak corresponding to a step pulse should be fairly easy. Disentangling the motions of two axes would be a bit harder, but presumably can be done based on different room-acoustic filtering of the two motors. Direction is the biggest question mark for us, but a stepper probably has a slightly audible glitch when reversing. Keeping track of these reversals could do the trick.
What do you think? Anyone know how they did it? Does someone with access to the full article want to write us up a summary in the comments?
[Edit: We were sent a copy of the full article (thanks [PersonUnknown]!) and it doesn’t explain any technical details at all. Save yourself the effort, and have fun speculating, because reading the article won’t help.]
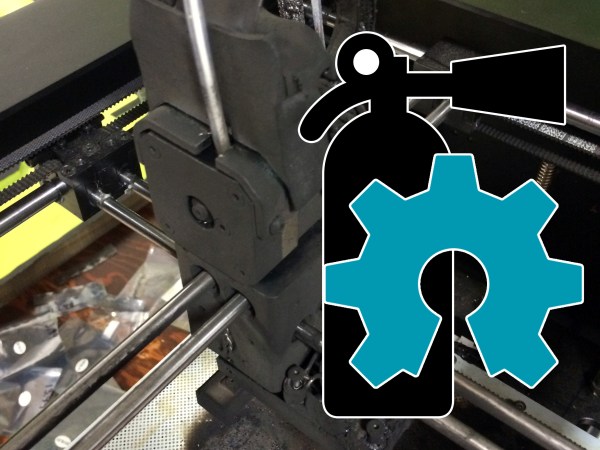
We posted about a 3D printer fire a while back. An attendee of the Midwest RepRap Fest had left his printer alone only to find its immolated remains on his return. In the spirit of open source, naturally, he shared his experience with the rest of us. It occurred to me that hackers are never powerless and there are active things to be done and avenues to explore.
An animation of a commercial fires suppression system, fire trace’s, operation. Firetrace‘s website has more.
There are really fantastic commercial fire extinguishing systems out there. One implementation, which is commonly deployed in cabinets and machining centers, is a plastic tube pressurized with an extinguishing agent by a connected tank. When a fire breaks out the tube melts at the hottest locations, automatically spraying the area with a suppressant. Variations of this involve a metal nozzle filled with a wax or plastic blended to melt at a certain temperature, much like the overhead fire sprinklers.
This system is also used inside engine compartments with success. For example, this item on amazon, is nothing but a pressurized plastic tube with a gauge on one end. Since the inside of an engine compartment can be treated as an enclosed space, very little fire suppressant is needed to extinguish an unexpected flame. It is important to note that this system works in a high temperature environment like an engine compartment, which bodes well for enclosed build envelopes on 3D printers.
BlazeCut Automatic Fire Suppression System 6′ TV200FA, Automotive Extinguisher Installed under Car Hood.
Another option is to construct a suppressant mine. A Japanese and a Thai company have both come out with a throwable fire extinguisher. In the Japanese device, the outside of the extinguisher is a breakable glass vial which shatters upon impact; releasing the agent. The Thai device looks like a volley ball, and releases the agent upon the application of heat. This device seems like a better candidate for 3D printing or home projects. Imagine a small rectangular pack with adhesive on one side that sits near the possible fire points of the printer, such as under the bed or above the nozzle. In the event of a fire, the casing will melt and the system will automatically deploy a spray of extinguishing agent.
Most of the chemicals used in these constructions are benign and readily available. High pressure tubing and waxes can all be purchased and the desired melt points can be aligned with their datasheets by need. Plastic sheets are not hard to procure. These offer a nice solution due to their entirely passive nature. They don’t need power to operate and rely entirely on the properties of the materials they are constructed out of.
There are other options in active systems. Hackaday readers suggested things such as flame sensors for adding automatic cut-offs in case of a fire. Thermal fuses can also be considered in some cases. There are other tricks too, which are less kosher but will work nonetheless. For example, placing a critical wire, fuse, or component in the likely path of a fire so that it is destroyed first, stopping the operation of the device quickly. These avenues should be explored. At minimum there should be at least one project that uses a Raspberry Pi and an Arduino to tweet that fire suppression failed and the house is on fire.
The Thai invention is a volleyball that melts upon contact with flame and releases a pressurized extinguishing agent.
Some of the big questions to ask are on the legal and ethical side. If someone started selling kits for a DIY fire suppression system and a fire ends up destroying someone’s property despite the device, who is responsible? Is it even safe to post instructions? What if a kit prematurely sets off and injures someone. I imagine a big part of the cost of these professional systems is some sort of liability insurance and certification. Still, putting a six hundred dollar fire suppression system on a six hundred dollar printer seems silly, and something is better than nothing.
Lastly, the comments directed a ton of flak towards the certification systems. There should be no reason that open source projects can’t produce their own specification for safety. An open source specification without an agency naturally couldn’t provide a legal defense against property damage, but a thought-out test program would provide piece of mind. For example, in the case of 3D printers, one could have a set of basic fail-safe tests. One example would be bringing the printer up to temperature and rapidly disconnecting the thermistor, does the printer erupt into fire? No? Good, it meets the spec. I wouldn’t mind knowing that the latest version of Marlin was tested on the popular boards and still met the community specification for fire safety.
As far as I can tell, there’s been very little work in open sourcing safety systems or in providing a testing framework for ensuring open hardware meets basic safety conditions. Many of you have experience with these systems. Some of you have gone through the entirely un-enjoyable process of getting a UL certification. What does Hackaday think?

 Developed as an off-shoot from the open-source