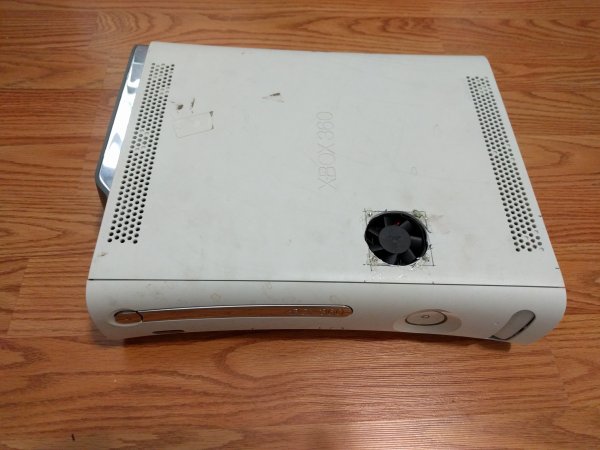
Hanging Onto The World’s Greatest Piggyback Ride.

We were really sad to see NASA retire the Space Shuttle. Even though it’s being replaced with some new and exciting hardware, we have fond memories of the Shuttle program. The good news is that a lot of the old hardware can now be seen up close and personal. [Brady Haran] recently took a video tour of one of the iconic pieces of hardware from the Shuttle program, the Shuttle Carrier N905NA.

NASA purchased the Boeing 747-100 in 1974 from American Airlines, and by 1976 the jumbo jet was put on a strict diet in preparations to carry the shuttle on it’s back for transportation and initial testing. She was stripped of her interior (all but few first class seats), sound deadening, air conditioning, and baggage compartment. Vertical fins on the tail were added for yaw stability, and the four Pratt and Whitney turbofans were upgraded to more powerful units. The fuselage was strengthened, and mounting points for the shuttle added. Even with all the weight savings, it severely limited the 747’s range from about 5000 miles to about 1000 miles while the orbiter was on it’s back. The aircraft was retired from service after ferrying the Shuttles to their final destinations in 2012.

In the video after the break, you can take a short tour of the N905NA at the Johnson Space Center in Houston where they are preparing it for public display. Visitors will be able to tour the 747 (with exhibits inside the fuselage), and a very accurate mock-up of the shuttle that sits atop.
Continue reading “Hanging Onto The World’s Greatest Piggyback Ride.”

Retro Edition: The LAN Before Time

Ethernet has been around since the mid-70s, but if you think it was always Cat5 and 10BaseT, you’d be sorely mistaken. The first ethernet was built with coaxial cable, vampire taps, AUI adapters, and a whole bunch of other network hardware that will make wizened networking veterans cringe. [Matt] had heard about these weird physical layers back when he started building networks in 1997, but he had never seen one. Now it’s an ancient and forgotten footnote in the history of computer networking. Is it possible to build a Thicknet in this modern era? It turns out, yes, it’s possible. It’s not easy, though.

The network [Matt] is building is a true 10Base5, or Thicknet, network. The backbone of this network is a coaxial cable 9.5mm in diameter. [Matt] discovered that while the common belief that Thicknet used RG-8/U cable. This appears to be incorrect, as the connectors for this cable – vampire taps that pierced the insulation and shield of the cable – are designed for cable manufactured by Belden, part number 9880.

[Matt] assembled the cable, vampire taps, AUI cables, and even found a few ISA NICs that would still work with a reasonably modern computer. He even went so far as to build a USB Ethernet adapter with an AUI interface. This impossibly retro device uses a standard USB to 10BaseT Ethernet adapter, with a chip designed to convert 10BaseT to AUI hacked onto a circuit board. That in itself is an incredible piece of engineering, with a handful of power supplies to get the correct 2.5, 3.3, 5, and 12 Volts to the right places.

As far as exercises in computing history go, [Matt] is at the top of his game. In the process of building it, he also figured out why no one uses Thicknet anymore; once it’s in place, you can’t change it, the cable is big, bulky, and the connectors are terrible. Still, it’s an amazing example of how far we’ve come.

Solder Any Expansion Directly To Your Computer’s Memory

Heat up that iron, you’re going to want to try this one: [Hugatry] is adding hardware to his laptop by tapping into the i2c lines on the memory module. We love this because the penalty for borking memory during the soldering process is much lower than when soldering directly to a motherboard!

Until we watched the video after the break we hadn’t realized that memory modules usually have an i2c EEPROM on them. This is actually a standard called Serial Presence Detect which allows the BIOS to poll the memory and configure automatically. It seems ironic that we knew the Raspberry Pi HAT standard uses this same trick but didn’t know it was on computer memory as well.

Hardware-wise this provides an easy method of soldering your own equipment to the bus. From there it becomes a software hack. Linux, of course, makes this quite easy and that is demonstrated by [Hugatry] with an LM75 temperature sensors. We would like to hear from our Windows and OSX using readers on how the i2c bus can be accessed within those OS’s.

Continue reading “Solder Any Expansion Directly To Your Computer’s Memory”

Hackaday Prize Entry: Flex Modules

One of [Chris Hamilton]’s entries for The Hackaday Prize deals directly with his job. He works at Fyber Labs designing wearable and flexible electronics. While anyone can go out and buy some flex sensors and every large board house can make flex PCBs, there aren’t many people building flexible products, and even fewer are creating the tools to build these wearable electronics. To solve this problem, [Chris] is building Flex Modules, circuit boards that combine the ease of use of breadboard-compatible modules with something that can be placed on a flexible PCB.

This is a toolkit for [Chris] and he already has a ton of modules that are either completed or in the works. The Flex Sensor ADC Buffer and Filter is meant to read flexible sensors, the STM32F401 module puts an incredibly powerful microcontroller in these projects, and the 12axis module gives these projects pressure, humidity, gyro, and temperature sensors. There are over two dozen modules [Chris] is working on, and each of them work with his system for flexible electronics.

If you’d like to see an example of what these modules can do, check out the Dance Kit [Chris] built. It’s a wearable LED strip with motion feedback and bioelectric monitoring. Without being flexible, this project would be a huge unwieldly mass of circuit boards. With these modules, it was easy to create a wearable solution to the problem.


The 2015 Hackaday Prize is sponsored by:

Portabilizing The Kinect

Way back when the Kinect was first released, there was a realization that this device would be the future of everything 3D. It was augmented reality, it was a new computer interface, it was a cool sensor for robotics applications, and it was a 3D scanner. When the first open source driver for the Kinect was released, we were assured that this is how we would get 3D data from real objects into a computer.

Since then, not much happened. We’re not using the Kinect for a UI, potato gamers were horrified they would be forced to buy the Kinect 2 with the new Xbox, and you’d be hard pressed to find a Kinect in a robot. 3D scanning is the only field where the Kinect hasn’t been over hyped, and even there it’s still a relatively complex setup.

This doesn’t mean a Kinect 3D scanner isn’t an object of desire for some people, or that it’s impossible to build a portabilzed version. [Mario]’s girlfriend works as an archaeologist, and having a tool to scan objects and places in 3D would be great for her. Because of this, [Mario] is building a handheld 3D scanner with a Raspberry Pi 2 and a Kinect.

This isn’t the first time we’ve seen a portablized Kinect. Way back in 2012, the Kinect was made handheld with the help of a Gumstix board. Since then, a million tiny ARM single board computers have popped up, and battery packs are readily available. It was only a matter of time until someone stepped up to the plate, and [Mario] was the guy.

The problem facing [Mario] isn’t hardware. Anyone can pick up a Kinect at Gamestop, the Raspberry Pi 2 should be more than capable of reading the depth sensor on the Kinect, and these parts can be tied together with 3D printed parts. The real problem is the software, and so far [Mario] has Libfreenect compiling without a problem on the Pi2. The project still requires a lot of additional libraries including some OpenCV stuff, but so far [Mario] has everything working.

You can check out his video of the proof of concept below.

Continue reading “Portabilizing The Kinect”

Meter Backlight

Adding A Backlight To A Cheap Multimeter

We don’t all need super high quality electronic testing gear. Sometimes second-hand or inexpensive equipment is accurate enough to get the job done. Though it can be a bit annoying to miss out on some of those “luxury” features. [Ekriirke] had this problem with his cheap multimeter. He wished the LCD screen had a backlight for easier visibility, so rather than upgrade to a more expensive unit he just added one himself.

After opening up the multimeter [Ekriirke] found that it ran on a single 12V battery. He realized that the simplest thing to do would be to wire up four white LEDs in series. The four LEDs were arranged within the case off to each side of the LCD, one in each corner. The leads were bent at 90 degree angles and soldered together “dead bug” style. Thin strips of copper foil tape were attached to the PCB in such a way that the anode and cathode from the LEDs would make contact when the case was closed back up.

The tape wraps around to the other side of the PCB where there was more room for the next piece of the circuit. A capacitor, resistor, and transistor are used in conjunction with a momentary switch. This circuit allows [Ekriirke] to turn on the light for about ten seconds by pressing the button one time. The circuit also runs through the meter’s dial switch, preventing the LEDs from being turned on while the meter itself is turned off.

[via Reddit]

Caption CERN Contest – Safe Science Is No Accident

Week 18 has faded into history, but not before you wrote some great captions! A hearty thanks to all the entrants. Astute reader [jlbrian7] has done it again! He’s uncovered the story behind this image. The woman in this photo is manually analyzing photographs of charged particles taken in a bubble chamber. He linked to an article from Fermilab, and to a 1971 film about Gargamelle, CERN’s largest bubble chamber at the time. The film is well worth a watch. It’s aimed at the layman, explaining the design, construction, and operation of bubble chambers. The photo scanning section starts at 14:40. The video has plenty of “1970’s-isms”, such as referring to the women analyzing the photographs as “scanning girls”. The filmmaker even bookend the section with an actual scanned girl – a possibly NSFW (by today’s standards) ASCII art printout of a nude pin-up model, as printed by a Control Data Corporation supercomputer.

The Funnies:

  • “Tabatha, the dungeon master, plots tonight’s dungeon and dragons game inside the exploded atom.”- [LloydTCannonIII]
  • “CERN, the only place you can watch Netflix on the same table that you eat lunch and plot global domination. Muwahahaha!” – [Joshua]
  • “They take Kerbal Space Program very serious at CERN. Here you can see the first interactive real time orbital view display.” – [haxtormoogle]

This week’s winner is [Jarrett] with “Friday night is Missile Command night in the lab. It’s a serious event”

We’re giving away two prizes this week – one to [jlbrian7] for his research on this and other CERN images, and one to [Jarrett] for his winning caption! Congrats to both of you. Enjoy your Logic Pirates From The Hackaday Store!

Week 19

cern-19-smJust about every workplace has to worry about safety. Many companies have a safety team that is trained to handle emergencies and help patients until proper medical technicians arrive. In a typical office environment this training is pretty easy, but what if you’re working on the bleeding edge of science? CERN’s safety team trains for everything, including badly burned hands and partially removed eyeballs. Don’t worry, these are just simulated injuries, which is probably why this CERN scientist is so calm, even smiling for the photo! CERN’s medical room also appears to be well stocked – with a full skeleton, and no less than four different types of fire extinguishers.

So, even though we already have a pretty good idea of what is going on in this photo (and the accompanying album), we’re sure you’ll come up with some great captions. Have at it!

This week’s prize is a Lightblue Bean from The Hackaday Store. Add your humorous caption as a comment to this project log. Make sure you’re commenting on the contest log, not on the contest itself (or on this post).

As always, if you actually have information about the image or the people in it, let CERN know on the original image discussion page.

Good Luck!