Talking Tactile 3D Prints

Cell biology professor [Mike] has created a way for blind students to decipher microscope slides using 3D prints and the magic of capacitive sensing. His write-up focuses on a slide showing the anaphase stage of mitosis in whitefish blastula, a popular choice for studying cell division. When a student touches a certain area of the print, the capacitive sensor triggers audio playback to tell them what they’re feeling.

[Mike] started by turning a 2D image of a cell into a 3D print. To do this, he made the image black and white, and then inverted the colors so that the 3D print’s topography will correspond correctly. The talking part is handled by an Arduino Duemilanove and a Spikenzie voice shield. The latter has a somewhat limited amount of space, but is more than adequate for the audio labels [Mike] made, which are all less than three seconds long.

A hard copy of the 2D file comes in handy for making sure the cap sensors are in the right places. To make those, [Mike] cut up some floor protector pads and covered the sticky side with copper tape. These are held on the 2D image with double-sided tape. The 3D print sits on top, separated by more furniture pads at the corners. He labeled this scientific sandwich model with a 3D printed Braille label that reads ‘anaphase’. [Mike] has made the referenced STL file along with a few others available at the National Institutes of Health’s 3D print exchange site.
Triple Sensor Mailbox Alert Really Delivers

Messing with the U.S. Mail is not something we generally recommend. But if you build your own mailbox like [Bob] did, you stand a much better chance of doing what you want without throwing up any flags.

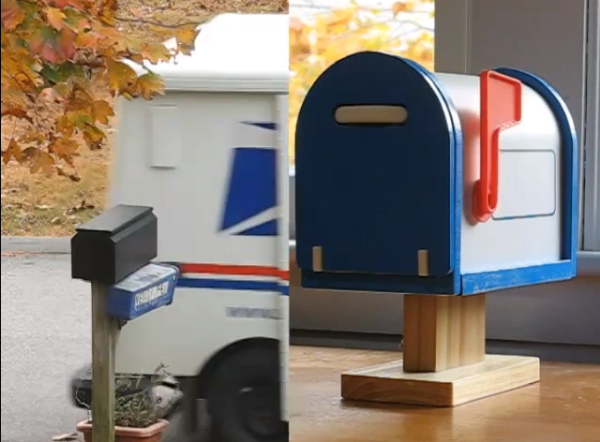
Speaking of throwing up flags, one of the coolest parts of this project is the toy mailbox inside the house that monitors the activity of the real box. When there is mail waiting, the flag on the toy mailbox goes up. Once [Bob] retrieves the mail, the flag goes back down automatically. A magnet in the real box’s flag prevents false alarms on the toy box provided the Flag Raised On Outgoing protocol is followed. Best of all, he built in some distress handling: If the mailbox door is left hanging open or the battery is low, the toy mailbox waves its flag up and down.

So, where do the three sensors come in? A magnetic reed switch on the wall of the real mailbox pairs with a magnet in the flag. To determine whether the door is open, [Bob] initially used another magnetic reed switch on the underside of the box. This didn’t work well in wet weather, so he switched to a mechanical tilt sensor. An IR LED on the ceiling and a phototransistor on the floor of the box work together to detect the presence of mail.

[Bob]’s homebrew mailbox has a false back that hides a PIC 16F1825. When the door opens, the PIC wakes up, turns on a MOSFET, and checks the battery level. It waits two minutes for the mailman to do his job and then reads the flag state. After comparing the IR LED and phototransistor’s states, it sends a message to the toy mailbox indicating the presence or absence of mail.

The toy mailbox holds a modified receiver board and a servo to control its flag. [Bob] has made the code and schematics available on his site. Walk-through video is after the jump.

Continue reading “Triple Sensor Mailbox Alert Really Delivers”

Medical Tricorder Mark I

A handheld tricorder is as good a reason as any to start a project. The science-fiction-derived form factor provides an opportunity to work on a lot of different areas of hardware development like portable power, charging, communications between sensor and microcontroller. And of course you need a user interface so that the values being returned will have some meaning for the user.

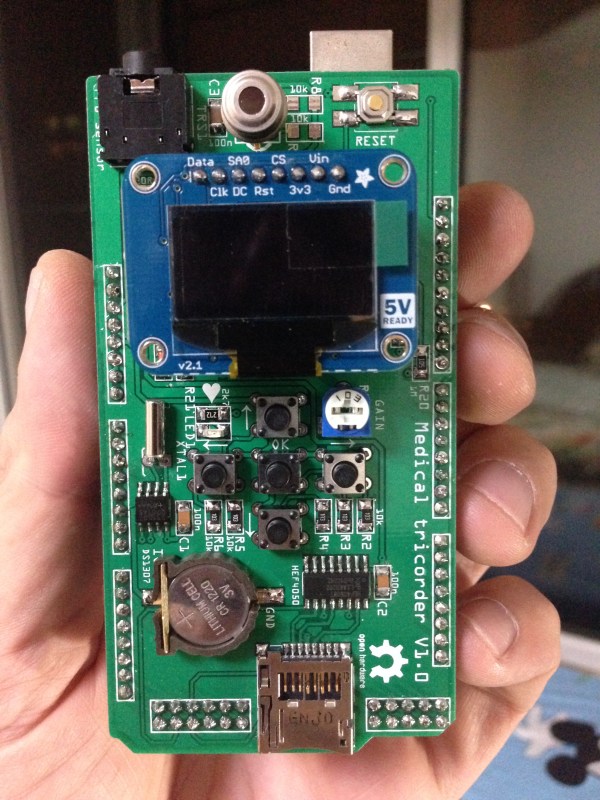
[Marcus B] has done a great job with all of this in his first version of a medical tricorder. The current design hosts two sensors, one measures skin temperature using infrared, the other is a pulse sensor.

For us it’s not the number of sensors that makes something a “tricorder” but the ability of the device to use those sensors to make a diagnosis (or to give the user enough hints to come to their own conclusion). [Marcus] shares similar views and with that in mind has designed in a real-time clock and an SD card slot. These can be used to log sensor data over time which may then be able to suggest ailments based on a known set of common diagnosis parameters.

Looking at the image above you may be wondering which chip is the microcontroller. This build is actually a shield for an Arduino hiding underneath.

There’s a demonstration video after the break. And if you find this impressive you won’t want to miss the Open Source Science Tricorder which is one of the finalists for the 2014 Hackaday Prize.

Continue reading “Medical Tricorder Mark I”

The KIM-1 Computer Minified

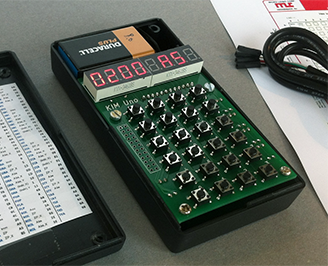
The KIM-1 wasn’t the first microcomputer available to computer hobbyists and other electron aficionados, but it was the first one that was cheap. It was also exceedingly simple, with just a 6502 CPU, a little more than 1k of RAM, 2k of ROM, a hexadecimal keypad and a few seven-segment displays. Still, a lot of software was written for this machine, and one of these boards can be found in every computer history museum.

[Oscar] thought the KIM-1 was far too cool to be relegated to the history books so he made his own. It’s not a direct copy – this one uses an Arduino for the brains, only breaking out some buttons, a pair of four-digit seven-segment displays, and the I2C and SPI pins on the ‘duino. The KIM-1 is emulated by the Arduino, allowing for the same interface as an original connected up to an old teletype, and [Oscar] got his hands on the original code for Microchess and the first 6502 disassembler from [Woz] and [Baum].

[Oscar] put the schematics for his version of the KIM-1 up, and has the PCBs up on SeeedStudio. If you’re looking for an awesome replica of a vintage computer and a nice weekend project, here ‘ya go.

Hackaday’s Most Excellent Munich Adventure

Bags are packed… it’s insane the amount of random electronics I carry with me on a trip. But who doesn’t want to do some prototyping on the plane?

In case you haven’t heard, the Hackaday Crew is headed to Munich. The coming week is Electronica. We’ll be prowling “the world’s leading trade show for electronic components” looking for the jewels of interest to the hacking community. Watch our Twitter feed for updates on those adventures.

But of course, Thursday the 13th is all about Hackaday Munich. The place will be packed! During the afternoon we feature hands-on hacking of embedded systems. The hardware we’re supplying is already spoken for. But you should bring along your own dev boards to hack on, or just come to watch the fun.

Get a ticket to The Hackaday Prize party. This includes a talk by [Sprite_TM], the announcement of the Grand Prize winner for the 2014 Hackaday Prize, followed by a party with music by [DJ Muallen]. Nobody should miss this event so please help get the word out. See you there!

Printing In Metal With A MIG Welder

Whenever the question of metal 3D printers comes up, someone always chimes in that a MIG welder connected to a normal 3D printer would work great. A bit of research would tell this person that’s already been done, but some confirmation and replication is nice. A few students at TU Delft University strapped a welder to a normal, off-the-shelf 3D printer and made a few simple shapes.

This project builds on the work of [Joshua Pearce] et al. at Michigan Tech where an MIG welder and delta bot was used to lay down rather complex shapes on a metal plate substrate. The team at TU Delft used a cartesian bot – a Prusa i3 – for their replication because of the sheer mass of moving a metal build plate, firebricks, and welder around.

In the first few prints on their machine, the team was able to lay down enough metal to build a vertical wall. It’s not much, and to turn this into a finished part would require some machining, but these are only the beginning steps of what could become a legitimate way of creating metal parts. Video below.

Continue reading “Printing In Metal With A MIG Welder”

Hackaday Prize Finalist: A Network Of Satellite Ground Stations

There are astonishing things you can do with a network of sensors spread across the globe, all connected to the Internet. Thousands of people have already installed hardware to detect lightning and flightaware gives out subscriptions to their premium service to anyone who will listen in to airplane transponders and send data back to their servers. The folks behind SatNOGS, one of the five finalists for The Hackaday Prize are using this same crowdsourced data collection for something that is literally out of this world: listening to the ever-increasing number of amateur satellites orbiting the planet.

There are dozens of cubesats and other amateur satellites flying every year, and they have become an extremely popular way of experimenting in a space environment, giving some budding engineers an awesome project in school, and testing out some technologies that are just too weird for national space agencies. The problem with sending one of these birds up is getting the data back down; a satellite will pass above the horizon of a single location only a few times a day, and even then for only minutes at a time. The SatNOGS team hopes to change that by planting receivers all around the globe, connecting them to the Internet, and hopefully providing real-time telemetry from dozens of orbiting satellites.

[Pierros] from the SatNOGS team was kind enough to sit down and answer a few questions for us about his entry to The Hackaday Prize. That’s below, right after their finalist video. Some of the SatNOGS team will also be at our Munich event where we announce the winner of the Prize.

Continue reading “Hackaday Prize Finalist: A Network Of Satellite Ground Stations”