Retrotechtacular: Time For Coffee

If you ask us, it’s almost always a good time for coffee. In the spotlight this week is an educational/promotional film made by A&P, who started in the 1800s as with a chain of shops offering coffee and tea. By the 1950s, they were operating full self-serve grocery stores with a trail of shuttered mom and pop operations in their wake.

This is the story of coffee as it goes from the nursery to the field to the shelves of your local A&P. It covers the growing, cultivation, and distribution of coffee from South American crops that at the time covered more than one million square miles of Brazil alone.

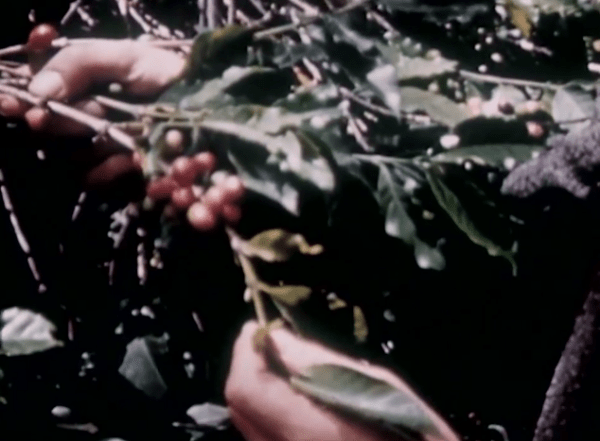
Coffee trees leave the nursery at two years old and are planted in nutrient-rich red soil. Two to three years later, they bear their first crop. Coffee blossoms appear first, and the fruit ripens over the next 8-9 months. Skilled workers pick the berries by hand. We are told that the average tree produces one pound of roasted coffee per year.

sun dried beans
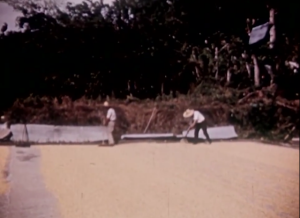
The day’s harvest is collected, weighed, and bagged for further production. The fruits are crushed to remove each bean from its red jacket. Then, the beans are washed and spread out in the sun for 8-10 days. They are frequently rotated so they dry evenly. The dried coffee is packed in bags and sent into the city.

bag stabbing
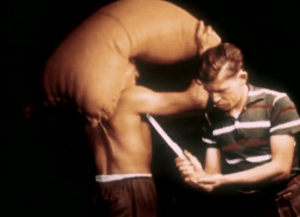
At a warehouse, the coffee is inspected, sorted, and graded. Bags are stamped with the coffee’s country of origin and intended destination before going to the seaport. A very important step happens here. As each bag walks by on the shoulders of a worker, another guy stabs it to get a sample of the beans. The on-site A&P officials take over at this point and do their own inspections, sending samples to the US. Here, the coffees are roasted and taste tested for both strength and flavor from a giant lazy Susan full of porcelain cups. taste testing

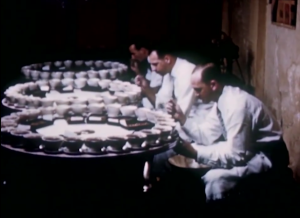
The film takes a brief detour to tell us that the great cities of Latin America were built upon the labors of coffee exportation. We see a montage of vistas, skylines, and shorelines, which bring it back to the subject of shipping the coffee to various ports of call. At the dock, bags are tumbled onto large nets to be loaded on the ship. As coffee is susceptible to moisture, special care is taken to avoid the ill effects of traveling out of the tropics.

Continue reading “Retrotechtacular: Time For Coffee”

[Ben Krasnow] Hacks A Scanning Electron Microscope

[Ben Krasnow] is quite possibly the only hacker with a Scanning Electron Microscope (SEM) collection. He’s acquired a JEOL JSM-T200, which was hot stuff back in the early 1980’s. [Ben] got a great deal, too.  He only had to pay shipping from Sweden to his garage. The SEM was actually dropped during shipment, but thankfully the only damage was a loose CRT neck plug. The JSM-T200 joins [Ben’s] homemade SEM, his DIY CT scanner, the perfect cookie machine, and a host of other projects in his lab.

The JSM-T200 is old tech; the primary way to store an image from this machine is through a screen-mounted Polaroid camera, much like an old oscilloscope. However, it still has a lot in common with current SEMs. In live video modes, an SEM can only collect one or two reflected electrons off a given section of a target. This creates a low contrast ghostly image we’ve come to associate with SEMs.

Attempting to fire more electrons at the target will de-focus the beam due to the electrons repelling each other. Trying to fire the electrons from higher voltages will just embed them into the target. Even SEMs with newer technology have to contend with these issues. Luckily, there is a way around them.

When “writing to photo”, the microscope switches to a slow scan mode, where the image is scanned over a period of a minute. This slower scan gives the microscope extra time to fire and collect more electrons – leading to a much better image. Using this mode, [Ben] discovered his microscope was capable of producing high-resolution digital images. It just needed a digital acquisition subsystem grafted on.

Click past the break to see how [Ben] modernized his microscope!

Continue reading “[Ben Krasnow] Hacks A Scanning Electron Microscope”

Extrinsic Motivation: BASIC For Bluetooth

There’s a lot more to those fancy radio modules you use with your Arduino projects than meets the eye. Many of them are systems on a chip, complete with their own microcontroller and memory that can control your entire blinking LEDs project. Developing for these radio modules is a bit of a challenge, as the IDEs and compilers cost several thousand dollars. [Tim]’s entry for the Hackaday Prize looks at one of these Bluetooth LE modules – Texas Instrument’s CC2540 and CC2541 – and puts an embedded BASIC interpreter right on the chip.

[Tim]’s inspiration for this project came from looking at a few popular devices using the CC254X chip. Many of these included a microcontroller and the added costs, complexity, and power requirements that come along with an additional chip. This radio module could easily run any code an ATMega could, and adding another chip to a product seemed like a terrible waste, and certainly not in the spirit of open hardware and software.

The alternative is writing an interpreter for the CC254X chip. He’s chosen BASIC, but added a little bit of Arduino language syntax to make it even easier to develop on. Having already run through a few successful tests involving SPI, I2C and 1-wire devices, [Tim] has a basic system working, but [Tim] admits it does need a little rework to make it easier to use.

It’s a great project, and personally astonishing that it didn’t make the quarterfinal selection for The Hackaday Prize. [Tim] is still working on his project, though, in a great example of extrinsic motivation; he doesn’t need a trip to space to convince him to build something cool.

You can check out [Tim]’s two minute concept video below.


SpaceWrencherThis project is an official entry to The Hackaday Prize that sadly didn’t make the quarterfinal selection. It’s still a great project, and worthy of a Hackaday post on its own.

Continue reading “Extrinsic Motivation: BASIC For Bluetooth”

Soundwave Tunes Up Your Portable Workbench

[Tez_Gelmir] built an awesome portable workbench. Not satisfied with just mundane designs, he patterned his box after Soundwave from the classic Transformers: Generation 1 series. This portable bench keeps his tools organized and ready to roll out.

[Tez] has all the basic tool groups covered – screwdrivers small and large, pliers, crimpers, soldering iron, fume extractor, vice, and wire spool. He’s also got room for parts boxes to hold his components.

soundwave
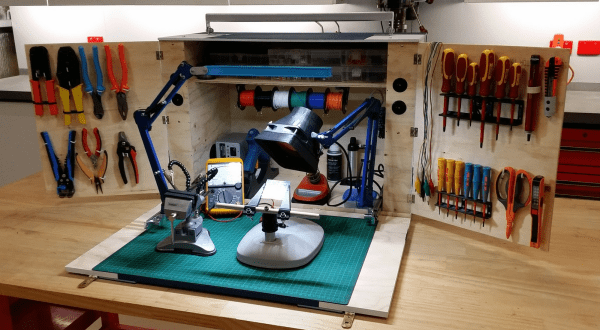
The basic box is built from a single sheet of 7mm plywood. The front work area is a smaller piece of 12mm plywood. Working with 7mm plywood did prove to be a challenge – [Tez] had to use some very small screws for his hinges.  The basic box construction was easy though – [Tez] used a pneumatic nailer and PVA (wood) glue.

[Tez] used a number of 3D printed parts in his design. He kept the Transformer theme going with a Decepticon logo built into his screwdriver holder. The fume extractor and lamp were also especially clever – [Tez] mounted them to drawer sliders, so they are there when he needs them, and out of the way when he doesn’t.

[Tez] spent quite a bit of time setting up his power system, and it shows. The inside of the box is framed with four power points. The main cord has its own “mouse door”, and everything tucks neatly away when not in use.

The Soundwave paint job is what sets this box apart – [Tez] spent quite a bit of time getting everything just right. It looks like Ravage is ready to spring out at any moment.

We really love this setup – Our only suggestion would be to add some sheet metal to protect the corners of the box while in transit.

Continue reading “Soundwave Tunes Up Your Portable Workbench”

Arduino-Powered Alarm System Has All The Bells And Whistles

Put aside all of the projects that use an Arduino to blink a few LEDs or drive one servo motor. [IngGaro]’s latest project uses the full range of features available in this versatile microcontroller and has turned an Arduino Mega into a fully-functional home alarm system.

The alarm can read RFID cards for activation and control of the device. It communicates with the front panel via an I2C bus, and it can control the opening and closing of windows or blinds. There is also an integrated GSM antenna for communicating any emergencies over the cell network. The device also keeps track of temperature and humidity.

The entire system can be controlled via a web interface. The Arduino serves a web page that allows the user full control over the alarm. With all of that, it’s hard to think of any more functionality to get out of this tiny microcontroller, unless you wanted to add a frickin’ laser to REALLY trip up the burglars!

Homemade Portable Gold Mining Trommel

[TheJogdredge] has been testing out his new gold washing machines that he made at home. By running dirt laced with rocks through this trommel, gold and precious materials can be filtered out. A video of the process can be seen embedded below.

The rig — which is meant to be easily lugged around from site to site — is powered by a Honda GX120 motor. No plastic parts were used in the system to help make it more durable. But foregoing the use of plastic means that this guy is heavy. The rig weighs about 240 pounds dry, and 265 when soaking wet with a sluice box attached. The rubber tires allow for the machine to be maneuvered from place to place without much hassle.

Although the parts are described on the website, no how-to instructions for this specific device can be found online. This is probably due to the fact that [TheJogdredge] is trying to sell his products and make some money. Releasing the instructions on how to build your own would most likely cut into the potential profits of his design. Regardless of which, this is portable gold mining trommel and perfect for those looking to step up their gold mining and prospecting game. The real question on our minds is: can you get more gold for less effort this way, or through electronic junk mining?

Continue reading “Homemade Portable Gold Mining Trommel”

GPS Bike Tracker

GPS Tracker Tracks Your Stolen Bike

Bikes are great for cruising through congested cities but there is a serious downside to pedaling your two-wheeler around… bike theft. It’s a big deal, for example, yearly estimates for stolen bikes in NYC are in the 60,000 – 100,000 range. Only an extremely small percentage of those are ever recovered. [stbennett] just got himself a halfway decent bike and is not too interested in having it stolen, and if it is stolen, he wants a way to find it so he built himself a GPS tracker for his bike.

The entire project is Arduino-based. It uses a GSM Shield and a GPS module along with a few other small odds and ends. A 2-cell LiPo battery provides the required power for all of the components. It’s pretty neat how this device maintains an extremely long battery life. The metal cable of the bike lock is used as a conductor in the circuit. When the cable is inserted and locked into the lock housing a circuit is completed that prevents electricity from passing through a transistor to the Arduino. In other words, the Arduino is off unless the bike cable is cut or disengaged. That way it is not running 24/7 and draining the battery.

The entire system works like this, once the bike lock cable is cut, the Arduino wakes up and gives a 15 second delay before doing anything, allowing the legitimate user to reconnect the bike lock and shut down the alarm system. If the bike lock is not re-engaged, the unit starts looking for a GPS signal. At that time it will send out SMS messages with the GPS location coordinates. Punching those numbers into Google Maps will show you exactly where the bike is.

Of course your other option is to park your bike where nobody else can access it, like at the top of a lamp pole.