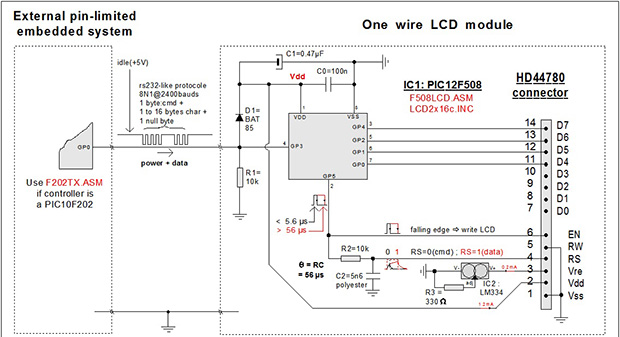
GameBoy Color Costume

game boy costume

Okay, okay. We know it’s November now, but when [John] sent this project in, we just had to share it. He made a fully functional Gameboy Color costume!

The costume makes use of a Raspberry Pi (located on his back), running RetroPie, which is an open source project dedicated to creating a universal console emulator.  To create the controllers he used two Teensy microcontrollers in his gloves, setup to emulate two USB keyboards on the Pi. Since he’s using Teensy 3.0, it supports capacitive touch sensing, so all he had to do was wire pieces of aluminum to the input pins to create touch-sensitive metal buttons on the gloves. He then slapped a cheap 10″ LCD from Adafruit onto his chest, stuffed a few 12V LiPo batteries in his pockets, and was ready to be the hit of any party he went to.

The costume was a great success, although a pesky pair of Mario and Luigi kept holding his hands all night… Stick around after the break to see a demonstration video!

Continue reading “GameBoy Color Costume”

Remote Control FPV Cockpit

cockpit

FPV flying, for how awesome it actually is, still consists of fiddling around with a remote control transmitter and either wearing video goggles or squinting into a screen. Awesome, yes, but not as cool as [Brett Hays]’s enclosed cockpit ground station. It’s a trailerable flight sim that allows you to have the same experience of flying an aircraft over your local terrain without actually leaving the ground.

The centerpiece for this build is a 42 inch flat screen TV that was picked up for $160. This was placed at the front of a large plywood and 2×2 box along with a computer joystick, throttle, and rudder controls.

The pots inside the controls needed to be switched out to match the resistance of the ones inside an old Futaba transmitter. From there, completing the the cockpit was just a matter of fabricating a few panels for a video switcher, gear retract lever, flaps. and RC radio settings.

It’s a truly amazing build and when placed on a trailer towed by [Brett]’s jeep, has the potential to be the closest thing to flying a manned aircraft you can get without a pilot’s license.

Videos of the cockpit in action below.

Continue reading “Remote Control FPV Cockpit”

The Tiniest Video Game

As we read [Adam]’s writeup for an extremely tiny video game system through coke bottle glasses, we’re reminded of the countless times we were told that sitting, ‘too close to the Nintendo’ would ruin our eyes. We’ll happily dismiss any article from a medical journal that says there was any truth to that statement, but [Adam]’s tiny video game system will most certainly hurt your eyes.

A few years ago, Atari sold keychain-sized joysticks that contained classics such as PongBreakout, Centipede, and Asteroids. [Adam] apparently ran into a cache of these cool classic baubles and immediately thought of turning them into a stand-alone video game system.

For the display, [Adam] used a CRT module from an old Sony Handicam. These modules had the right connections – power, ground, and composite video input – to connect directly to the Atari keychain games. The result is a video game that’s even smaller than a postage stamp. The picture above shows the tiny CRT next to a 25mm postage stamp; it’s small by any measure.

Fail Of The Week: CAN-Bus Attached HUD For Ford Mustang

This edition of Fail of the Week is nothing short of remarkable, and your help could really get the failed project back on track. [Snipor Bob] wanted to replace all of the dashboard readouts on his Mustang and got the idea of making the hacked hardware into a Heads-Up Display. What you see above is simply the early hardware proof of concept for tapping into the vehicle’s data system. But there’s also an interesting test rig for getting the windshield glass working as a reflector for the readout.

Continue reading “Fail Of The Week: CAN-Bus Attached HUD For Ford Mustang”

InFORM: MIT’s Morphing Table

Have you ever wished your dinner table could pass the salt? Advancements at MIT may soon make this a reality — although it might spill the salt everywhere. Enter the inFORM: Dynamic Physical Affordances and Constraints through Shape and Object Actuation.

While the MIT paper doesn’t go into much detail of the hardware itself, there are a few juicy tidbits that explain how it works. There are 900 individually actuated white polystyrene pins that make up the surface, in an array of 30 x 30 pixels. An overhead projector provides visual guidance of the system. Each pin can actuate 100mm, exerting a force of up to 1.08 Newtons each. To achieve the actuation, push-pull rods are utilized to maximize the dense pin arrangement as seen, making the display independent of the size of the actuators. The actuation is achieved by motorized slide potentiometers grouped in sets of 6 using custom PCBs that are driven by ATMega2560s — this allows for an excellent method of PID feedback right off the actuators themselves. There is an excellent image of the entire system on page 8 of the paper that shows both the scale and complexity of the build. Sadly it does not look like something that could be easily built at home, but hey, we’d love for someone to prove us wrong!

Stick around after the break to see this fascinating piece of technology in action. The video has been posted by a random Russian YouTube account, and we couldn’t find the original source for it — so if you can, let us know in the comments!

Continue reading “InFORM: MIT’s Morphing Table”

Laser Origami!

One of our tipsters just sent us a link to some fascinating videos on a new style of rapid prototyping — Laser Origami!

The concept is fairly simple, but beautifully executed in the included videos. A regular laser cutter is used to cut outlines of objects in clear lexan, then, by unfocusing the laser it slowly melts the bend lines, causing the lexan to fold and then solidify into a solid joint. It becomes even more interesting when they add in a servo motor to rotate the workpiece, allowing for bends of angles other than 90 degrees!

Depending on the part you are designing, this method of rapid prototyping far exceeds the speeds of a traditional 3D printer. The part shown in the included image could be printed in about 4 hours, or using the laser, cut and folded in 4 minutes flat!

Stick around after the break to see this awesome demonstration of the technology!

Continue reading “Laser Origami!”

Homemade Nixie Tubes

Do you love Nixie Tubes? Upset that they aren’t really manufactured anymore, and the cost of old ones is rising? Why not make your own? That’s exactly what [Dalibor] of the Czech Republic is up to, including blowing the glass tubes himself!

He’s chosen the Z568 nixie tubes to copy, as they are his favorite style of nixie. To create the display he has etched the digits and housing out of 0.3mm stainless steel sheet — which potentially means if he gets the hang of making the tubes, he could actually produce them to sell! To perform the glass blowing, he scored a Heathway glassblowing lathe off eBay — but unfortunately he hasn’t documented much of anything on making the glass tubes, which is too bad because we think that would be equally fascinating as the nixie displays themselves. On his first attempt with a properly sealed tube, the nixie worked and he even recorded striking voltage values very similar to industry tubes — not bad for something made in a backyard shed!

He has since then continued refining this art and is entering a glass-art contest called “When Prague Meets Shanghai” with a beautiful entry dubbed the ShanghaiTime Nixie Clock.

If this post seems vaguely familiar, it’s because this isn’t the first time we’ve posted an article about homemade nixie tubes, but we think [Dalibor’s] is by far the most elegant! Stick around after the break to see one of his first test videos — You might even think he’s cheating, the tubes look so professional!

Continue reading “Homemade Nixie Tubes”