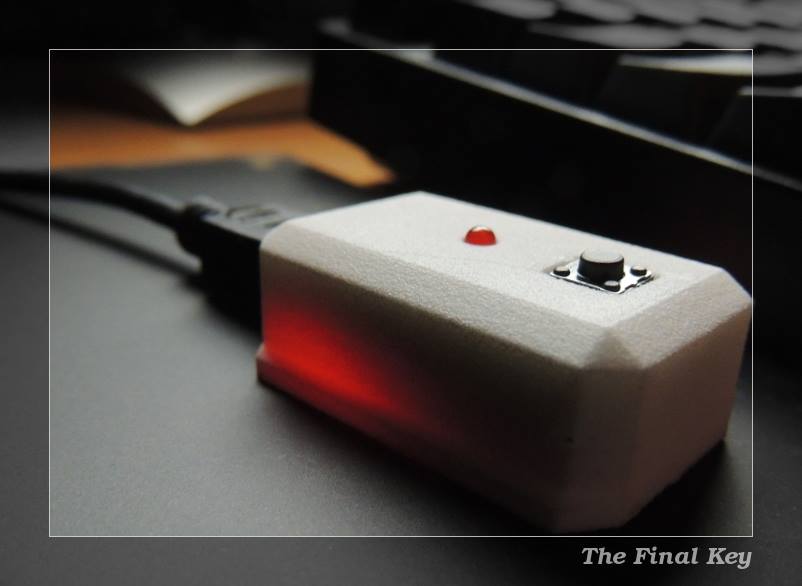
Anti-Tetris Project Is A Study In Hand Tracking

anti-tetris

The game of Anti-Tetris is played by standing in front of a monitor and watch falling Tetris pieces overlaid on a video image of your body. Each hand is used to make pieces disappear so that they don’t stack up to the top of the screen. We don’t see this as the next big indie game. What we do see are some very interesting techniques for hand tracking.

An FPGA drives the game, using a camera as input. To track your hands the Cornell students figured out that YUV images show a specific range of skin tones which can be coded as a filter to direct cursor placement. But they needed a bit of a hack to get at those values. They patched into the camera circuit before the YUV is converted to RGB for the NTSC output.

Registering hand movement perpendicular to the screen is also a challenge that they faced. Because the hand location has already been established they were able to measure distance between the upper and lower boundaries. If that distance changes fast enough it is treated as an input, making the current block disappear.

Continue reading “Anti-Tetris Project Is A Study In Hand Tracking”

Hackaday Newsletter: Now Including “This Day In Hackaday History”

timehax

A while back we toyed with the idea of doing a look back on hackaday history. We weren’t sure how often to publish it, or what exactly to publish. Now, we’ve decided that this will be the main part of the Hackaday news letter. You can sign up here if you haven’t already, but hurry I’m sending out today’s newsletter in a couple hours!

Each email (1-2 a week) will have that day’s history going all the way back to roughly the beginning. It will also have a quick blurb about what video I’m working on or any other little hackaday news bits.

Submersible Camera Snaps Pics Of Ocean Going Predators

RPi-submersible-camera-rig
This camera rig uses a Raspberry Pi to send a camera down fifty meters (mirror on RPi blog) in order to spy on sharks. We got really excited at first thinking that it might be using the camera module from the Raspberry Pi Foundation but that isn’t the case. Do keep reading though, there’s a lot of cool stuff involved in this one.

The project used a collection of camera units spread over a large area to monitor shark activity. Each is mounted on an anchored buoy, using solar panels and a lead acid gel battery for power. The RPi itself remains topside in a waterproof box. It connects to the camera using a 50-foot Ethernet patch cable.

We figure the challenge of building the hardware parallels that of designing an underwater ROV. The camera needs an enclosure that can stand up to the pressure at that depth while allowing the cable to pass through it. There is also an interesting note in the project log about getting the camera exposure settings to behave.

Adding Stereo To Monophonic Audio

board

A lot of awesome stuff happened up in [Bruce Land]’s lab at Cornell this last semester. Three students – [Pat], [Ed], and [Hanna] put in hours of work to come up with a few algorithms that are able to simulate stereo audio with monophonic sound. It’s enough work for three semesters of [Dr. Land]’s ECE 5030 class, and while it’s impossible to truly appreciate this project with a YouTube video, we’re assuming it’s an awesome piece of work.

The first part of the team’s project was to gather data about how the human ear hears in 3D space. To do this, they mounted microphones in a team member’s ear, sat them down on a rotating stool, and played a series of clicks. Tons of MATLAB later, the team had an average of how their team member’s heads heard sound. Basically, they created an algorithm of how binarual recording works.

To prove their algorithm worked, the team took a piece of music, squashed it down to mono, and played it through an MSP430 microcontroller. With a good pair of headphones, they’re able to virtually place the music in a stereo space.

The video below covers the basics of their build but because of the limitations of [Bruce]’s camera and YouTube you won’t be able to experience the team’s virtual stereo for yourself. You can, however, put on a pair of headphones and listen to this, a good example of what can be done with this sort of setup.

Continue reading “Adding Stereo To Monophonic Audio”

Vine App Hack On IPhone Makes Time-lapse Movies

time-lapse-with-smashed-iphone

The Vine app is all the rage these days. It lets you shoot six-second videos on your iPhone and easily post them on the Internet. The problem is that [Sean Hodgins] doesn’t find the time limit to be useful for traditional video. But you can cram a lot more info into a half-dozen seconds if you make it a time-lapse video. The rig above is his solution to making the Vine app act as a time-lapse recorder.

The trick is in how the app itself works. It only records video when you’re touching the screen. So you record one second of video, then remove your finger and it ‘pauses’ the recording until you’re ready for the next scene. [Sean] automated this by adding a servo motor and a stylus. An Arduino drives the servo, making quick taps on the screen to get as many different frames into the six seconds as possible. He had a bit of trouble registering quick taps at first. His solution was to inject 3.3V into the stylus he gutted for the project. Click through the link above to see some example videos, or watch this embedded video to see the hardware at work:

Continue reading “Vine App Hack On IPhone Makes Time-lapse Movies”

Scratch-built Desk Adjusts So You May Sit Or Stand

custom-height-adjustable-battlestation

Knowing that this desk was built from scratch is pretty impressive. But the motorized legs that raise and lower the desk to any height really puts the project over the top.

Surprisingly this started off as a computer case project. [Loren] upgraded his hardware and couldn’t find a case that would organize it the way he liked. His desk at the time had a glass top and he figured, why not build a new base for the glass which would double as a computer case? From there the project took off as his notebook sketches blossomed into computer renderings which matured into the wooden frame seen above.

Much like the machined computer desk from last December this uses motorized legs to adjust the height of the desk. These cost about $50 each, and he used four of them. If you consider the cost of purchasing a desk this size (which would not have been motorized) he’s still not breaking the bank. This battlestation is now fully functional, but he does plan to add automated control of the legs at some point. We think that means that each has an individual adjustment control which he wants to tie into one controller to rule them all.

33 Node Beowulf Cluster Built With Raspberry Pi

Not only did [Josh Kiepert] build a 33 Node Beowulf Cluster, but he made sure it looks impressive even if you don’t know what it is. That’s thanks to the power distribution PCBs he designed and etched. In addition to injecting power through each of the RPi GPIO headers they host an RGB LED which is illuminated in blue in the images above.

Quite some time ago we saw a 64-node RPi cluster. That one used LEGO pieces as a rack system to hold all of the boards. But [Josh] used stand-offs to create the columns of hardware which are suspended between top and bottom plates made out of acrylic. The only thing that’s unique about each board is the SD card and that’s why each has a label on it that identifies the node. These have been flashed with almost identical images; the host name and IP address are the only thing that changes from one to the next. They’ve been put in order physically so that you can quickly find your way through the rack. But functionally this doesn’t matter… put the card in any RPi and it will automatically identify itself on the network no matter where it’s located in the rack.

Don’t miss the demo video where [Josh] explains the entire setup.

Continue reading “33 Node Beowulf Cluster Built With Raspberry Pi”