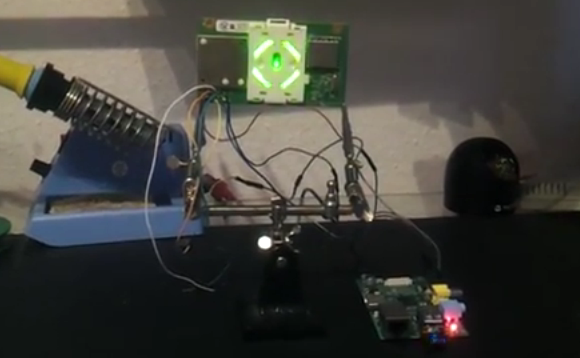
Multiple Raspberry Pi Boards Used To Create Video Wall

Five Rasberry Pi’s are used to drive this four-display video wall. This screenshot shows the system playing back some BBC documentaries. The sync, alignment, and video quality all seem to be spot on which makes it quite easy for your eye to assemble the images into one picture.

Each screen has its own Raspberry Pi which generates the HDMI video shown on the screen. These are fed from one central RPi board which acts as the controller. Video is pushed between the boards using the Real Time Streaming Protocol (RTSP) available through the Linux GStreamer package. Synchronization between the different video boards is taken care of using network time. [Samer] mentions that this system is scalable — each additional screen simply requires one more RPi to drive it.

The team also did some experiments with live video. They added a sixth RPi board with the camera module in order to display a live feed.

Leather Wallet Making Involves More Than You Think

01-leather-wallet

It’s not rocket science, but ending up with a beautifully crafted leather wallet like this one takes quite a bit more than you might think.

The project starts off with already tanned leather, so that definitely saves on time. The pieces are marked out on the stock before being cut with a hobby knife. There’s still a long way to go before you can start stitching though. The thickness of the edges is trimmed down and then burnished with a rotary tool. A channel is cut just inside the edges to receive the thickness of the thread. Holes are marked with a special tool, then bored using an awl. Once stitched together the edges are sanded perfectly flush before being burnished.

Just from the look of it we’d guess it’ll hold up years longer than anything you can buy at an ordinary big box retailer.

Continue reading “Leather Wallet Making Involves More Than You Think”

Mac Malware Uses Right To Left Character Exploit

right-to-left-character-malware-attack

Check out this jumbled confirmation window. At first glance the message appears to contain a bunch of gibberish, but it can actually be read if you start at the right side and read each character moving left. The text displays like this because it is prefixed by a special Right-to-Left override Unicode character. The technique is being used in malware to obscure the actual extension of the file being launched. Notice that when written backwards your eye can still pick out the string “pdf” which may be enough to trick the uninitiated into approving the launch of the file.

This confirmation screen is launched when clicking on a piece of malware found in the wild a little over a week ago. If you do choose to run it, a decoy PDF file is opened in order not to arouse suspicion. But at the same time the program — which is signed with an Apple Developer ID — is installing itself in the home directory and making a cron job to launch at each boot. Sneaky!

Animated GIFs On An Apple II

Before the Internet, computer enthusiasts needed to get their cat pictures, image macros, and animated gifs somehow. If only [Nate] was writing code back in the 80s: he created a video player for the Apple II, essentially turning the classic computer into a machine that can play one or two animated gifs.

Vintage microcomputers aren’t especially noted for a huge amount of RAM, or being very fast, so [Nate] needed to bring in some extra hardware to give his recently acquired Apple II+ a 64k RAM disk to store the gifs.

The gifs are loaded off the floppy drive after being converted on a PC with a Python script, reducing the resolution and colors to 280 x 192 pixels and an amazing rainbow of four colors. For some gifs, seen below, it’s actually slightly impressive an Apple II can pull off this trick. It’s amazing  [Nate] got this thing to work, as well.

If you have an Apple II set up, you’re awesome. You should go peruse [Nate]’s git and make your own animated gifs for your awesome classic computer.

Continue reading “Animated GIFs On An Apple II”

Complex Camera Rig Controlled With Blender 3D

blender-3d-camera-control

This is a pretty intricate camera mount. Not only does it provide pan and tilt as the subtitles state, but it moves along a track and offers zoom and focus controls. Its great, but you’ll need an equally complex set of controls to do anything meaningful with it. That’s where the real hack comes into play. The entire system is controlled by its virtual model in Blender 3D.

You probably already know that Blender 3D is an open source 3-dimensional modeling suite. It’s got a mountain of features, which include a framework for animating virtual objects. The camera rig was replicated inside of the software, and includes a skeleton that moves just like the real thing. You can make an animation of how the camera should move, then export and play back those motions on the physical hardware.

Now if you need help making 3D models of your hardware perhaps you should try scanning them.

Continue reading “Complex Camera Rig Controlled With Blender 3D”

Hackaday Links: Sunday, July 21st, 2013

hackaday-links-chain

Adafruit tears down a set of brainwave cat ears. They’re made by Necomimi and use your brain waves to adjust a pair of plush cat ears on the headgear.

If your desktop computer is sitting on the floor you may have damaged USB dongles by hitting them with your knees. [Megacier] prevents this from happening again by building a flexible dongle link.

Can anyone help [Brian Benchoff] find a datasheet for this International Rectifier 92-O350 so he can fix up his old VT100 terminal?

Here’s a quick example of how to graph data from a Raspberry Pi on the sen.se cloud service.

Have some extra fun with your oscilloscope by displaying any image. This set of conversions starts with a picture and ends with an audio file that will draw it on the scope’s screen.

You’ve probably already heard that the Sikorsky Prize for human powered helicopter has been claimed. If you didn’t see any footage of the flight now’s your chance. [Thanks Adam]

Hardware Store Goods And An Mbed Combine Help Solar Panels Track The Sun

sun-tracking-solar-panels

If you have the space, and can build a tracking rig cheaply you’ll be able to get a lot more out of your solar panels. That’s because they work best when the sun’s rays are hitting them perpendicular to the surface and not at an angle. [Michael Davis] hit both of those stipulations with this mbed powered solar tracker.

At a garage sale he picked up an antenna motor for just $15. The thing was very old, but still wrapped in the original plastic. It’s beefy enough to move his panels, but he first needed a way to mount everything. After checking his angles he built a base out of wood and used galvanized water pipe as an axle. Cable clamps mate his aluminum angle bracket frame to the pipe. This frame holds the panels securely.

To track the sun he used two smaller cells which aren’t easy to pick out in this image. They are monitored by the mbed microcontroller which measures their output in order to point the assembly in the direction which has the most intense light. A couple of limit switches are included to stop the assembly when it reaches either side.

This technique of using small solar cells as the tracking sensors seems to work well. Here’s another project that took that approach.

Continue reading “Hardware Store Goods And An Mbed Combine Help Solar Panels Track The Sun”