Using Electrical Conduit For A 3D Printer Frame

electrical-conduit-for-cnc-frame

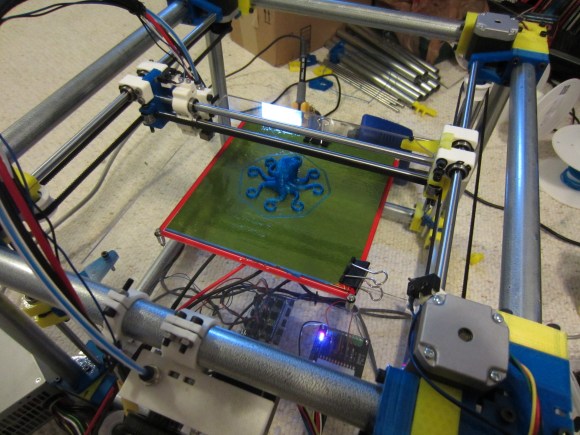
We’re always on the lookout for parts that can be source locally and that don’t cost a bundle. This hack fits both of those criteria. [Lee Miller] came up with a way to use steel electrical conduit as a 3D printer frame. He recently finished building the device seen above, and has been showing it off at Solid State Depot, a Hackerspace in Boulder, Colorado where he is a member.

Look closely at the corners of the frame in this image and you’ll see the 3D printed parts that make up the clamping mechanism. Each has three components that screw together. The two gaps in between each have a rubber ‘O’ ring. When the plastic clamps are screwed together they squeeze the rings which hold the electrical conduit firmly. This also has the side benefit of dampening vibrations.

It’s certainly easy to find this type of conduit which is sold at every home store (and most hardware stores). Just make sure that you check that a piece is straight when you pick it out. The SCAD files for the parts are available from his Github repo.

Continue reading “Using Electrical Conduit For A 3D Printer Frame”

Building A Digital Scale From Scratch

duplo

[Raivis] was given a particular task at his university – find a way to measure how many Duplo bricks are stacked together. There are a number of ways to do this, everything from computer vision to using a ruler, but [Raivis] chose a much more educational method. He built a digital scale from scratch out of a strain gauge and a Wheatstone bridge. The build log is immensely educational and provides some insight into the challenges of weighing things digitally.

A strain gauge is a simple piece of equipment, just a small force sensitive resistor. When attached to a metal bar and a force is applied, the resistance inside the strain gauge changes, but not by much. There’s only a few micro Ohms difference between the minimum and maximum of [Raivis]’ load cell, so he needed a way to measure very slight changes in resistance.

The solution was a Wheatstone bridge, or four resistors arranged in a square. When one of the resistors in the bridge is replaced with a strain gauge, very small changes in resistance  can be measured.

With a custom ‘duino amplifier shield, [Raivis] can measure the resistance of his load cell with 10-bit resolution, or a maximum weight of 1.32 kg with a resolution of two and a half grams. A single duplo block weighs about 12 grams, so we’ll call this one a success.

Loading Atari Games From An SD Card

Atari

They’re not a 2600, but the Atari 400, 800 and 1200 are awesome computers in their own right. With only BASIC built in to the ROM, they’re not especially useful or fun, as [Jeroen] found out when he acquired an 800 with a broken tape drive. There are options that allow you to load emulator files from a PC, but [Jeroen] wanted something more compact. He came up with a way to load games and apps off an SD card using a simple microcontroller.

The 400, 800, and 1200 each have a port that allows the computer to talk to printers, modems, disk drives, and load games. There are already a few circuits around that connect the SIO port to a computer so games can be loaded, but [Jeroen] wanted a more compact and portable solution for his 800.

What he came up with is actually pretty simple; just an Arduino, SD card, and an LCD display that allows him to browse the directory on the SD card and load it into the 800’s memory.

A lot of folks over on the Atariage forums are really impressed with [Jeroen]’s work, and would like to get their hands on one of these boards themselves. The project isn’t done just yet – [Jeroen] still needs to make a case for his device – but hopefully he’ll be spinning a few boards up in the coming months.

You can see a pair of videos of the device in action below.

Continue reading “Loading Atari Games From An SD Card”

Telegraph Sounder Clicks Out Email Messages

telegraph-box-together

[Patrick Schless] is excited to show off the project he took on about nine months ago. After finding an antique telegraph sounder he wired it up to an Arduino to see if he could make it tick. The successful experiment laid the ground work for different hardware that would make it into a morse code email reader.

He doesn’t know much about the background of the old hardware, but driving it is relatively simple. It’s basically a magnetic relay so you need to have a transistor for switching and a flyback diode for protection. Once those components are in place it’s just a matter of toggling a bit. [Patrick] knew he wanted to pull messages from an online source, so he set his Arduino aside and grabbed a Raspberry Pi. It worked like a charm. His plan was to put this on a bookshelf in perpetuity so he went the extra mile, designing his own PCB and having it spun using the OSH Park service. The project is finished with this low-profile laser-cut base which houses all of the electronics.

Now if he wants to respond to his emails in Morse code he needs to build this keyboard.

Continue reading “Telegraph Sounder Clicks Out Email Messages”

Giving An RC Tank A Fire Control Computer

tank

[Vincent] plays around with remote control tanks, and even though his current model is a WWII-era armor piece, he’d still like modern accoutrements such as a fire control computer and laser sighting for his main gun. His latest project did just that (French, Google translation) with the help of an Arduino, a few modifications to the receiver, and an IR rangefinder.

The stock RC tank includes servos to move the turret and the requisite electronics to fire an Airsoft gun. The precision of the mechanical movements inside the turret weren’t very precise, though, so [Vincent] had to gear down the servos to turn large movements into slight adjustments. After that, he installed an IR rangefinder and laser diode onto the barrel that allowed the gun to sight a target and read its distance.

After some experimentation with the rangefinder and laser, [Vincent] plotted data from firing a few BBs at a whole bunch of distances and targets. The graph came out fairly linear, and after plugging this into a graphing calculator, he was able to find an equation that took into account the distance and angle so the Arduino-powered fire control computer would hit its mark.

The accuracy of the gun is very impressive, all things considered. [Vincent] is able to accurately fire BBs downrange and hit an 8×12 cm target at five meters. You can check out that action below.

Continue reading “Giving An RC Tank A Fire Control Computer”

Building A WiFi Enabled Nixie Counter

wifi-nixie-counter

[Kevin Ballard] built this Nixie counter on the company dime. Tubes like this are getting more and more difficult to find since they’re no longer being manufactured. But when the Bossman hands you a corporate credit card those kinds of concerns take a back seat to your parts-shopping impulses. Start to finished this WiFi enabled counter took six weeks to build.

Connecting the board to the internet was very easy thanks to the Electric Imp that drives it. The difficult part comes in building a driver board and sockets for the tubes. We don’t see a lot of detail on how he’s generating the high voltage. But you can get a good feel for the tube connectors from the picture. He’s using an adapter PCB from Kosbo which breaks the tube pins out to two rows of 0.1″ pitch pin headers. The acrylic base has a port for each made of pin sockets spaced by a thick chunk of acrylic. Wiring harnesses wrap around the back side of the base to mate with the driver hardware. It’s programmed to count some type of company metric (it was funded by the corporation after all). They must be fairly successful because those numbers are flying by in the demo video.

Continue reading “Building A WiFi Enabled Nixie Counter”