A Trio Of Last-minute 555 Timer Projects

555_timer_secret_knock_circuit.jpg

[Bob] has been busy lately putting the finishing touches on three different projects that he plans on entering into the 555 Design Contest.

His first entry is a low-power H-bridge, which can be used to drive small servos. While he admits that it is a bit odd to build use a 555 timer to construct an H-bridge, they are cheap and plentiful enough to justify their use. Check out the video below to see the simple H-bridge controlling a servo.

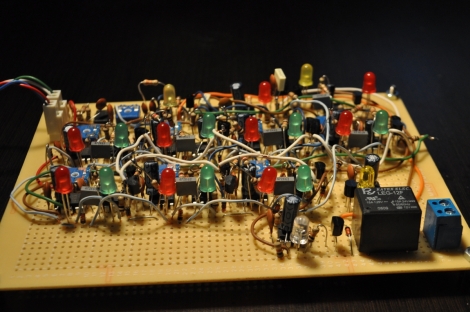
[Bob’s] second entry is quite a bit more complex than his H-bridge. His secret knock detector listens for a pattern of knocks, triggering a relay if the proper cadence is detected. If a knock is heard, the first 555 timer starts, listening for another knock within a specific time range. If a knock is heard during this period, the next timer is triggered, and the process is repeated. Subsequent knocks must be timed correctly, or the circuit halts, waiting for a reset timer to expire before listening is resumed. It’s a bit hard to get the knocks just right, but that should be fixable with a few small tweaks.

The third entry he sent us is a project that is pretty common, though with a somewhat uncommon implementation. Class D amplifiers are often built as low-power headphone amps for personal audio applications. He liked the idea of a Class D amplifier, but wanted to build something with enough power to listen to his music in a small room. To accomplish this task, he looked over the internal block schematics of a 555 timer and constructed a pair of high-power 555 timers himself, using discrete components to mimic those usually found in the 555 package. His results were decent, though admittedly not of the highest quality, and could be tweaked a bit to provide better sound fidelity.

Continue reading to see videos of each project in action.

Continue reading “A Trio Of Last-minute 555 Timer Projects”

Alien Life Form Synth Toy

space_bug_in_a_bottle

We were sent [Dr. Offset’s] most recent project, a kid’s toy that is half sculpture/half noisemaker, but 100% cool. The device uses several 555 Timers and is his entry into the 555 Design Contest, which wraps up in just a few days. To really enjoy his creation, you need to suspend disbelief for a moment, and indulge the space fantasy he creates. In other words, let yourself be a kid again, if only for a few minutes.

What he has built is a containment unit for an alien life form found during an outer space exploratory mission. The creature has fused its organic bits with electronic components in order to survive in the stark, empty world it used to call home. The containment unit allows you to zap the “bug” with various frequencies to see how it reacts. The “bug” is light sensitive, so it always offers a varying experience, day or night.

It’s definitely one of the most artistically creative entries into the 555 Design Contest we have seen yet. Continue reading to see a thorough walkthrough and demonstration of his project.

[Thanks Rich Decibels]

Continue reading “Alien Life Form Synth Toy”

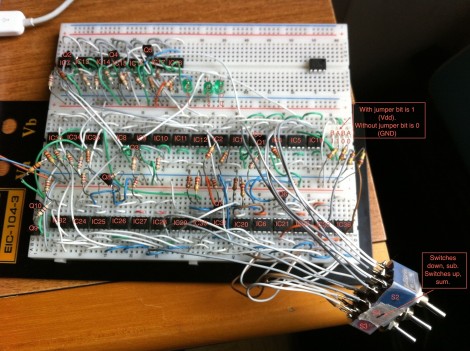
2-bit Full Adder Using Just Thirty Six 555 Timers

This 2-bit adder was a lot of work to build. It uses a total of thirty-six 555 timers and it does have the option of adding or subtracting numbers. It’s a rather unorthodox use of the part, depending more on the chip as an inverter and taking advantage of the fact that there’s an NPN transistor built into it. [cpu86] did use some PNP transistors to give him the ability to turn off some of the 555’s to get everything working correctly.

He explains the use of two’s complement in the subtracting feature but the process is just touched on very quickly. Luckily there’s a huge eagle schematic available with his project writeup so that you can follow along and really grasp how this thing works. We’ve generated a PNG and embedded it after the break for your convenience. You’ll find it just after the two videos of the device in action.

Continue reading “2-bit Full Adder Using Just Thirty Six 555 Timers”

Reverse Engineering Shopping Cart Security

All this talk about 555 timers is causing projects to pop out of the woodwork like this one that reverse engineers a shopping cart security mechanism. The wheel seen above listens for a particular magnetic signal and when encountered it locks down the yellow cowl, preventing the wheel from touching the ground and making the cart very hard to move.

[Nolan Blender] acquired one of these wheels for testing purposes and he’s posted some details about the hardware inside. But the first thing he did was to put together some test equipment to help find out details about the signal that trips the mechanism. He connected a coil to an audio amplifier and walked around the market looking for strong signals. Once he found a few strong bursts with that equipment he grabbed an oscilloscope, hooked it to the coil, and made some measurements. He found an 8 kHz signal at a 50% duty cycle at 30 ms intervals (it would be hard to make a better case for why you need an oscilloscope).

With the specs in hand, [Nolan] grabbed two 555 timers, an audio amplifier, and a 200 turn antenna around a ferrite core to build his own locking mechanism. If you’re ever stopped short in the middle of the market, just look for the hacker at the end of the aisle holding the homemade electronics.

[Photo source]

[Thanks Colin]

Kindle 3 Powers This Diy LED Light

ePaper displays are easy on the eyes because there’s no flickering backlight to put strain on them. This is great until you’re trying to read in a dim environment. Of course Amazon will sell you a backlight that’s powered from the reader itself if you’re willing to pay. [Txoof] thought the price was a bit too high so he built his own version.

There are two pockets in the top of the Kindle reader for hooks to grab onto. Each has an electrical contact in it and together they provide about 4V of power. To patch into that source [Txoof] cut his own hooks from brass stock and mounted them onto a piece of basswood. He then cut and bent a hood from more of the brass stock to house the LEDs. A series of three of the white diodes draw their power from the hooks and shine onto to the display. As you can see this works just fine, but could benefit from just the right diffuser.

Fabric Speaker

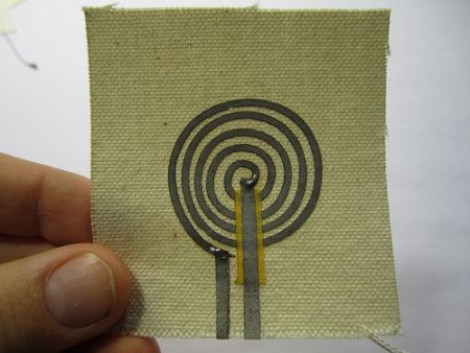
The theory behind speaker operation is pretty simple. There’s a coil that is attached to some type of diaphragm and a permanent magnet. When electrical signals pass through the coil a magnetic field is generated, and that field’s interaction with the permanent magnet causes the diaphragm to vibrate and create sound. But we’ve always assumed that the vibrating material must be stretched tight for this to work. [Hannah Perner-Wilson] proved us wrong by making this speaker out of fabric. It uses conductive tape as the coil on a heavy piece of canvas. The permanent magnet is resting on a table and for the demonstration the fabric is just laid on top.

Check out the video after the break to hear the sounds generated by this device as well as a design that uses conductive thread instead of tape. This gets us wondering if what we’re hearing is the result of the magnet vibrating against the tabletop? Let us know your thoughts, and if you’ve got any information about the paper-backed circuit (seen at 0:04 into the video) driving the speakers we’d love to hear about that too.

Continue reading “Fabric Speaker”

Easy To Build Rig Prevents Reflow Soldering Mishaps

reflow_soldering_rig

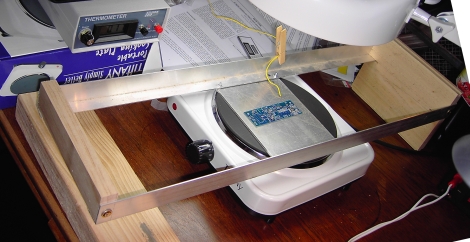
[Erich aka VK5HSE] performs quite a bit of solder reflow work, but has always been concerned about bumping his circuit boards once the solder has liquified and is ready to be removed from the heat source. He says that removing workpieces from toaster ovens often results in the unintentional jarring of a circuit board full of components sitting on molten solder, and he wanted to find a solution.

Using some off-the shelf components from a local hardware store, he built a rig that fits on top of a hot plate, allowing him to move hot circuit boards away from the heat source in a smooth controlled motion. The rig is pretty simple, not only preventing unwanted workpiece movement, but also making it easy to regulate the amount of time a circuit board is allowed to heat.

He suggests that his design is not absolutely ideal, and that it can easily be improved upon in several ways without adding significant cost to the project.