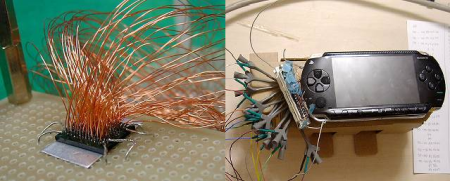
Reverse Engineering The PSP

The original PSP may be old news but there is an interesting relic of a website (translated) dedicated to the reverse engineering of a PSP (and exploring Saturn?). To determine the true capabilities of the PSP they desoldered most of the ball grid array chips and then hand soldered 157 jumper wires to allow for direct memory access. In later pictures it shows the PSP hooked up to external hardware for on the fly memory modification. Unfortunately the details are sparse and it doesn’t appear as if they will be updated anytime soon because the website has been “deleted and freezed because of spam. may ineffaceable curse prevail on the spammers.” Still this doesn’t detract too much some very impressive soldering.
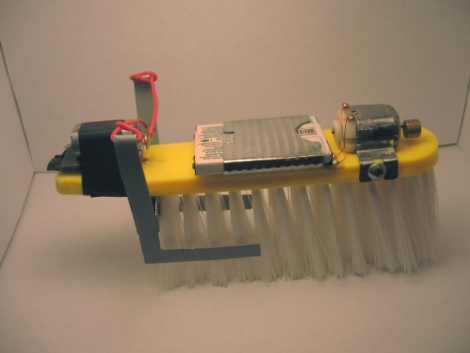
Bristlebot Mod Never Rubs You The Wrong Way

controllable_bristlebot

[Underling] sent in his bristlebot project that aims to put a new spin on controlling bristlebot movement. We have seen several attempts at bristlebot directional control in the past, but none of these methods really fit what he wanted to do. His goal was to use a single brush rather than two, and be able to aim the bot in any direction at will.

He tried several different designs, but settled on what you see in the picture above. The large brush head is fitted with a vibrating motor on the front as well as a cell phone battery near the midsection.  These pieces are placed in the center plane of the brush as to not influence the direction of movement.  A separate servo-like motor is placed on the back of the brush, and each side of the motor’s arm is attached to a paddle that extends down the sides of the brush. When the motor is activated, one paddle is pressed in towards the bristles, while the other paddle is pulled away. This causes an immediate shift in direction, and should provide for a relatively tight turn radius. It should be noted that he also took the time to remove bristles from the center of the brush where the steering paddles are located in order to improve turning performance.

Unfortunately [Underling] does not currently have a video camera with which to show off his work, but we hope to see some action footage in the near future.

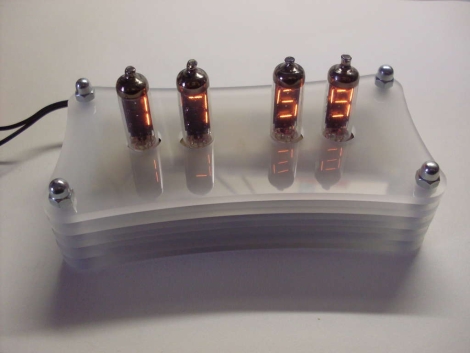
Sleek Numitron Clock Tells The Time And Temperature

numitron_clock

Instructables user [janw] is a big fan of nixie clocks, but he had never built one before. He decided he would rather start small and build a clock using numitron tubes first, before moving to nixies. He preferred the simpler tubes due to their much lower voltage requirements and the fact that he would not have to use any specialized power supply for his project.

His clock serves double-duty, functioning as a thermometer as well. Timekeeping is regulated with a DS12307, and temperature is monitored using a DS18B20 single wire sensor – both of which are pretty common in these sorts of projects. Both are wired to an Atmega48 MCU which serves as the brain of the clock.

The numitrons were mounted in a handsome 5-layer milled acrylate stand with a pair of buttons mounted on the bottom which allow him to set the time. It really is a spectacular looking timepiece, and a great first effort on [janw’s] part.

Be sure to stick around to see a video of the clock in action.

Continue reading “Sleek Numitron Clock Tells The Time And Temperature” →

USB Dongle Hack Tethers DSLR Cameras At A Fraction Of The Price

wireless_usb_grip

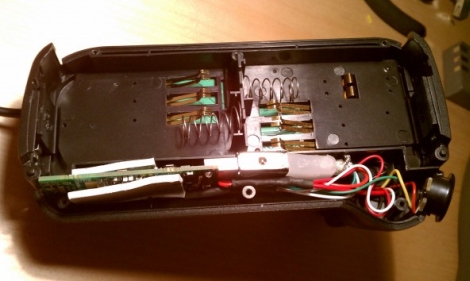
[Neal] wanted to tether his DSLR to his computer, but he wasn’t about to fork out the $1,000 Nikon was asking for their wireless adapter. Instead, he opted to construct his own solution using two separate camera accessories which cost him less than $200 when finished.

The two components he purchased were a wireless USB transmitter/receiver pair and an external battery grip. The battery grip allows him to use a pair of batteries to power his camera, while providing just enough space to wedge in the USB transmitter. He stripped the casing off the transmitter and connected it to a mini USB plug that he wired into the battery grip. He then added a small voltage regulator to step down the Nikon battery voltage from 7.2v to the 5v required by the USB transmitter.

The battery grip and transmitter were then hooked directly into his camera using the weatherproof plug built into the grip. Once he powered on his camera, it was connected to the PC immediately.

It’s amazing how the simplest hacks can save incredible amounts of money.  Nice job!

Be sure to check out the video embedded below to see the wireless adapter in action.

Continue reading “USB Dongle Hack Tethers DSLR Cameras At A Fraction Of The Price” →

Protei: Articulated, Backward Sailing Robots Clean Oil Spills

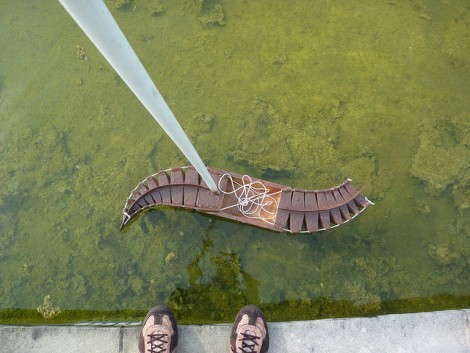
The Protei project aims to develop a robotic solution for oil-spill cleanup. [Cesar Harada] quit what he calls his dream job at MIT to work toward a solution to the ecological disasters that are oil spills. He had previously been working on Seaswarm, a swarm of robots that use conveyor belts of absorbent material to leech oil from seawater. But Protei doesn’t use legions of drones. It aims to use better design to improve the effectiveness of a small number of units.

The whole idea is well described in the video after the break. If a long trailing boom of absorbent material is towed in a serpentine pattern perpendicular to the flow, starting down current and moving upward, it can be quite effective at halting the spread of crude. Initial experiments have shown that a robotic vessel can do this efficiently with just a few improvements. First, to counteract the drag of the tail the rudder of the boat was moved to the bow. Secondly, the hull has been articulated as you can see above. This allows the robot to better utilize wind power to sail, making turns without losing the push of the wind.

The project is raising money through Kickstart as an open hardware project. Let’s hope this becomes a cheap and effective way to fix our costly drilling mishaps. Continue reading “Protei: Articulated, Backward Sailing Robots Clean Oil Spills” →

Personal Soundboard Recounts Years Of Clever One-liners

personal_soundboard

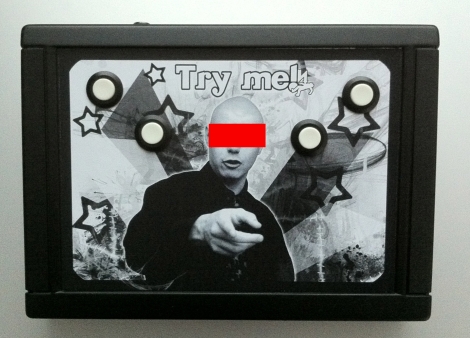
[Antibore’s] friend was just wrapping up his Ph.D. Degree and he wanted to build him something special to commemorate the accomplishment. After thinking about it awhile, he realized that his friend was quite gregarious and known to make off-the-wall comments at parties and such. A ton of these one-liners were documented on video over a span of 10 years, so [Antibore] got the idea to make his friend a soundboard featuring his own witticisms.

He found a breakout board capable of playing back OGG files and got to work loading it up with his friend’s random sayings. The board was connected to a small amplifier and speaker, then everything was installed into a black plastic case. Four arcade-style buttons were mounted on the front of the case, along with a picture of his friend. Up to 16 different sayings can be played, depending on which combination of buttons are being held at a particular time.

It’s sounds like a really cool project, and certainly makes for a one of a kind gift. Currently there is no video or audio of the box in action, but here’s hoping we’ll see some soon.

NBA Hangtime Pinball Display

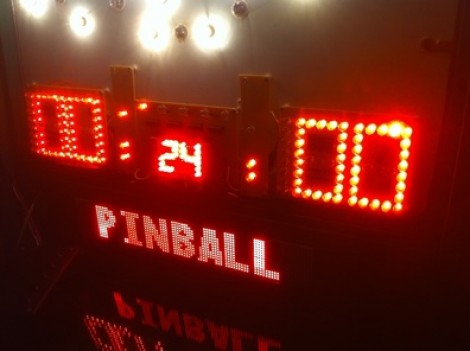
[Ed Zarick] continues work on his NBA Hangtime pinball machine with the completion of the scoreboard and backglass. You should remember this project as we already covered the layer audio he developed for the system. Now he’s proving to be a protoboard master, using point-to-point techniques to build a pair of two and a half digit LED displays for team scores, as well as a shot clock timer and other status indicators.

The lighting board that controls it all is commanded via the i2c protocol, just like the three audio modules. It uses shift registers along with MOSFETs and [Ed] has taken the time to add pin headers and sockets for board interconnects. As is true with the audio system, one Arduino Mega acts as the master on the i2c bus and you’ll notice in the video after the break that the display works in perfect harmony with the sound effects.

We can’t wait to see what he comes up with for the play field!

Continue reading “NBA Hangtime Pinball Display” →