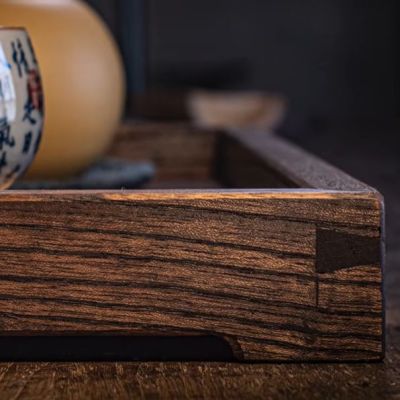
When we hear about flash drives in the context of cybersecurity, we tend to think of them more as threats than as targets. When you’re using flash drives to store encryption keys, however, it makes sense to pay more attention to their security. [Juergen] designed the PECKUS (Presence Enforcing Crypto-Key USB-Storage) with this specifically in mind: a few-kilobyte storage device that only unlocks if the owner’s Bluetooth device is in the vicinity.
[Juergen] needed to store an infrequently-used keyfile on an air-gapped system, and commercial encrypted flash drives were rather expensive and left much to be desired in terms of usability. Instead, he designed a CircuitPython custom firmware for MakerDiary’s nRF52840 micro development kit, which provided a BLE-capable system in the form of a USB dongle.
After flashing the firmware to the board, the user sets it up with a particular Bluetooth device and a file to be stored; after writing the file during setup, it cannot be rewritten. Before reading from the device, the user must pair the previously-set device with the board and press a button on the board, and only then does the device appear to the computer.
The limited amount of storage space means that this device will probably only serve its intended purpose, but in those cases, it’ll be handy to have an open-source and inexpensive protected storage device. [Juergen] notes that attackers could theoretically defeat this system by desoldering the microcontroller from the board and extracting the memory contents from the its storage, but if you have enemies that resourceful, you probably won’t be relying on a $20 board anyways.
We’ve previously seen a few flashdrives cross these pages, including one meant to self-destruct, and one made from a rejected microSD card.
Nerf Blaster Becomes Remote Control Turret
For most of us, turrets that aim and shoot at things are the sole domain of video games. However, they’re remarkably easy to build with modern technology, as [meub] demonstrates. Meet the SwarmTurret.
The build is based around an existing foam blaster, namely the Nerf Swarmfire. This blaster was chosen for being easy to integrate into the build, thanks to its motorized direct-plunger firing mechanism and electronic trigger. It also has the benefit of being far less noisy and quicker to fire than most flywheel blasters.
For this build, the Nerf blaster was slimmed down and fitted to a turret base built with hobby servos and 3D printed components. The blaster is also fitted with a webcam for remote viewing. A Raspberry Pi is running the show, serving up a video feed and allowing aiming commands to be sent via a Websockets-based interface. Thus, you can login via a web browser on your phone or laptop, and fire away at targets to your heart’s content.
We’ve featured some great turrets before, like this Portal-themed unit.
Continue reading “Nerf Blaster Becomes Remote Control Turret”
The Need For Speed?
We wrote up a video about speeding up Arduino code, specifically by avoiding DigitalWrite
. Now, the fact that DigitalWrite
is slow as dirt is long known. Indeed, a quick search pulls up a Hackaday article from 2010 demonstrating that it’s fifty times slower than toggling the pin directly using the native pin registers, but this is still one of those facts that gets periodically rediscovered from generation to generation. How can this be new again?
First off, sometimes you just don’t need the speed. When you’re just blinking LEDs on a human timescale, the general-purpose Arduino functions are good enough. I’ve written loads of useful firmware that fits this description. When the timing requirements aren’t tight, slow as dirt can be fast enough.
But eventually you’ll want to build a project where the old slow-speed pin toggling just won’t cut it. Maybe it’s a large LED matrix, or maybe it’s a motor-control application where the loop time really matters. Or maybe it’s driving something like audio or video that just needs more bits per second. One way out is clever coding, maybe falling back to assembly language primitives, but I would claim that the right way is almost always to use the hardware peripherals that the chipmakers gave you.
For instance, in the end of the video linked above, the hacker wants to drive a large shift register string that’s lighting up an LED matrix. That’s exactly what SPI is for, and coming to this realization makes the project work with timing to spare, and in just a few lines of code. That is the way.
Which brings me to the double-edged sword that the Arduino’s abstraction creates. By abstracting away the chips’ hardware peripherals, it makes code more portable and certainly more accessible to beginners, who don’t want to learn about SPI and I2C and I2S and DMA just yet. But by hiding the inner workings of the chips in “user friendly” libraries, it blinds new users to the useful applications of these same hardware peripherals that clever chip-design engineers have poured their sweat and brains into making do just exactly what we need.
This isn’t really meant to be a rant against Arduino, though. Everyone has to start somewhere, and the abstractions are great for getting your feet wet. And because everything’s open source anyway, nothing stops you from digging deeper into the datasheet. You just have to know that you need to. And that’s why we write up videos like this every five years or so, to show the next crop of new hackers that there’s a lot to gain underneath the abstractions.
Who Needs 100K Speakers When You’ve Got A 3D Printer?
The B&W Nautilus is, depending who you ask, either infamous or an icon of modern design. Want the look but don’t have a hundred grand to spare? [Every Project All at Once] has got a Nautilus-inspired design on printables you can run off for pennies. He also provides a tutorial video (embedded below) so you can follow along with his design process and get build instructions.
The model was done in Blender, and is designed to contain a 3.5″ full-range driver by Dayton Audio — a considerable simplification from the array of woofers and tweeters in the original Nautilus. On the other hand, they cost considerably less than a car and have no production wait list. [Every Project All At Once] is apparently working on a matching woofer if that interests you, but unless he invests in a bigger printer it seems we can safely say that would require more assembly than this project.
Of course it would also be possible to copy B&W’s design directly, rather than print a loose inspiration of it as makers such as [Every Project All At Once] have done, but what’s the fun in that? It’s a much more interesting hack to take an idea and make it your own, as was done here, and then you can share the design without worrying about a luxury brand’s legal team.
Desktop 3D printing offers a wealth of possibilities for would-be speaker makers, including the possibility of rolling your own drivers.
Continue reading “Who Needs 100K Speakers When You’ve Got A 3D Printer?”
LED Matrix Built For M.2 Interface
The M.2 slot is usually used for solid-state storage devices. However, [bitluni] had another fun idea for how to use the interface. He built an M.2 compatible LED matrix that adds a little light to your motherboard.
He then hooked up the serial interface to a CH32V208 microcontroller, which was tasked with driving a 12×20 monochrome LED matrix. Even better, he was even able to set the microcontroller up to make it programmable upon first plugging it into a machine, thanks to its bootloader supporting serial programming out of the box. Some teething issues required rework and modification, but soon enough, [bitluni] had the LEDs blinking with the best of them. He then built a web-based drawing tool that could send artwork over serial direct to the matrix.
While most of us are using our M.2 slots for more traditional devices, it’s neat to see this build leverage them for another use. We could imagine displays like this becoming a neat little add-on to a blingy computer build for those with a slot or two to spare. Meanwhile, if you want to learn more about M.2, we’ve dived into the topic before.
TeensyROM NFC Game Loading On The C64
When retro computing nostalgia meets modern wireless wizardry, you get a near-magical tap-to-load experience. It’ll turn your Commodore 64 into a console-like system, complete with physical game cards. Inspired by TapTo for MiSTer, this latest hack brings NFC magic to real hardware using the TeensyROM. It’s been out there for a while, but it might not have caught your attention as of yet. Developed by [Sensorium] and showcased by YouTuber [StatMat], this project is a tactile, techie love letter to the past.
At the heart of it is the TeensyROM cartridge, which – thanks to some clever firmware modding – now supports reading NFC tags. These are writable NTag215 cards storing the path to game files on the Teensy’s SD card. Tap a tag to the NFC reader, and the TeensyROM boots your game. No need to fumble with LOAD “*”,8,1. That’s not only cool, it’s convenient – especially for retro demo setups.
What truly sets this apart is the reintroduction of physical tokens. Each game lives on its own custom-designed card, styled after PC Engine HuCards or printed with holographic vinyl. It’s a tangible, collectible gimmick that echoes the golden days of floppies and cartridges – but with 2020s tech underneath. Watch it here.
EMF Forming Was A Neat Aerospace Breakthrough
Typically, when we think about forming metal parts, we think about beating them with hammers, or squeezing them with big hydraulic presses. But what if magnets could do the squeezing? As it turns out—Grumman Aerospace discovered they can, several decades ago! Even better, they summed up this technique in a great educational video which we’ve placed below the break.
The video concerns the development of the Grumman EMF Torque Tube. The parts are essentially tubes with gear-like fittings mounted in either end, which are fixed with electromagnetic forming techniques instead of riveting or crimping. Right away, we’re told the key benefits—torque tubes built this way are “stronger, lighter, and more fatigue resistant” than those built with conventional techniques. Grumman used these torque tubes in such famous aircraft as the F-14 Tomcat, highlighting their performance and reliability.
Continue reading “EMF Forming Was A Neat Aerospace Breakthrough”