It’s a simple fact that, in this universe at least, energy is always conserved. For the typical electronic system, this means that the energy put into the system must eventually leave the system. Typically, much of this energy will leave a system as heat, and managing this properly is key to building devices that don’t melt under load. It can be a daunting subject for the uninitiated, but never fear — Adam Zeloof delivered a talk at Supercon 2019 that’s a perfect crash course for beginners in thermodynamics.
Adam’s talk begins by driving home that central rule, that energy in equals energy out. It’s good to keep in the back of one’s mind at all times when designing circuits to avoid nasty, burning surprises. But it’s only the first lesson in a series of many, which serve to give the budding engineer an intuitive understanding of the principles of heat transfer. The aim of the talk is to avoid getting deep into the heavy underlying math, and instead provide simple tools for doing quick, useful approximations.
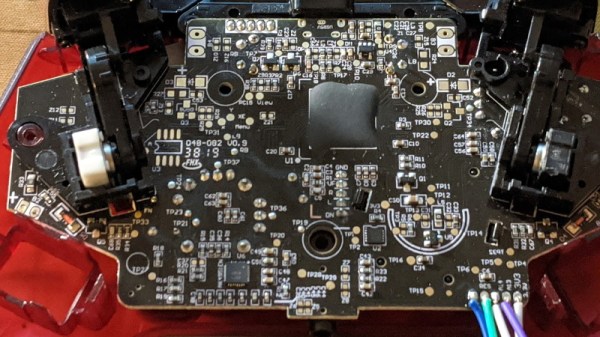
It’s amazing to see how much technology is packed into even the “simple” devices that we take for granted in modern life. Case in point, the third party Xbox controller that [wrongbaud] recently decided to tear into. Not knowing what to expect when he cracked open its crimson red case, inside he found an ARM Cortex microcontroller and a perfect excuse to play around with Serial Wire Debug (SWD).
Though even figuring out that much took a bit of work. As is depressingly common, all the interesting components on the controller’s PCB were locked away behind a black epoxy blob. He had no idea what chip was powering the controller, much less that debugging protocols it might support. But after poking around the board with his multimeter, he eventually found a few test points sitting at 3.3 V which he thought was likely some kind of a programming header. After observing that pulling the line labelled “RES” low reset the controller, he was fairly sure he’d stumbled upon a functional JTAG or SWD connection.
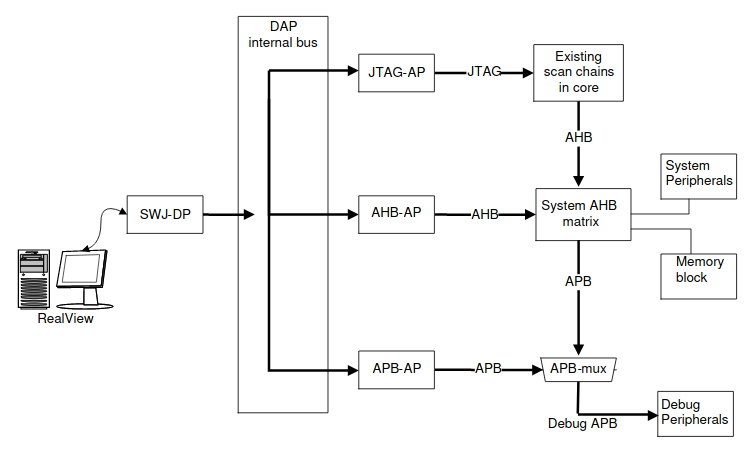
The Serial Wire Debug architecture.
As [wrongbaud] explains in his detailed blog post, SWD is something of a JTAG successor that’s commonly used by ARM hardware. Using just two wires (data and clock), SWD provides hardware debugging capabilities on pin constrained platforms. It allows you to step through instructions, read and write to memory, even dump the firmware and flash something new.
For the rest of the post, [wrongbaud] walks the reader through working with an SWD target. From compiling the latest version of OpenOCD and wiring an FTDI adapter to the port, all the way to navigating through the firmware and unlocking the chip so you can upload your own code.
To prove he’s completely conquered the microcontroller, he ends the post by modifying the USB descriptor strings in the firmware to change what it says when the controller is plugged into the computer. From here, it won’t take much more to get some controller macros like rapid fire implemented; a topic we imagine he’ll be covering in the future.
The exotic cruise destination of Hoek van Holland Haven.
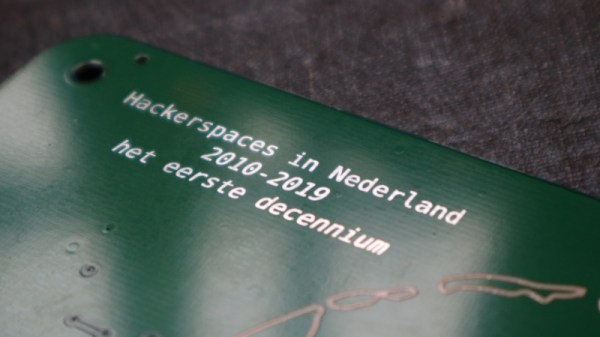
A couple of months ago I wrote a piece about the evolution of hackerspaces, and mentioned that I’d be attending a party for a hackerspace birthday. As I write this that party was last weekend, and it was celebrating both the birthday of RevSpace in the Hague, and the tenth anniversary of hackerspaces in the Netherlands. After a relaxing ocean cruise across the North Sea and a speedy train ride I found myself in RevSpace with a bottle of Club-Mate in my hand, hanging out with not only the locals but a selection of others from all across northwestern Europe and beyond. RevSpace is an exceptionally well-organised hackerspace with a large membership, so there was plenty to talk about and a lot of interesting projects to look at.
There was a short programme of talks in Dutch, covering hackerspace history and interviewing a panel of hackerspace founders. I am told that these may make their way online with an English translation in due course, and should be worth looking out for. Then there was an epic-scale barbecue, an old-school rave with Gameboy chiptunes and analogue synth EDM among other delights, and the chance for an evening’s socialising with the rest of the attendees. Continue reading “Dutch Hackerspaces At Ten Years Old: Celebrating A Community With A Special Map”→
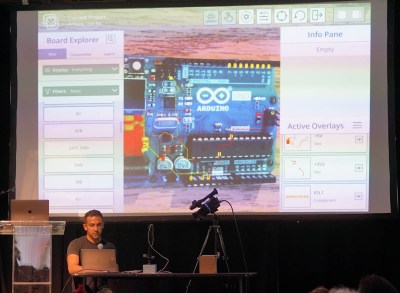
Mihir Shah has designed many a PCB in his time. However, when working through the development process, he grew tired of the messy, antiquated methods of communicating design data with his team. Annotating photos is slow and cumbersome, while sending board design files requires everyone to use the same software and be up to speed. Mihir thinks he has a much better solution by the name of InspectAR, it’s an augmented reality platform that lets you see inside the circuit board and beyond which he demoed during the 2019 Hackaday Superconference.
The InspectAR package makes it easy to visualise signals on the board.
The idea of InspectAR is to use augmented reality to help work with and debug electronics. It’s a powerful suite of tools that enable the live overlay of graphics on a video feed of a circuit board, enabling the user to quickly and effectively trace signals, identify components, and get an idea of what’s what. Usable with a smartphone or a webcam, the aim is to improve collaboration and communication between engineers by giving everyone a tool that can easily show them what’s going on, without requiring everyone involved to run a fully-fledged and expensive electronics design package.
The Supercon talk served to demonstrate some of the capabilities of InspectAR with an Arduino Uno. With a few clicks, different pins and signals can be highlighted on the board as Mihir twirls it between his fingers. Using ground as an example, Mihir first highlights the entire signal. This looks a little messy, with the large ground plane making it difficult to see exactly what’s going on. Using an example of needing a point to attach to for an oscilloscope probe, [Mihir] instead switches to pad-only mode, clearly revealing places where the user can find the signal on bare pads on the PCB. This kind of attention to detail shows the strong usability ethos behind the development of InspectAR, and we can already imagine finding it invaluable when working with unfamiliar boards. There’s also the possibility to highlight different components and display metadata — which should make finding assembly errors a cinch. It could also be useful for quickly bringing up datasheets on relevant chips where necessary.
Obviously, the electronic design space is a fragmented one, with plenty of competing software in the market. Whether you’re an Eagle diehard, Altium fanatic, or a KiCad fan, it’s possible to get things working with InspectAR. Mihir and the team are currently operating out of office space courtesy of Autodesk, who saw the value in the project and have supported its early steps. The software is available free for users to try, with several popular boards available to test. As a party piece for Supercon, our very own Hackaday badge is available if you’d like to give it a spin, along with several Arduino boards, too. We can’t wait to see what comes next, and fully expect to end up using InspectAR ourselves when hacking away at a fresh run of boards!
Dance and house music exploded in a big way at the end of the 1980s. Typically the product of well-equipped studios with samplers and mixers worth thousands of dollars, it was difficult for the home gamer to get involved. That was, until the advent of the glorious Amiga, as [cTrix] ably demonstrates.
Sampling on your Amiga often meant sneaking off with the family hi-fi.
The video explains the history of both the music and the hardware, and highlights just why the Amiga was so special. Packing stereo audio and a four-channel sound chip, it had the grunt to pump out the tunes. All it was lacking was an audio input – which is where third-party hardware stepped in. Parallel-port analog-to-digital converters hit the market in a big way, letting users sample audio on their home computer without breaking the bank.
[cTrix] then proceeds to demonstrate how one would go about producing a dance track on an Amiga way back in 1990. A home stereo is used to play records, hooked up to a Stereo Master parallel port sampler. With a bunch of drum, piano, and synth samples recorded and saved on disk, a tracker is then used to assemble the track. It’s then compared with other music from the era as a great example of how things used to be done.
Overall, the Amiga will long have a legacy as the machine that brought real multimedia capabilities to the home computer. It’s one of our favourites, though keeping them going can be tough sometimes. Video after the break.
[Enddrift] had a real problem trying to run a classic game, Hello Kitty Collection: Miracle Fashion Maker, into a GBA (Gameboy Advance) emulator. During startup, the game would hit an endless loop waiting for a read from a non-existent memory location and thus wouldn’t start under the emulator. The problem is, the game works on real hardware even though that memory doesn’t exist there, either.
To further complicate things, a similar bug exists when loading a saved game under Sonic Pinball Party. Then a hack for Pokemon Emerald surfaced that helped break the case. The story is pretty interesting.
Over the last few years, we’ve seen a steady improvement in the sort of custom hardware a dedicated individual can produce. With affordable desktop 3D printers and PCB fabrication services, the line between store bought and home built can get very blurry. This slick MQTT-connected thermometer created by [Martin Cerny] is a perfect example.
The case for the device, which [Martin] calls Temper, is printed in a stone-look PLA filament and has been carefully designed so that LEDs shining behind it illuminate perfect square “pixels” on the front. There’s a living hinge button on the left side, and on the right, an opening for the SHT30 temperature and humidity sensor. Some may say that the look of the sensor aperture could be improved with a printed grille, but there was likely a concern about reduced airflow.
Inside the case is a 13×7 array of SMD LEDs, a few 74HC595 shift registers, a TP4054 charging chip to keep the internal 250 mAh battery topped off via USB, and some passives to round out the party. The ESP-12E module that brings it all together and the battery are on the flip side of the PCB. At a press of the button, the display fires up for 5 seconds and Temper publishes temperature, humidity and battery percentage through MQTT. If you’re looking for more granular data, it can also be configured to publish regular updates at the cost of increased energy consumption.
The physical product is gorgeous on its own, but we’re happy to report that the firmware and documentation have been handled with a similar attention to detail. The project’s GitHub repo has a Wiki to help others build and configure their very own Temper, and the device’s web configuration portal is easily just as nice as anything you’d find in a piece of modern consumer electronics (if not moreso).
We’ve seen plenty of ESP8266-based environmental monitoring devices here at Hackaday, but we think this one really pushes the state-of-the-art forward. This is a device that wouldn’t be out of place on the shelf at a Big Box electronics retailer, and while [Martin] says he has no interest in building and selling them himself, we don’t doubt that folks out there will be spinning up their own Temper clones before too long.