World Maker Faire: The New Ultimaker

Ult

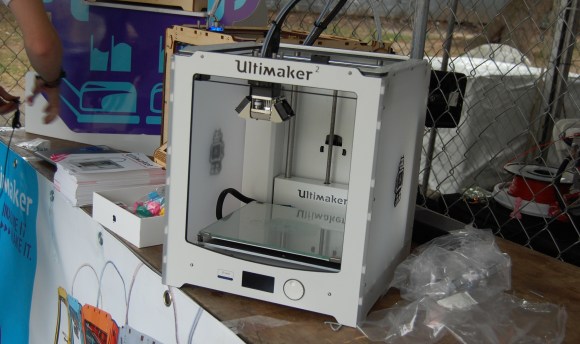
Just as the the gates opened at the World Maker Faire in New York City the skies opened, sending everyone underneath the tents and pavilians on the faire grounds. Luckily, I was able to check out the new Ultimaker before that happened, and only a day after it was officially announced.

Compared to the older laser-cut Ultimaker, the Ultimaker 2 is much, much cleaner that’s made more for designers and architects instead of students, hackerspaces and tinkerers. There are a few new additions to the Ultimaker 2 – OLED display, heated bed, and a larger build volume. Basically, if you want Ultimaker quality without a lot of futzing around, go with the Ultimaker 2.

Ultimaker will be shipping a pre-assembled version for €1.895,00, with a kit version to follow shortly. As always, the Ultimaker 2 is open source, and no, this doesn’t mean an end to the classic Ultimaker.

BeagleBone Black Does CNC With RAMPS

[Bart] Wanted to try controlling a CNC with his BeagleBone black, but didn’t want to invest in a CNC Cape. No problem – he created his own translator board for RAMPSLinuxCNC for the BeagleBone Black has been available for a few months now, and [Bart] wanted to give it a try. He started experimenting with a single stepper motor and driver.  By the time he hooked up step, direction, and motor phases, [Bart] knew he needed a better solution.

Several CNC capes are available for the BeagleBone boards, but [Bart] had a RAMPS board just sitting around, waiting for a new project.  Most RepRap fans have heard of the RAMPS – or Reprap Arduino Mega Pololu Shield.  In fact, we covered them here just a few days ago as part of our 3D Printering series.   RAMPS handle all the I/O needed for 3D printing, which carries over quite nicely to other CNC applications as well.   The downside is that they’re specifically designed for the Arduino Mega series. Continue reading “BeagleBone Black Does CNC With RAMPS”

Accurate Temperature Control Of Your 3D Printer Extruder

[Tim] is working on building a 3D printer and using it as an excuse to learn as much as he can. The first big issue he tackled was accurate temperature control, so he made an interesting write-up on how to characterize the thermal properties of an QU-BD extruder’s hot end and use that information to create a control algorithm for the heater.

The article starts with a basic thermal model and its corresponding formula. [Tim] then runs several tests where he measures the heater and extruder tip temperatures while switching on and off the heater. This allows him to figure out the several model parameters required to design his control algorithm. Finally, he tweaked his formula in order to predict the short term future so he can know when he should activate the heating element. As a result, his temperature is now accurately controlled in the 200°c +/-1°c window that he was shooting for.

RepRap Simpson Puts A New Spin On Delta RepRaps

Just when you think you’ve seen it all in the 3D printer world, something new pops up! [Nicholas Seward] posted a video of RepRap Simpson, his latest project.  Simpson is a delta robot – but unlike any delta we’ve seen before. Previous offerings vertical rails on which the arms travel. As you can see, this design mounts three articulated arms directly to the base of the printer, using steel cables as part of the joint mechanism.

Judging by [Nicholas’] posts on the RepRap forums, Simpson’s grounded delta design has already gone through a few revisions. The basic geometry though, has remained the same. [Nicholas] calls this edition a “Proportional Gear Drive Joint Simpson”. The name may not roll off the tongue, but the movements are incredibly smooth, organic, and fast.

As with any delta design inverse kinematics play a huge role in the software. [Nicholas] is trying to simplify this with an optical calibration system. For the adventurous, the equations are posted on the forums, and a python Gcode preprocessor is posted on Thingiverse.

Even Simpson’s base received special attention.  It’s built from a water jet cut piece of basalt.  We like the use of opposed helical gears on the large joints, as well as the guitar machine heads used to tension the cable drive. One thing we are not sure of is the longevity of system – will cable stretch play an issue? Will the printed parts suffer wear from the cables? Only time will tell.

Continue reading “RepRap Simpson Puts A New Spin On Delta RepRaps”

3D Printering: Alternative Filaments

printering

ABS and PLA are the backbones of the 3D printing world. They’re both easy to obtain and are good enough for most applications. They are not, however, the be-all, end-all filaments for all your 3D printing needs. Depending on your design, you may need something that is much tougher, much more flexible, or simply has a different appearance or texture. Here are a few alternative plastics for your RepRap, Makerbot, or other 3D printer:

Continue reading “3D Printering: Alternative Filaments”

Automatic Tool Changing On A 3D Printer

tool

[Luis] has a pretty interesting project on his hands. He’s using a delta 3D printer to plate a few edibles – yogurt, chocolate, and other thick liquids. Because he intends to use actual plates as the build surface, calibration is key. One solution to this problem would be to use identical, pre-measured plates for everything this printer makes. [Luis]’ solution is much more ingenious than that, however. He’s programmed his printer to automatically swap out two tools – one for probing the build surface, and another to extrude liquids.

The two tools are suspended from the body of the printer, and with a little bit of software it’s possible for them to be picked up by the head of the printer and held in place with a few magnets. After auto leveling the build surface in software, a G Code command switches the tools over to a paste extruder for all those delicious edibles.

If an automated tool changer isn’t enough, [Luis] has also completed a very nice 3D printed peristaltic pump to squirt out foodstuffs. You can check out a video of this printer in action below.

Continue reading “Automatic Tool Changing On A 3D Printer”

3D Printed Injection Molds

A team at Budapest University has successfully created a functional injection mold for prototyping by using a Stratasys 3D printer.

Prototype injection molds are expensive. They are typically machined out of steel or aluminum which is both costly and time consuming, due to the complex geometries of most molds. [Dr. Jozsef Gabor Kovacs] works in the Department of Polymer Engineering at Budapest University, which is where he came up with the innovative approach of using 3D printing to produce a prototype mold.

The mold was printed in Digital ABS PolyJet Photopolymer plastic using a Objet Connex 3D printer. The injection material used was polyacetal; which has a fairly low melting point of 175°C. By using this method they were able to go from a prototype mold to a test part in less than 24 hours. We don’t even want to think about how expensive that would be to expedite from a machine shop.

After the break you can watch the entire production process from printing to molding.

Continue reading “3D Printed Injection Molds”