Air-powered Gripper Design Makes Them Easy To Produce

air-powered-gripper

This invertebrate gripper uses air pressure to grab onto objects. The secret is all in the design. But you don’t have to reinvent the wheel. If you’ve got a 3D printer you can follow this guide to make your own.

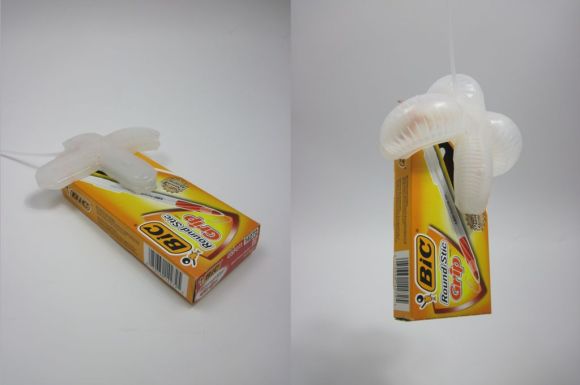
The gripper is made of silicone. The trick is in designing an inner structure that deforms in one direction when pressurized. To make one or one hundred, simply download the design files and 3D print a mold. The process from there is much like the silicone band prototyping process we looked at back in March. The two-part silicone is mixed and poured in the mold. You also need to pour some on a flat surface. We were under the impression that uncured silicone would not stick to cured silicone but we were wrong. The two parts are glued together with a fresh batch of the mix. After everything has set up you can pierce the bladder with a hose in order to inject air.

Below you can see the star-shaped version being tested. There’s also a Harvard research video which shows a similar design lifting an egg.

Continue reading “Air-powered Gripper Design Makes Them Easy To Produce”

Easily 3D Print Mesh Screens

easy-way-to-3d-print-mesh-screens

If you need a way to make openings in your project enclosures look nice just head on over to the 3D printer. In the image above [Alfred] is showing off the result of his Slic3r hack for printing mesh grills.

It’s important to note that you need to make sure you’re using Slic3r version 0.9.8. This won’t work with newer versions because starting with 0.9.9 the software will add a raft to the bottom of your design.

The grill can be in any shape you desire. It starts by modelling this outline, then extruding the edges downward the same distance as your desired mesh thickness. After importing the design file into Slic3r [Alfred] uses the support material settings to choose this honeycomb design. He then sets the fill density to zero. This means the design will not be printed at all, only the fill material, resulting in these honeycomb screens.

Slic3r’s a fantastic piece of software. Check out this interview with Slic3r’s lead developer.

An Interview With [David] Of Ultimaker

cura

After interviewing the creator of Slic3r and the folks at Shapeways, [Andrew] is back again with his adventures in 3D printer videography and an interview with [David Braam] of Ultimaker

About a year ago, [David] looked at the state of the art in 3D printer control and Replicator G. While Replicator G, along with Pronterface and Repetier-Host both convert 3D models into G-code files as well as control the printer while its squeezing plastic out onto a bed. [David] thought the current state of these RepRap host programs were janky at best, and certainly not the best user experience for any home fabricator. This lead him to create Cura, a very slick and vastly improved piece of host software for the Ultimaker.

Cura isn’t just a fancy front end on an already existing slicer engine; [David] created his own slicing algorithm to turn .STL files into G-code that’s immensely faster than skeinforge. Where skeinforge could take an hour to slice a complex model, Cura does the same job in minutes.

There are also a bunch of cool features available in Cura: you can rotate any part before sending it to the printer, as well as pulling voxels directly from your Minecraft world and sending them to your printer. Very, very cool stuff, and if you’re running a Ultimaker or any other RepRap, you might want to check it out.

Continue reading “An Interview With [David] Of Ultimaker”

Using Electrical Conduit For A 3D Printer Frame

electrical-conduit-for-cnc-frame

We’re always on the lookout for parts that can be source locally and that don’t cost a bundle. This hack fits both of those criteria. [Lee Miller] came up with a way to use steel electrical conduit as a 3D printer frame. He recently finished building the device seen above, and has been showing it off at Solid State Depot, a Hackerspace in Boulder, Colorado where he is a member.

Look closely at the corners of the frame in this image and you’ll see the 3D printed parts that make up the clamping mechanism. Each has three components that screw together. The two gaps in between each have a rubber ‘O’ ring. When the plastic clamps are screwed together they squeeze the rings which hold the electrical conduit firmly. This also has the side benefit of dampening vibrations.

It’s certainly easy to find this type of conduit which is sold at every home store (and most hardware stores). Just make sure that you check that a piece is straight when you pick it out. The SCAD files for the parts are available from his Github repo.

Continue reading “Using Electrical Conduit For A 3D Printer Frame”

3D Printed Hand-cranked Digital Computer

What a beautiful thing it is to see this digital computer in action. [Chris Fenton] did an amazing job of designing and printing this mechanical digital computer. If you’re interested in one to call your own check out the source files he published this week.

[Chris’] design inspiration came from some research into Victorian Era mechanical looms. He adjusted the concept to build a punch card reader, starting with a capacity of three holes and moving to this design which can read ten holes. It provides just enough bits to address all three of the counters pictured above. Program the computer by inserting a punch card that is the size of a business card and crank away. The video below shows the process from afar… hopefully he’ll post a follow-up video with closer views of each piece in action.

This isn’t his first basic computing machine. Check out the electromechanical version from last year.

Continue reading “3D Printed Hand-cranked Digital Computer”

An Interview With Shapeways

shape

It seems [Andrew] is an up and coming historian for the world of 3D printing. We’ve seen him interview the creator of Slic3r, but this time around he’s headed over to Eindhoven, Netherlands to interview the community manager for Shapeways, [Bart Veldhuizen].

Unlike the RepRaps, Ultimkers, and Makerbots, Shapeways is an entirely different ecosystem of 3D printing. Instead of building a machine that requires many hours of tinkering, you can just upload a model and have a physical representation delivered to your door in a week. You can also upload objects for others to buy. Despite these competing philosophies, [Bart] doesn’t see Shapeways as encroaching on the homebrew 3D printers out there; they serve different markets, and competition is always good.

Unfortunately, [Andrew] wasn’t allowed to film on the Shapeways factory floor. Proprietary stuff and whatnot, as well as a few certain ‘key words’ that will speed your customer support request up to the top of the queue.

As for how Shapeways actually produces hundreds of objects a day, [Andrew] learned that individual orders are made in batches, with several customer’s parts made in a single run. While most of the parts made by Shapeways are manufactured in-house, they do outsource silver casting after making the preliminary positive mold.

As for the future, a lot of customers are asking about mixed media, with plastic/nylon combined with metal being at the top of the list. It’s difficult to say what the future of 3D printing will be, but [Bart] makes an allusion to cell phones from 10 years ago. In 2003, nobody had smartphones, and now we have an always-on wireless Internet connection in our pockets. Given the same rate of technological progress, we can’t wait to see what 3D printing will be like in 10 years, either.

60,000 RPM Vacuum Powered Rotary Tool Was 3D Printed

vacuum-powered-rotary-tool

The whining of the turbines in the 3D printed pneumatic rotary tool might make your teeth hurt. When [Axodus] tipped us off about it he mentioned it sounded like a 747 taking off. But we hear a dentist’s drill when watching the demo video.

[Richard Macfarlane] published his design if you want to try building one for yourself. But you will need to do some machining in addition to printing the enclosure and the pair of turbines. The shaft of the tool needs to fit the bearings precisely. It accepts a center blue spacer with a red turbine on either side. This assembly is encapsulated in the two-part threaded blue body which has a flange to friction fit with the shop vacuum hose. The business end of the machined shaft was designed and threaded to accept the collet from a Dremel or similar rotary tool.

We wonder how much work it would be to re-engineer this to act as a PCB drill press?

Continue reading “60,000 RPM Vacuum Powered Rotary Tool Was 3D Printed”