There’s an old saying about something being a “drop in the ocean.” That’s how I felt faced with the prospect of replacing a 12 V heated bed on my printer with a new 24 V one. The old bed had a nice connector assembled from the factory, although I had replaced the cable long ago due to heating issues with that particular printer. The new bed, however, just had bare copper pads.
I’m no soldering novice: I made my first solder joint sometime in the early 1970s. So I felt up to the challenge, but I also knew I wouldn’t be able to use my usual Edsyn iron for a job like this. Since the heated bed is essentially a giant heatsink for these pads, I knew it would require the big guns. I dug out my old — and I mean super old — Weller 140 W soldering gun. Surely, that would do the trick, right?
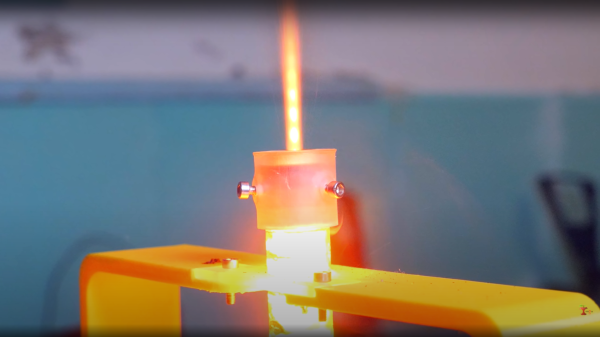
[Integza] is on a mission to find as many ways as possible to build rockets and other engines using 3D printing and other accessible manufacturing techniques. He had an a great idea – is it possible to 3D print a solid fuelled rocket, (video, embedded below) specifically can you 3D print the rocket grain itself? By using the resin as a fuel and mixing in a potent oxidiser (ammonium perchlorate specifically – thanks for the tip NASA!) he has some, erm, mixed success.
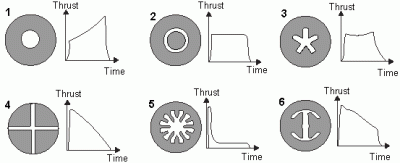
Effective thrust vs grain cross-sectional profile
As many of us (ahem, I mean you) can attest to, when in the throes of amateur solid-propellant rocket engine experimentation (just speaking theoretically, you understand) it’s not an easy task to balance the thrust over time and keep the combustion pressure within bounds of the enclosure’s capability. Once you’ve cracked making and securing a nozzle within the combustion chamber, the easiest task is to get control of the fuel/oxidiser/binder (called the fuel grain) ratio, particle size and cast the mixture into a solid, dry mass inside. The hard part is designing and controlling the shape of the grain, such that as the surface of the grain burns, the actively burning surface area remains pretty constant over time. A simple cylindrical hole would obviously increase in diameter over time, increasing the burning surface area, and causing the burn rate and resulting pressure to constantly increase. This is bad news. Various internal profiles have been tested, but most common these days is a multi-pointed star shape, which when used with inhibitor compounds mixed in the grain, allows the thrust to be accurately controlled.
[Integza] tried a few experiments to determine the most appropriate fuel/binder/oxidiser ratio, then 3D printed a few fuel grain pellets, rammed them into an acrylic tube combustion chamber (obviously) and attached a 3D printed nozzle. You can see for yourself the mach diamonds in the exhaust plume (which is nice) due to the supersonic flow being marginally over-expanded. Ideally the nozzle wouldn’t be made from plastic, but it only needs to survive a couple of seconds, so that’s not really an issue here.
The question of whether 3D printed fuel grains are viable was posed on space stack exchange a few years ago, which was an interesting read.
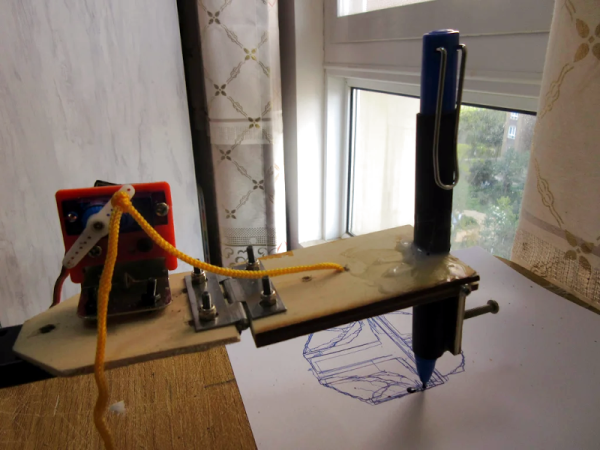
Although the widespread use of 3D printers has made things like linear bearings and leadscrews more common, you still can’t run down to your local big-box hardware store and get them. However, you can get drawer slides and any hobby shop can sell you some RC servos. That and an Arduino can make a simple and easy plotter. Just ask [JimRD]. You can also watch it do its thing in the video below.
Of course, servos aren’t usually what you use in a plotter. But the slides convert the rotation of the servo into linear motion. One servo for X and one for Y is all you need. Another microservo lifts the pen up and down using a hinge you could also get from a hardware store.
USB cables inevitably fail and sometimes one end is reincarnated to power our solderless breadboards. Of course, if the cable broke once, it is waiting to crap out again. Too many have flimsy conductors that cannot withstand any torque and buckle when you push them into a socket. [PROSCH] has a superior answer that only takes a couple of minutes to print and up-cycles a pair of wires with DuPont connectors. The metal tips become the leads and the plastic sheathing aligns with the rim.
The model prints with a clear plus sign on the positive terminal, so you don’t have to worry about sending the wrong polarity, and it shouldn’t be difficult to add your own features, like a hoop for pulling it out, or an indicator LED and resistor. We’d like to see one with a tiny fuse holder.
In an ideal world, your FDM 3D printer’s bed would be perfectly parallel with the print head’s plane of movement. We usually say that means the bed is “level”, but really it doesn’t matter if it is level in the traditional sense, as long as the head and the bed are the same distance apart at every point. Of course, in practice nothing is perfect.
The second best situation is when the bed is perfectly flat, but tilted relative to the print head. Even though this isn’t ideal, software can move the print head up and down in a linear fashion to compensate for the tilt. Things are significantly worse if the bed isn’t itself flat, and has irregular bumps up and down all over.
To combat that, some printer firmware supports probing the bed to determine its shape, and adjusts the print head up and down as it travels across the map. Of course, you can’t probe the bed at every possible point, so the printer will have to interpolate between the measured reference points. Marlin’s bilinear bed leveling is an example.
But if you have enough flash space and you use Marlin, you may want to try unified bed leveling (UBL). This is like bilinear leveling on steroids. Unfortunately, the documentation for this mode is not as plain as you might like. Everything is out there, but it is hard to get started and information is scattered around a few pages and videos. Let’s fix that.
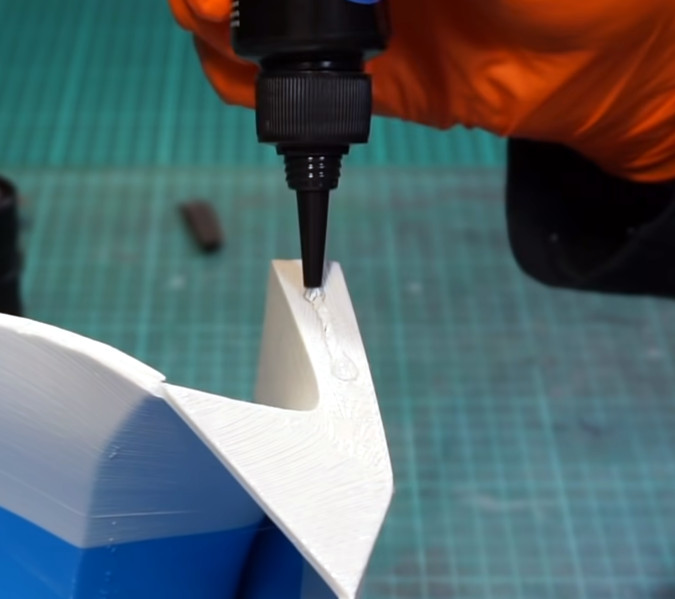
At this point, everyone knows that the print quality you’ll get from even an entry level UV resin printer far exceeds what’s possible for filament-based fused deposition modeling (FDM) machines. But there’s a trade-off: for the money, you get way more build volume by going with FDM. So until the logistics of large-format resin printers gets worked out, folks looking to make things like replica prop helmets have no choice but to put considerable time into post-processing their prints to remove the obvious layer lines.
But thanks to this somewhat ironic trick demonstrated by [PropsNstuff], you can actually use UV resin to improve the finish quality of your FDM prints. The idea is to put a layer of resin over the layer lines and other imperfections of the 3D print, cure it with a handheld UV flashlight, and then sand it smooth. Essentially it’s like using resin in place of a body filler like Bondo, with the advantage here being that the resin cures in seconds.
With the tough spots addressed, he then moves on to coating larger areas with resin. But this time, he mixes leftover resin from his SLA printer with talcum powder to make a mix that can be brushed on without running everywhere. It takes a few thin coats, but with this mix, he’s able to build up large swaths of the print without losing any surface detail.
Is it still a hassle? Absolutely. But the final result does look spectacular, so until we figure out how to build the replicators from Star Trek, it looks like we’ll have to make up for our technological shortcomings with the application of a little elbow grease.
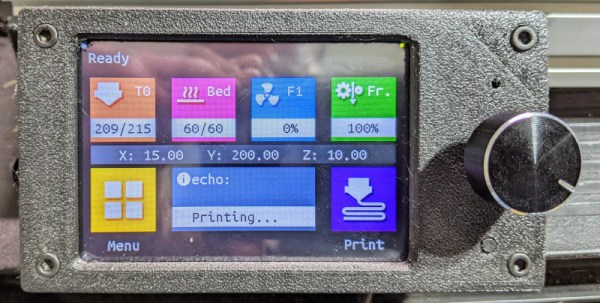
I was rebuilding one of my 3D printers — again — and decided I needed a display upgrade. A color screen is nice, but there are some limitations. I also found there are ways around these limitations, so I wanted to share my thoughts on a dual-mode color touch screen LCD controller for your 3D printer. The screen in question is a TFT35 from BigTree Tech. It is similar to an MKS screen, but it can operate in two different modes, as you will see.
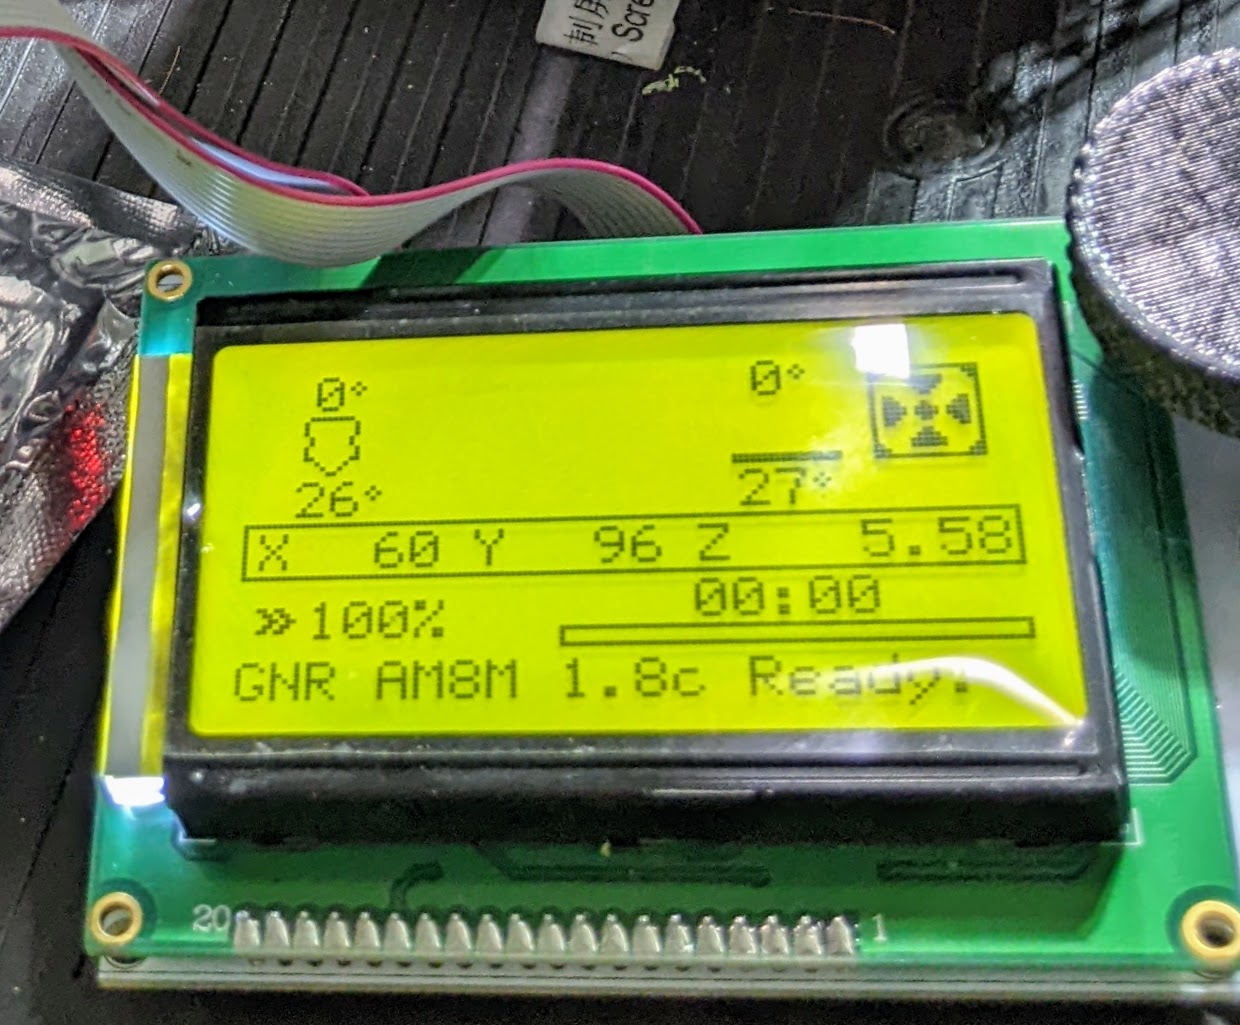
The more-or-less standard display for Marlin.
A few years ago, I picked up an Anet A8 which was very inexpensive, especially on sale. Not the best printer, though, because it has that cheap acrylic frame. No problem. A box full of aluminum extrusion later, the printer was reborn. Over time, I’ve completely reworked the extrusion system and the Y-axis, leaving only the motors, bearings, and the controller/display as the original.
That last part was what bothered me. The Anet board is actually pretty capable for a small cheap board. But it is just what the printer needs and nothing more. If you wanted to hack the printer there was very little memory left and only one spare pin for I/O. So it was time to replace the board and why not the controller, too?
The A8 has an LCD2004. That means it has a 20×4 LCD. Instead of an encoder knob, there are five buttons: basically up, down, left, right, and enter. Most printers now have an LCD12864 which, as you can probably guess, is a 128×64 LCD and they use an encoder knob for direction that you can push for the enter key.

![USB to Dupont adapter by [PROSCH]](https://hackaday.com/wp-content/uploads/2022/01/2022-01-01-USB-to-DuPont-adapter-feat.jpg?w=600&h=450)