We’ve seen all sorts of 3D-printers on these pages before. From the small to the large, Cartesians and deltas, and printers that can squeeze out plastic, metal, and even concrete. But this appears to be the first time we’ve ever featured a paper-pulp extruding 3D-printer.
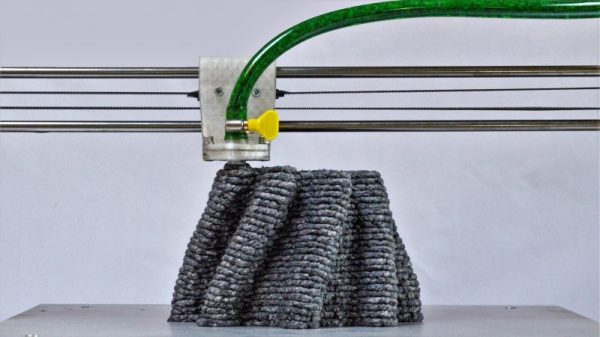
It’s fair to ask why the world would need such a thing, and its creator, [Beer Holthuis], has an obvious answer: the world has a lot of waste paper. Like 80 kg per person per year. Thankfully at least some of that is recycled, but that still leaves a lot of raw material that [Beer] wanted to put to work. Build details on the printer are sparse, but from the photos and the video below it seems clear how it all went together. A simple X-Y-Z gantry moves a nozzle over the build platform. The nozzle, an order of magnitude or two larger than the nozzles most of us are used to, is connected to an extruder by a plastic hose. The extruder appears to be tube with a stepper-driven screw that lowers a ram down onto the pulp, squeezing it into the hose. [Beer] notes that the pulp is mixed with a bit of “natural binder” to allow the extruded pulp to keep its shape. We found the extrusion process to be just a wee bit repulsive to watch, but fascinating nonetheless, and the items he’s creating are certainly striking in appearance.
This may be the first pulp printer to grace our pages, but it’s not the first pulp hack we’ve featured. Pulp turns out to be a great material to keep your neighbors happy and even makes a dandy fuel.
Continue reading “3D-Printer Extrudes Paper Pulp Instead Of Plastic”