Hackaday Links: March 6, 2016

There’s the R2 Builders Club, hundreds of people are building BB-8, but there are a few robots that don’t get enough love from the amateur propsmiths. [Kenneth] just finished up his build of Crow from MST3K. He built Tom Servo a year or so ago and K-9 from Doctor Who. The beautiful thing about building MST3K robots and Doctor Who props is that you’re probably working with a larger budget than the prop department had.

Heathkit’s new website is up. The two products we know about so far – an AM radio kit and a slim jim antenna – can only be described as, ‘meh.’ Still, there are a few upgrades for old kits available and the requisite amount of nostalgia.

On today’s issue of, ‘should not be attempted by anyone, ever, under any circumstance’ here’s how to build a table saw at home. Yes, it’s a table saw built from a piece of aluminum, styrofoam, hot glue, and a shoe box. The guy really botched it by not going for the zero clearance insert here, but at least the fence is only a few dozen degrees off parallel with the blade.

[Mathieu] is working on a Mooltipass Mini. It’s tiny and the scroll wheel thingy makes things fun.

March 18th through March 20th is the Midwest RepRap Festival in Goshen, Indiana. This is, by far, the best conference, meetup, or festival we go to year after year. We’ll have a few members of the Hackaday crew at the event, and rumor has it the Internet has made it to Indiana this year.

Adafruit got a writeup in the New Yorker. The article is technically about the art of PCB design, but as with most general interest pieces on electronics it is awash in non sequiturs and simply defining the terminology.

[Oscar] built a miniature replica of a blinkenlight computer last year for the Hackaday Prize. This was the PiDP-8/I. While it looks awesome, the PDP-8/I is inherently limited. [Oscar] has his design methodology down, and now he’s working on a miniature replica of the king of the PDPs. It’s the PiDP-11/27. It’s just a prototype and render now, but the finished project will have custom switches, a handsome bezel, and will be much more capable.

MAME is now FOSS. That’s great news, but think about the amount of work that went into making this happen. MAME is 19 years old, and  that means everyone who has contributed to the project over the years needed to sign off on this initiative.

Fail Of The Week: Battery Pack Jack Wired Backwards

Last Saturday I had a team of teenage hackers over to build Arduino line-following robots from a kit. Everything went well with the mechanical assembly and putting all the wires on the correct pins. The first test was to check that the motors were moving in the proper direction. I’d written an Arduino program to test this. The first boy’s robot worked fine except for swapping one set of motor leads. That was anticipated because you cannot be totally sure ahead of time which way the motors are going to run.

The motor’s on the second robot didn’t turn at all. As I checked the wiring I smelled the dreaded hot electronics smell but I didn’t see any smoke. I quickly pulled the battery jack from the Arduino and – WOW! – the wires were hot. That didn’t bode well. I checked and the batteries were in the right way. A comparison with another pack showed the wires going into the pack were positioned properly. I plugged in another pack but the motors still didn’t run.

I got my multimeter, checked the voltage on the jack, and it was -5.97 V from center connector to the barrel. The other pack read 6.2 V. I had a spare board and pack so swapped those and the robot worked fine. Clearly the reverse polarity had zapped the motor control ICs. After that everyone had a good time running the robots on a course I’d laid out and went home pleased with their robots.

After they left I used the ohmmeter to check the battery pack and found the wiring was backwards, as you can see in the feature photo. A close inspection showed the wire with a white line, typically indicating positive, indeed went to the positive battery terminal. I shaved the barrel connector down to the wires and the white line wire was connected to the outside of the barrel. FAIL!

This is a particularly bad fail on the part of the battery pack supplier because how hard is it to mess up two wires? You can’t really fault the robot kit vendor because who would expect a battery pack to be bad? The vendor is sending me a new battery pack and board so I’m satisfied. Why did I have an extra board and pack, actually an entire kit? For this exact reason; something was bound to go wrong. Although what I had imagined was for one of the students to break a mechanical part or change wiring and zap something. Instead, we were faced with a self-destructing kit. Prudence paid off.

Hacklet 98 – Underwater ROVs

A few motors, propellers, a camera, maybe a wire tether, and some waterproof electronics. Throw it all together and baby you’ve got an underwater Remotely Operated Vehicle (ROV) cooking! It all sounds simple on the surface, but underwater ROVs are a tough challenge. We’ve all seen deep-sea ROVs searching the wreck of the Titanic, or working to stop the flow of oil below the Deepwater Horizon. Plenty of hackers, makers, and engineers have been inspired to build their own underwater ROVs. This week on the Hacklet, we’re spotlighting at some of the best ROV projects on Hackaday.io!

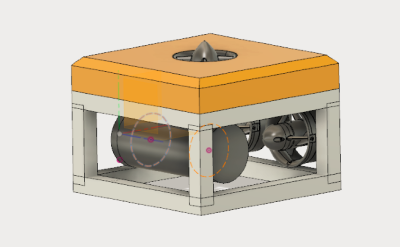
borgcubeWe start with [Tim Wilkinson] and BorgCube ROV. [Tim] has jumped into the world of underwater ROVs with both feet. BorgCube is designed to operate in the unforgiving salt waters of the Pacific Ocean. This ROV can see in stereo, as [Tim] plans to use a head mounted VR display like the Oculus Rift to control it. [Tim] wanted to use a Raspberry Pi as the brains of this robot. Since the Pi Compute module can handle two cameras, it was a natural fit. The electronic speed controls are all low-cost Hobby King R/C car units. [Tim] created a custom circuit board to hold all 12 ESCs. This modular design allows individual controllers to be swapped out if one meets an untimely doom. BorgCube is just getting wet, but with 37 project logs and counting, we’re sure [Tim] will keep us posted on all the latest action!


lunaNext up is [MrCullDog] with Luna I ROV. Inspired by a professional underwater ROV, [MrCullDog] decided to build a deep diving unmanned vehicle of his very own. Like BorgCube above, many of Luna I’s motors and drive components come from radio controlled hobby electronics. [MrCullDog] is bringing some 3D printed parts into the mix as well. He’s already shown off some incredibly well modeled and printed thruster mounts and ducts. The brains of this robot will be an Arduino. Control is via wired Ethernet tether. [MrCullDog] is just getting started on this project, so click the follow button to see updates in your Hackaday.io Feed.

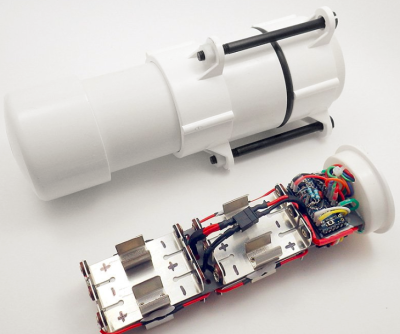
cavepearlNext up is [Edward Mallon] with The Cave Pearl Project. Not every underwater system needs motors – or even a human watching over it. The Cave Pearl Project is a series of long duration underwater data loggers which measure sea conditions like temperature and water flow. [Edward’s] goal is to have a device which can run for a year on just three AA batteries. An Arduino Pro Mini captures data from the sensors, time stamps it, and stores it to a micro SD card. If the PVC pipe enclosure keeps everything dry, the data will be waiting for [Edward] to collect months later. [Edward] isn’t just testing in a swimming pool, he’s been refining his designs in open water for a couple of years now.

 

If you want to see more under (and above) water projects, check out our updated waterborne projects list! If I missed your project, don’t be shy! Just drop me a message on Hackaday.io. That’s it for this week’s Hacklet. As always, see you next week. Same hack time, same hack channel, bringing you the best of Hackaday.io!

Materials To Know: Acetal And Delrin

Delrin, Acetal, and its many trade names is a material properly known as Polyoxymethylene or POM. It is one of the strongest plastics and is a good go-to material when you want the best properties of plastic, and don’t need the full strength of a metal part. It was originally formulated to compete with Zinc and Aluminum castings after all.

I won’t go too deep into the numbers behind POM. If you need the Young’s Modulus, you probably don’t need this guide. This is intended to be more of a guide to its general properties. When you’re looking for something to fit an application it is usually easier to shift through the surface properties to select a few candidates, and then break the calculator out later to make sure it will work if you’re uncertain about the factor of safety.

The most popular property of POM is its ease of machining. While doing this research every single site I came across referred to it as the most machinable plastic. That’s about as objective as subjective praise can get. It doesn’t tend to grab tools like, for example, HDPE. It also chips nicely unlike UHMW and Nylon. Some plastics, like UHMW, have the unfortunate tendency to render the dials on a mill or lathe meaningless as the plastic deflects away from the tool. POM does not do this as much. Of course these other plastics have their strengths as well, but if any plastic will do, and you’re machining, POM is a very good choice.

Continue reading “Materials To Know: Acetal And Delrin”

Transforming Spice

Spice is a circuit simulator that you should have in your toolbox. While a simulator can’t tell you everything, it will often give you valuable insight into the way your circuit behaves, before you’ve even built it. In the first installment of this three-part series, I looked at LTSpice and did a quick video walkthrough of a DC circuit. In the second, I examined two other parts of Spice: parameter sweeps and AC circuits. In this final installment, I want to talk a bit more about real-world component performance and also look at modeling transformers.

Recap

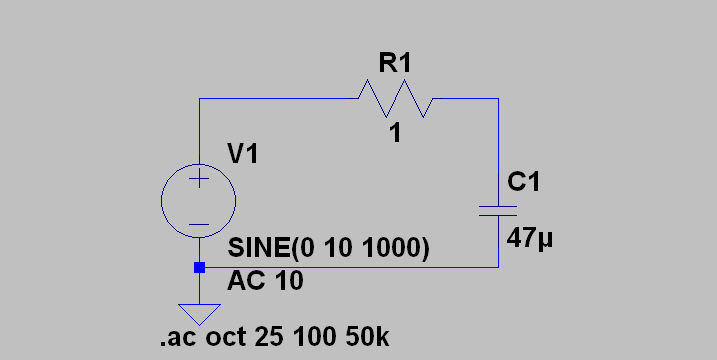
lowpasssLast time we looked at a low pass filter, but it wasn’t practical because the components were too perfect. Only in simulation do voltage sources and wires have zero resistance. There was no load resistance either, which is unlikely. Even an oscilloscope probe will load the circuit a little.

The resulting AC analysis showed a nice filter response that was flat to about 1 kHz and then started roll off as the frequency increased. Suppose the source had an 8 ohm series resistor. How does that change the circuit response?

Continue reading “Transforming Spice”

Spice Power

Spice is a circuit simulator that you should have in your toolbox. While a simulator can’t tell you everything, it will often give you valuable insight into the way your circuit behaves, before you’ve even built it. In the first installment of this three-part series, I looked at LTSpice and did a quick video walkthrough of a DC circuit. This time, I want to examine two other parts of Spice: parameter sweeps and AC circuits. So let’s get to it.

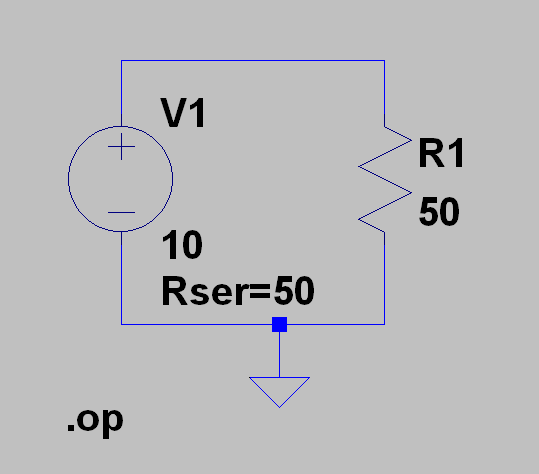
schem2In the first installment, I left you with a cliffhanger. Namely the question of maximum power transfer using this simple circuit. If you run the .op simulation you’ll get this result:

--- Operating Point ---
V(n001): 5 voltage
I(R1): 0.1 device_current
I(V1): -0.1 device_current

The power in R1 (voltage times current) is .5 W or 500 mW if you prefer. You probably know that the maximum power in a load occurs when the load resistor is the same as the source resistance. The Rser parameter sets the voltage source’s internal resistance. You could also have created a new resistor in series with V1 and set it explicitly.

Continue reading “Spice Power”

Hackaday Links: Leap Eve, 2016

The current Mac Pro is a masterpiece of design that looks like a trash can. We’ve been waiting for someone to take one of these computers and stuff a MiniITX board in there, but seeing as how the Mac Pro costs $3000, that probably won’t happen anytime soon. Here’s the solution. It’s a trash can computer case that is also too expensive for what it is. Now all we need is someone to put a big fan inside one and turn this computer into a wacky waving inflatable arm flailing tube man.

[Mike Harrison] recently got his hands on a $20,000 SPARC CPU module. This is an enormously thick board that must be dozens of layers thick. How many layers was an open question until he put the board in a CNC milling machine. The setup is pretty much what you would expect with a few lines of g-code repeated over and over. The real trick comes from using one of the outputs for lubricant to trigger the shutter release on a camera. How many layers were in the CPU module? About 30, or something like that.

Almost a year ago, we saw the latest advances in perfboard. It was a perfboard with each hole connected to rows and columns on a selectively solderable orthogonal busses. Something like that. Actually, we still can’t wrap our head around it. Now, it’s a crowdfunding campaign with a few new and useful features. There’s also a layout tool that will show you where to place your components and where to make solder bridges.

[Ray Wilson] started Music From Outer Spacethe place to learn about DIY analog synthesizers. Ray now has cancer, and as you can imagine, being a self-employed engineer specializing in analog synthesizers doesn’t provide great health coverage. [Ray]’s family set up a GoFundMe page to pay for the medical expenses.

We haven’t seen much in the land of 3D scanners, and we’re betting most of that is because they’re so expensive. The guys from CowTech have a kickstarter up for a 3D scanner that’s just $99. It’s based on the Ciclop scanner but designed around a custom Arduino shield and remains fully open source.

Remember the screen printed electroluminescent displays that were printed directly onto t-shirts from a few months ago? Now that company is working on a much cooler design: the Hackaday Jolly Wrencher. It works, but there are still a few problems: they’re setting the shirt on fire a little. Don’t worry, if these are ever reasonably safe and somewhat affordable, an EL Jolly Wrencher shirt will be in the Hackaday Store.

Need a rechargeable multimeter? It’s actually pretty easy. With an 18650 Lithium Ion cell and a 9V boost converter, this circuit will fit in most devices that need a 9V battery. To do this right, you’ll also need a USB charging port, to be used once every couple of years when the battery needs charging.