A Toe-Tappin’ Set Of Morse Code Pedals

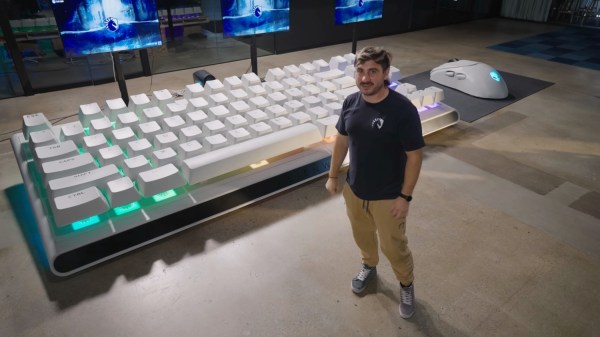
What’s the worst thing about traditional Morse keyers? If you ask us, it’s the fact that you have to learn how to do two distinct things with one hand, and switch between them quite quickly and often.

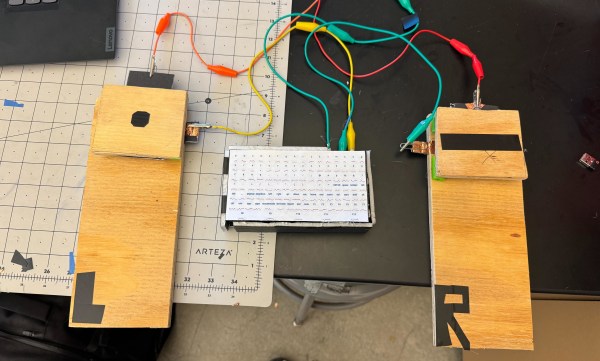
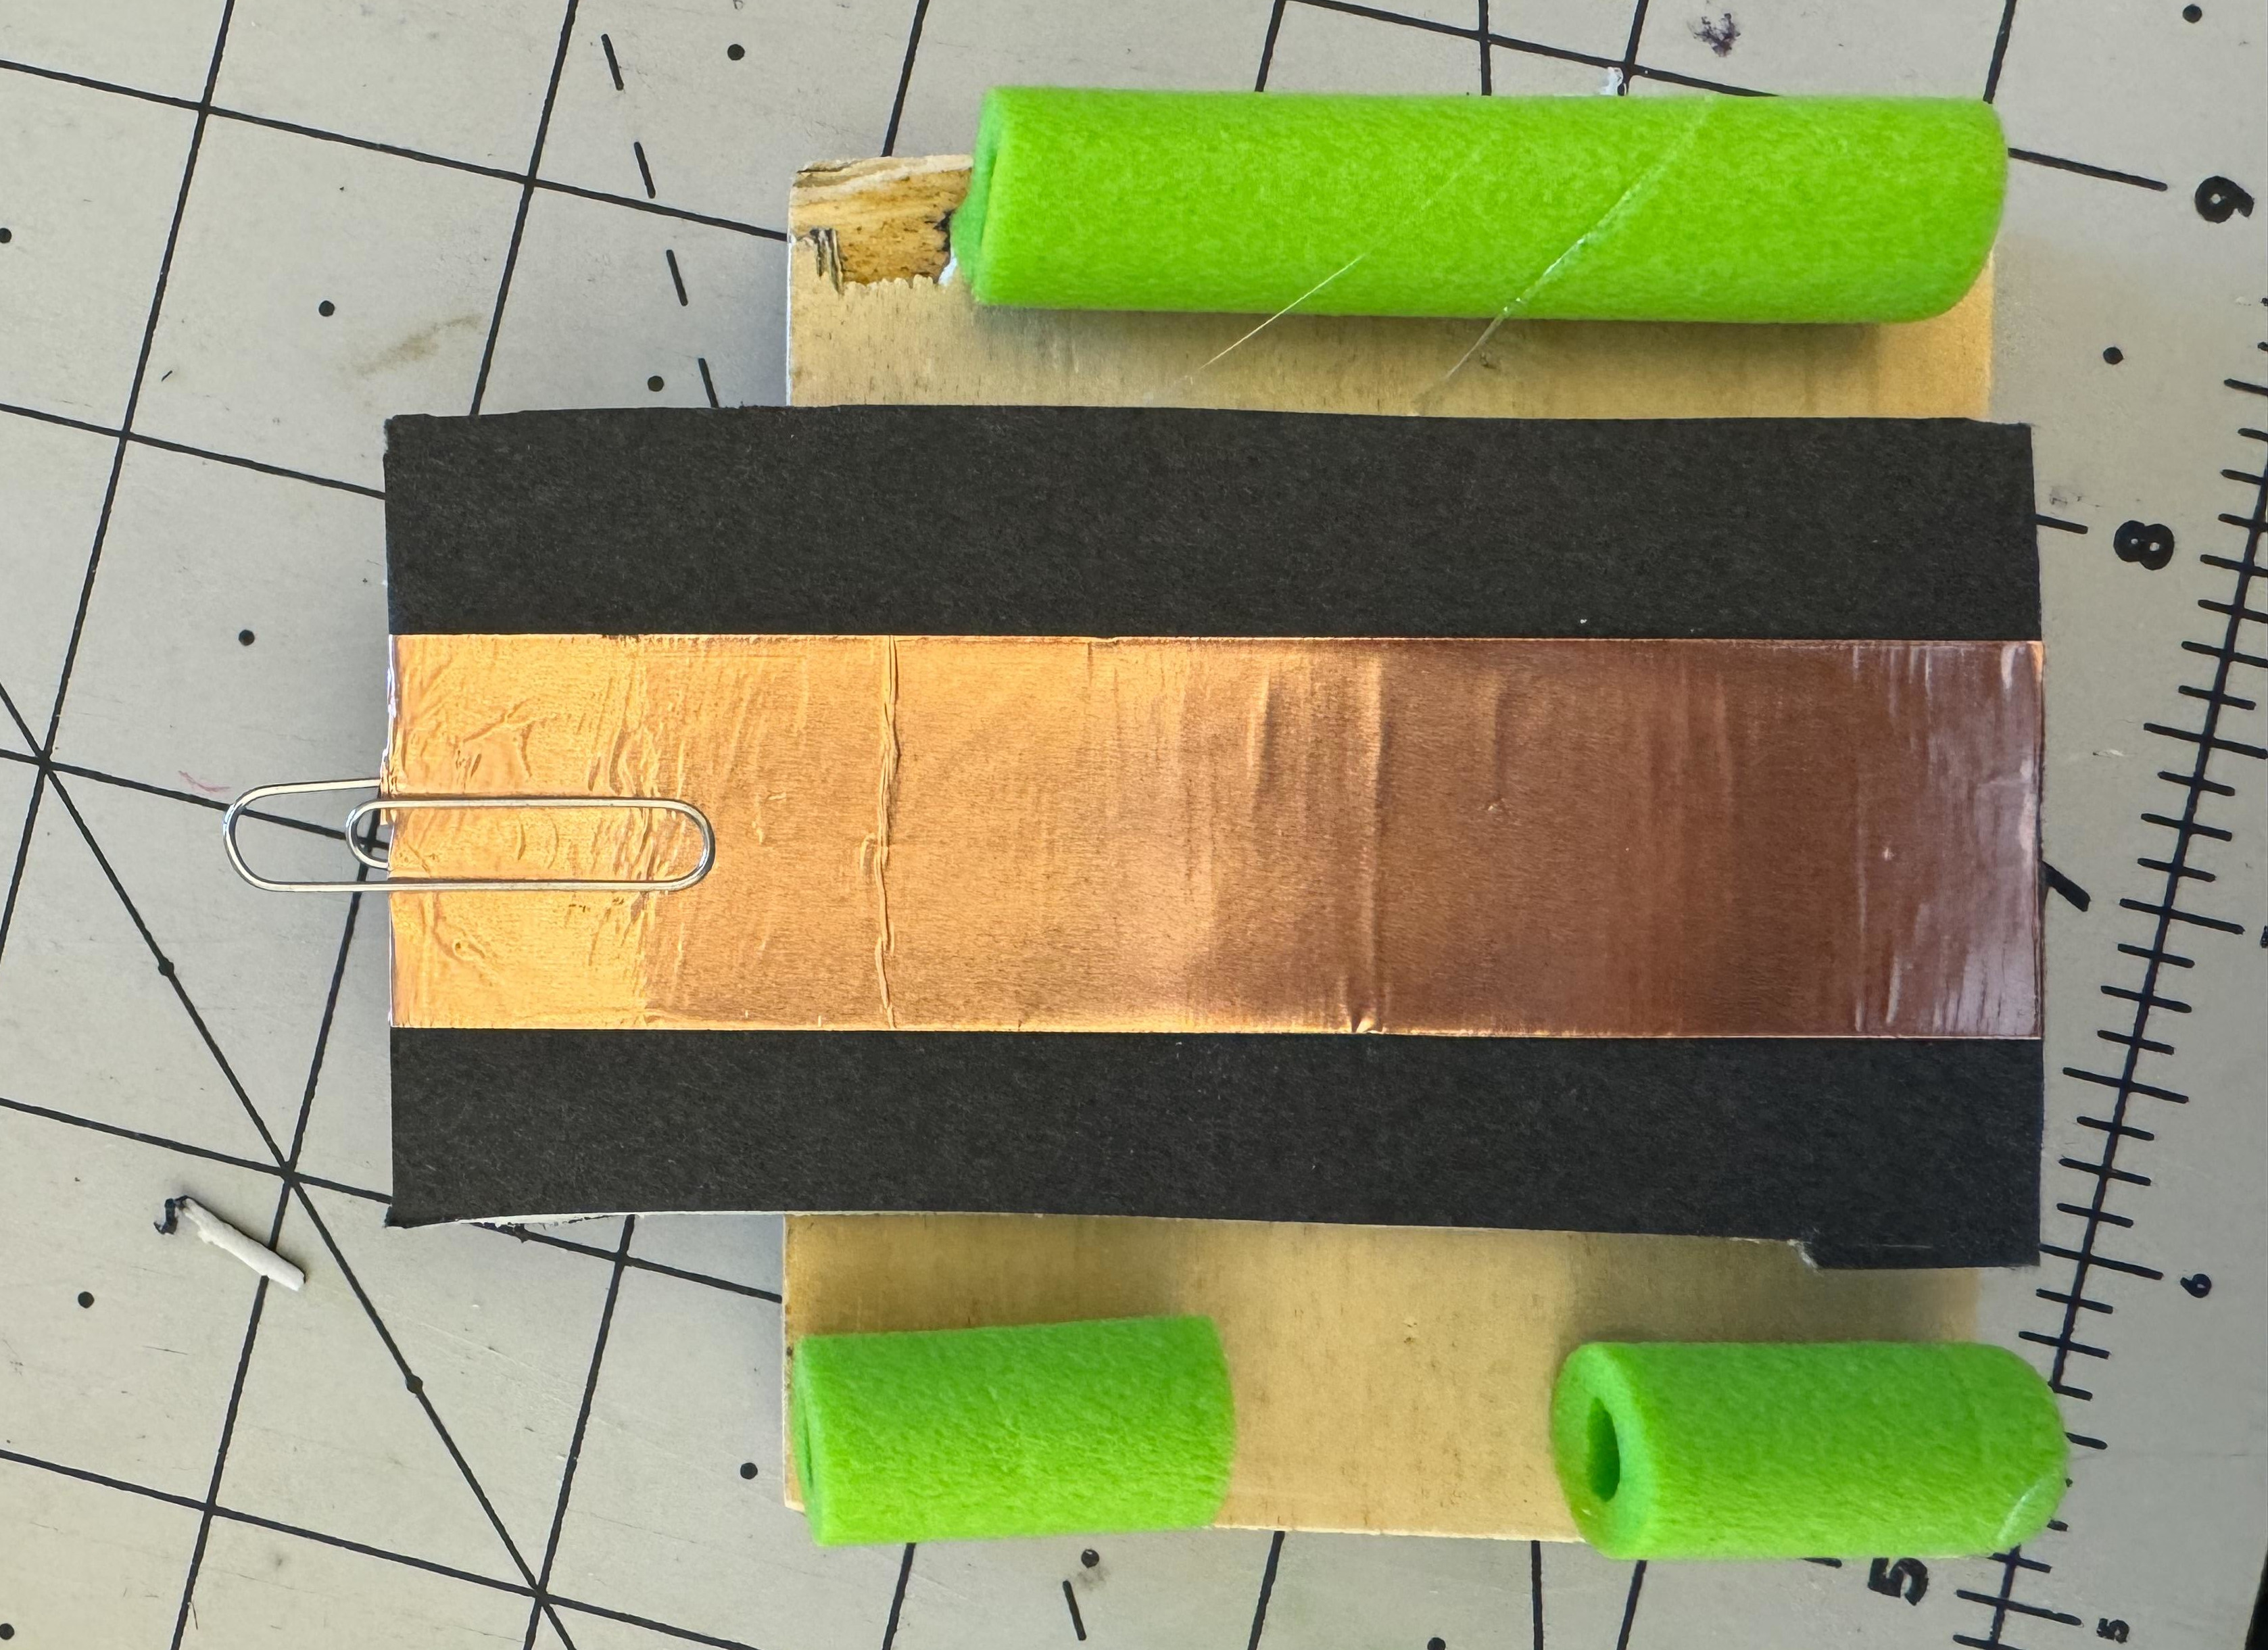
This set of Morse code foot pedals is meant for those who are unable to use traditional methods of keying. It uses a retrofitted wireless keyboard to read Z and X as dit and dah, respectively, and convert the Morse code into text.

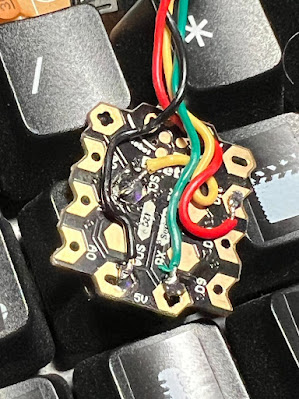
[Tevendale_Engineering] started by getting the controller out of the keyboard and figuring out which combination of pads sends Z and X. Then they wired those up with copper tape. The pedals themselves are made from 1/2″-thick wood, foam core board, and Nerf bullets to provide springiness.

There’s no solder here; it’s all copper tape and alligator clip test leads. So if this isn’t your hack for the day, we don’t know what is.

Not so great at Morse code? Here’s a clock that will train you on the numbers, at least.

Freshening Up Google’s USB-C PD Sniffer

USB-C Power Delivery has definitely made the big mess of wires a bit smaller but not all cables are created equal — some of them can handle upwards of 100 W while the cheapest can handle only 10. To accommodate this, USB-C cables need to actively tell both ends what their capabilities are, which turns an otherwise passive device into a hidden chip in a passive looking cable.

[Greg Davill] has decided to unravel the mystery of why your laptop isn’t charging by creating a USB-PD sniffer. Based on Google’s Twinkie sniffer, the FreshTwinkie makes the design more accessible by reducing the number of layers in the PCB and replacing the BGA variant of the STM32 for a more DIY-friendly QFN version. Interestingly, this isn’t the first time we’ve seen somebody try and simplify the Twinkie; back in 2021, the Twonkie from from [dojoe] hit a number of similar notes.

USB-C Power Delivery is just one of many protocols spoken over the CC pins, and the FreshTwinkie might be able to detect when some of those are enabled and why or why not. With future development, it could potentially provide useful information as to why a Thunderbolt 4 or tunneled PCIe device isn’t working correctly.

Illustrated Kristina with an IBM Model M keyboard floating between her hands.

Keebin’ With Kristina: The One With The Duplex Typewriter

The Coleco Adam? A not-so-great home computer that likely contributed to the downfall of the company. The keyboard, however, is a different story, and worth repurposing.

[Nick Bild] has created a USB adapter that uses a Teensy 4.1 and an RJ-12 breakout board. Now this wasn’t just a simple matrix to decode. No, the fine folks at Coleco rolled their own communications protocol called AdamNet.

The keyboard uses an RJ-12 connector and a single data line to communicate over a 62.5 kbit/s, half-duplex serial bus. Inside the keyboard is a Motorola 6801 that caches the key presses and sends them to the computer. So the BOM is limited to what you see above — an RJ-12 breakout and a Teensy 4.1. It’s great to see old keyboards come alive again, especially one with such cool sci-fi keycaps. Want to hear it clack? Of course you do.

Continue reading “Keebin’ With Kristina: The One With The Duplex Typewriter”

Hacking Apple’s Magic Mouse To Fix Its Worst Flaws

The Magic Mouse was first released by Apple in 2009 and was a major departure from previous designs. It was sleek, low-profile, and featured a touch pad on the top for gestures. Although the first generation was powered by two AA batteries and didn’t lead to much commentary, the 2015 redesign caused a lot of scathing memes and worse, mostly due to the rechargeable battery and the Lightning charging port that had been located on its bottom, leading to Dead Magic Mouse syndrome when you wanted to charge it. Since then myriad hackers have tried to fix the Magic Mouse’s issues, with [Ivan Kuleshov]’s recent attempt being perhaps the most straightforward and possibly successful.

Essentially, the Magic Mouse has two major flaws: ergonomics and the worst possible location of the charging port. Although both 3D models and commercial products exist to alleviate the former issue – and some of these even add wireless charging in between mousing sessions – all attempts to relocate the charging port were met by failure, as the Magic Mouse cannot be both charged and used at the same time due to how Apple designed the circuit.

What [Ivan] did differently is that aside from tweaking some existing 3D models for Magic Mouse extensions to his liking, he also fixed the charging issue by avoiding Apple’s circuitry altogether and adding a USB-C port in the process. He also added a TP4056-based charging module, directly soldered to the battery’s terminals, that will top off the battery when plugged in. During experimentation on a live Magic Mouse, this led to the battery charge reported in MacOS increasing correspondingly. More or less, at least.

The 3D printed shell isn’t just a wrapper around the original mouse either, but splits the squat rodent into its upper and lower sections, so that the optical sensor isn’t suspended off the surface, while also keeping the touch-sensitive top section where it should be. According to [Ivan] the project files will be made available on his GitHub account in the near future.

Num Pad Reborn As Stream Deck

Stream decks are cool and all, but they are essentially expensive, albeit sorta cool-looking macro pads. So why not try to make your own? You don’t necessarily have to start from scratch.

It all started when [dj_doughy] found an extremely clicky num pad in a recycle pile. It was so clicky, in fact, that even though [dj_doughy] didn’t need an external num pad, they wanted to keep it around as a fidget toy. From the video after the break, they look to be white ALPS switches. The only problem? It had a PS/2 connector.

Well, okay, there was another problem. The chip inside seemingly has no datasheet available. [dj_doughy] took to Discord for help, and was advised to just have the thing use extended keys, like F13-F24, and assign those as hotkeys in OBS.

In order to make it USB, [dj_doughy] need a microcontroller capable of acting as a Human Interface Device (HID). While [dj_doughy] tested using an Arduino Leonardo, they ended up using an Arduino Beetle due to its diminutive size. [dj_doughy] had a bit of trouble with the code sending two key presses, but found out they were just missing some variables. Now it works like a charm.

Would you like a macro pad that lets you physically reassign macros? Then check out this tile-based macro pad.

D-POINT: A Digital Pen With Optical-Inertial Tracking

[Jcparkyn] clearly had an interesting topic for their thesis project, and was conscientious enough to write up a chunk of it and release it to the wild. The project in question is a digital pen that uses some neat sensor fusion to combine the inputs from a pen-mounted gyro/accelerometer with data from an optical tracking system provided by an off-the-shelf webcam.

A six degrees of freedom (6DOF) tracking system is achieved as a result, with the pen-mounted hardware tracking orientation and the webcam tracking the 3D position. The pen itself is quite neat, with an ALPS/Alpine HSFPAR003A load sensor measuring the contact pressure transmitted to it from the stylus tip. A Seeed Xaio nRF52840 sense is on duty for Bluetooth and hosting the needed IMU. This handy little module deals with all the details needed for such a high-integration project and even manages the charging of a single 10440 lithium cell via a USB-C connector.

Positional tracking uses Visual Pose Estimation (VPE) assisted with ArUco markers mounted on the end of the 
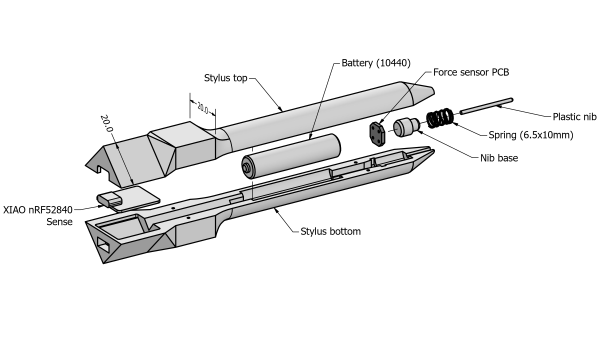
stylus. A consumer-grade (i.e. uncalibrated) webcam is all that is required on the hardware side. The software utilizes the familiar OpenCV stack to unroll the effects of the webcam rolling shutter, followed by Perspective-n-Point (PnP) to estimate the pose from the corrected image stream. Finally, a coordinate space conversion is performed to determine the stylus tip position relative to the drawing surface.

The sensor fusion is taken care of with a Kalman filter, smoothed with the typical Rauch-Tung-Striebel (RTS) algorithm before being passed onto the final application. This process is running in Python using the NumPy module, as you would expect, but accelerated using the Numba JIT compiler.

Motion tracking is not news to us, we’ve seen many an implementation over the years, such as this one. But digital input pens? Why aren’t they more of a thing?

Thanks to [Oliver] for the tip!

We Like Big Keyboards And We Cannot Lie

So, let’s say you’re good at DOTA. Like, world-class good. How good do you think you’d be on a keyboard that’s 16 feet long, with a space bar the size of a person? Well, you’d need the rest of your team, that’s for sure.

Alienware have created the world’s largest mechanical keyboard and mouse, which are working, 14:1 scale representations of their AW420K keyboard and AW720M mouse. And they got Team Liquid to try it out.

While this may be a marketing ploy, it took quite a lot of work and weeks of 3D printing to faithfully reproduce those peripherals on that scale.

What’s really impressive are the custom key switches, which are described early on in the video after the break. They are nearly a foot wide with the keycap on, and they have an incredible four inches of travel.

Each of the 87 key switches is made with two snugly-fitting pieces of PVC, a thick rubber band, and of course, an actual, regular-size key switch to register the presses. Not satisfied with that, the team added a small piece of measuring tape to produce a nice clicky, tactile feedback. And, oh yeah, that space bar? The stabilizer is made from a 1″ copper pipe. Be sure to check it out in action after the break.

This just so happens to be the same size as the last keyboard we saw claiming to be the world’s largest, which was rejected from the Guinness Book because it’s not an exact replica of an existing keyboard. So, somebody call Guinness, we suppose.

Continue reading “We Like Big Keyboards And We Cannot Lie”