An optical keyboard that works using IR LEDs and phototransistors.

Take A Look At This Optical Keyboard

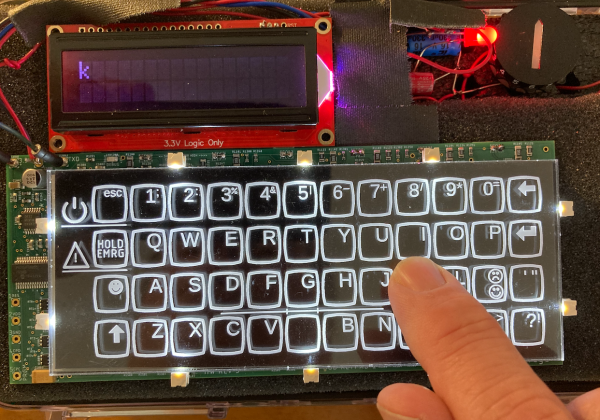
Making keyboards is easy, right? Just wire up a bunch of switches matrix-style to a microcontroller, slap some QMK and a set of keycaps on there and you’re good to go. Well, yeah, that might work for cushier environments like home offices and Hackaday dungeons, but what if you need to give input under water, in a volatile area, or anywhere else you’d have to forego the clacking for something hermetically sealed? Mechanical switches can only take you so far — at some point, you have to go optical.

the layers of an optical keyboard
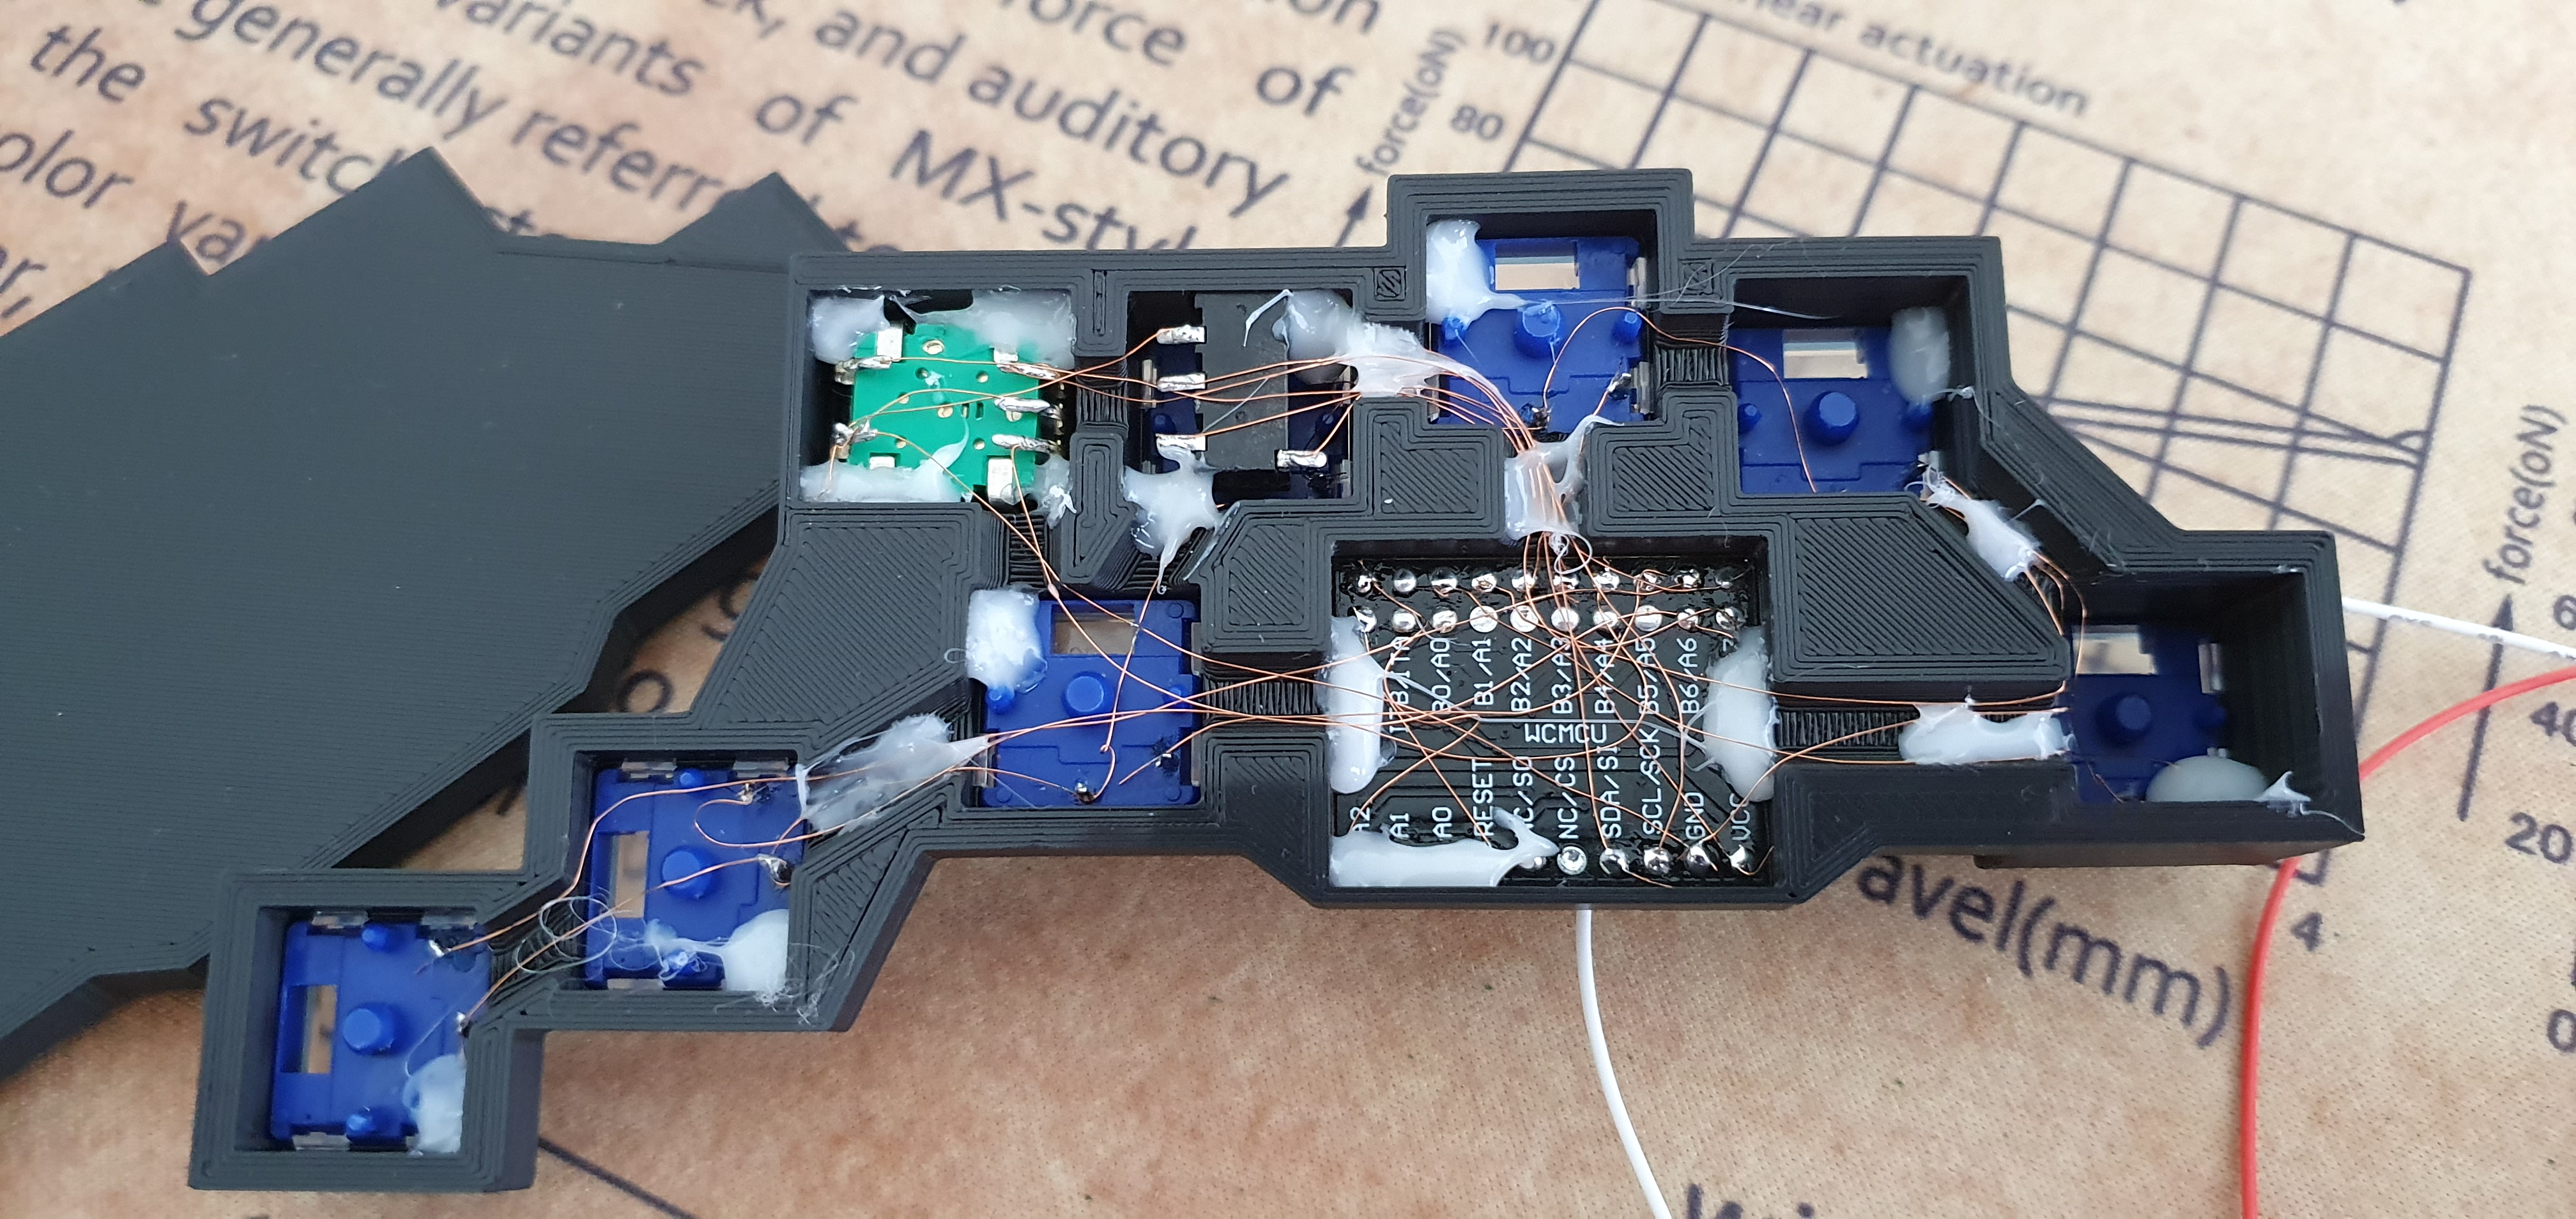
This gorgeous keyboard works with reflected IR beams to determine when a finger is occupying a given key site (because what else are you going to call them?). Each key site has an IR LED and a phototransistor and it works via break-beam.

[BenKoning] wanted a solution that would be easy for others to build, with a low-cost BOM and minimal software processing cost. It just so happens to be extremely good-looking, as well.

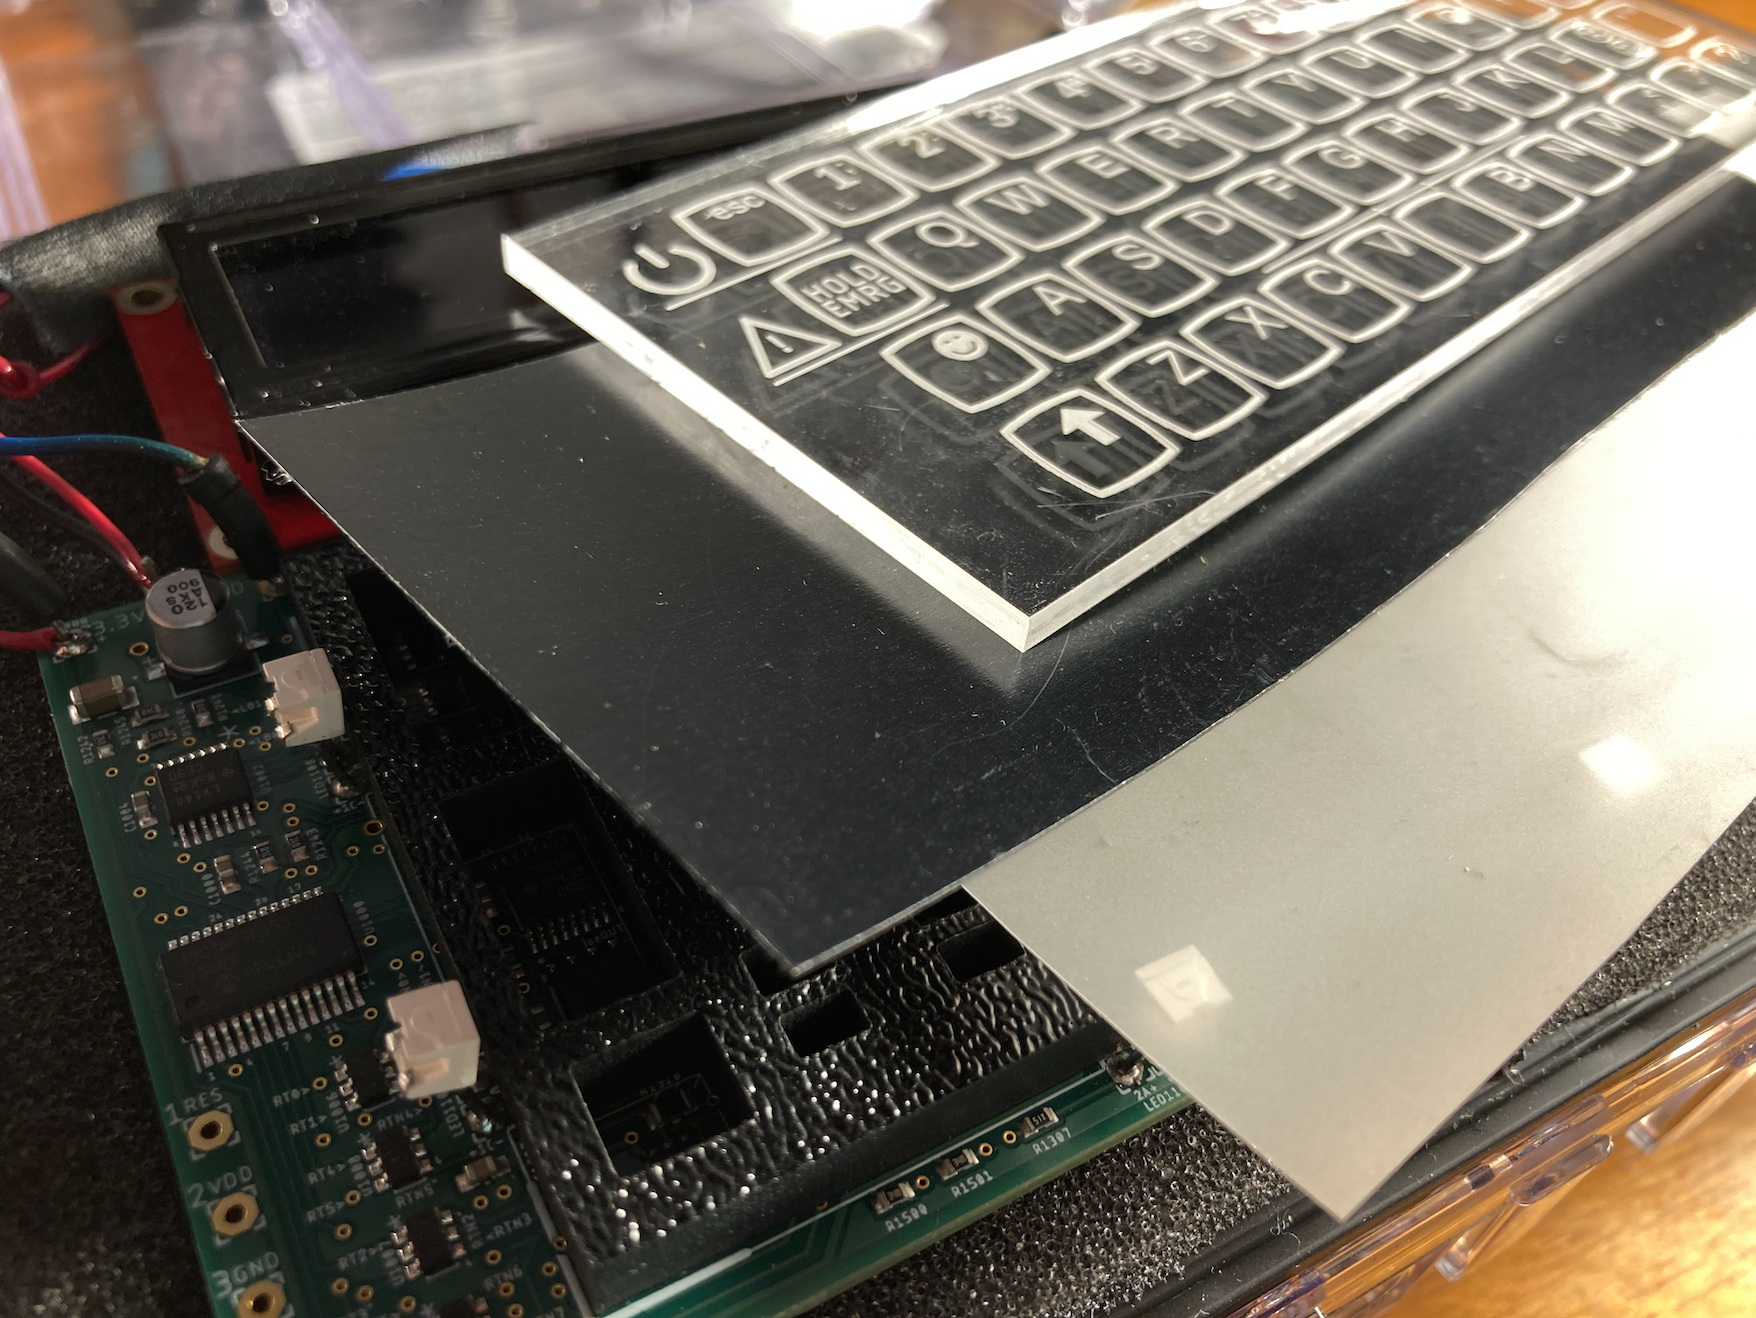
The reason you can’t see the guts is that black layer — it passes infrared light, but is black to the eye. The frosted layer diffuses the beams until a finger is close enough to register. Check it out in action after the break, and then feed your optical key switch cravings with our own [Bob Baddeley]’s in-depth exploration of them.

Continue reading “Take A Look At This Optical Keyboard”

A couple of joysticks wired up to a Teensy for prototyping.

Custom Joystick Build Guide Should Point You In The Right Direction

Over the last two years, [benkster] has been perfecting their ideal flight controller. Like many people, they started out with a keyboard and mouse and eventually moved on to a joystick. While a HOTAS (hands on throttle-and-stick — e.g. a yoke controller with inputs right there on the sides) might have been the next logical step, those things cost too much. Naturally, the answer is to build one, ideally for less money. Hey, it could happen.

The design went from just an idea to a cardboard prototype, and then to a wooden enclosure and later, a 3D-printed case. Since [benkster] learned a great deal along the way, they want to give back to the community with a comprehensive joystick design/build guide so that others don’t have to start from zero, overwhelmed with information.

[benkster] wanted three joysticks, a bunch of big buttons, a throttle, a display to show component status (as in, is joystick #3 a joystick right now or a WASD keyboard?), and immersive details everywhere — you know, a million buttons and switches to give it that cockpit feel. [benkster] is using a Teensy 4 to control two 3-axis joysticks and one 2-axis stick. Since this adds up to too many axes for Windows/DirectX to read in, the 2-axis stick is used as a WASD keyboard.

This guide is a great place to start, especially for folks who may be newer to electronics. There are nice introductions to many types of components and tidbits that are relevant outside the world of joysticks.

You want immersive flight simulation away from the PC? Here’s a printable flexure-based ‘stick that snaps right on your Xbox controller and pushes the buttons.

Giving A Console Controller Mouse-Like Precision Aim

Controller vs keyboard and mouse is one of the never-ending battles in the world of gaming, with diehard proponents on both sides of the fence. [Tech Yesterday] has been working to create a controller that’s the best of both worlds. His latest Mouse Pro Controller V5 features an inverted mouse riding on ball bearings.

Mouse Pro Controller V1-3‘s main focus was to create the largest possible moving surface for an optical thumb mouse for precision aiming. However, [Tech Yesterday] found that one’s thumb doesn’t work well for traversing a large flat surface, but works better with a concave surface. On V4 he flipped the optical sensor around, embedding it in the controller, with a small circular “mouse pad” attached to his thumb. The concave surface was made from the diffuser of a large LED light bulb. It had slightly too much friction for [Tech Yesterday]’s liking, so he embedded an array of small ball bearings in the surface using magnets.

While this “thumb mouse” has excellent precision, it can be a bit slow when you need to make large movements, like when performing 360° no scopes for the clips. For these situations, [Tech Yesterday] embedded a thumb stick on the back of the controller to allow for fast sideways movements using his middle fingers.

[Tech Yesterday] is already working on V6, but feels close to the limit of his skills. If you are interested in working with him, be sure to get in touch! Modding controllers for fun and performance are great, but for gamers with prosthetic fingers it’s a requirement.

Continue reading “Giving A Console Controller Mouse-Like Precision Aim”

a man sits on top of a motorcycle simulation rig

Motorcycle Simulation Rig Is Off To The Races

Many arcade machines can be emulated and handily controlled with the standard joystick and button combos. However, a few don’t feel quite right without some extra equipment, motorcycle racing games being one of them. So, no longer content to go to an arcade to get his fix, [The Q] welded his own motorcycle simulation rig for playing racing games at home.

After an initial design was sketched out, rectangular tube steel was cut to size and welded together with a MIG welder. A central shaft linked to some secured bearings made the central pivot point. A few pistons offered the resistance needed for leaning into the curves. To the central shaft, a seat and an old bicycle fork were attached. A clever linkage from the handlebars to the base causes the bike to tilt when turning the handlebars and vice versa.

The bike was ready for prime time after some grinding, orange paint, a license plate, and some lights and grips. [The Q] just needed to get the angle of the bike into the simulation of their choice. While we expected a teensy or other microcontroller emulating a controller, [The Q] went for a somewhat simpler approach, and 3D printed a cradle to hold a PlayStation controller. Little levers pull strings to articulate the joystick, and a cable from the throttle grip pulls back the trigger on the controller. All in all, the experience looks pretty decent, particularly when you’re comparing it to a motocross arcade machine. What it really needs are some fans blowing for the effect of the air stream coming at you.

If you’re thinking about busting out the MIG to make a rig of your own, maybe consider making a homemade car racing rig to complement the bike.

Continue reading “Motorcycle Simulation Rig Is Off To The Races”

a render of the curved bartop arcade machine in fusion 360

Bartop Arcade Machine That Isn’t Afraid Of Change

Arcade machines have a distinct look and feel with large imposing cabinets and smaller bartop machines that try to keep the look and feel of a traditional upright arcade cabinet while taking up less space. An entirely new aesthetic has been given for this engineering marvel of a bartop arcade that [DIY Engineering] has made. Gone is the expansive angular box, and in its place are sleek and slender curves. The key piece that makes this build work is the curved monitor.

He started with a detailed design in Fusion360 that really focused on the tools and techniques that [DIY Engineering] knew would work. The backbone of the device was formed from wooden dowels around which 3d printed parts slid on. To the sides of the dowels, two pieces of acrylic are screwed on to act as an LED diffusor. To that acrylic, two pieces of CNC’d red oak are attached with two arcade buttons for pinball-style actuation. Over the top, cast acrylic was heated and then bent into the desired shape with the help of a two-part mold press. The screen slotted right in perfectly. Part of the display at the top was reserved for a marquee, and the look is extraordinary with the dark acrylic. Ten arcade buttons and an eight-way joystick offer an array of options for input.

Internally, a temperature-controlled fan and a Raspberry Pi are running the show. Controls are wired as GPIO and read by the Pi. So naturally, the games on the SD card tend to look best on a long vertical screen: vertical shooters and the like.

Arguably, the best thing about this project isn’t just the execution (which is fantastic) but the look behind the curtain at the process. So many potential problems were solved in the modeling stage, and fabrication went fairly smoothly as a result (or so we think youtube hides a multitude of sins). The results speak for themselves, and we think this is an enviable arcading machine. [DIY Engineering] has mentioned providing files in the future for you to build your own. If perhaps it seems a little intimidating, why not give a smaller 3D printable bartop a try?

Video after the break.

Continue reading “Bartop Arcade Machine That Isn’t Afraid Of Change”

A giant, 3D-printed key switch that sends F to pay respects.

Big ‘F’ Key To Pay Big Respects

So your ally was slain. Your comrade has fallen. And somehow, that capital F coming from that tiny key is supposed to convey your respect? Please. What you need is a giant, dedicated F key that matches the size of your respect. And [Jaryd_Giesen] is gonna teach you how to build your own. Well, kind of. Between the Thingiverse build guide and the hilarious build video below, you’ll get the gist.

Making a custom spring using a drill and a 3D printed dowel.One of the coolest things about this build is the custom spring. Between a birthday time crunch and lockdown, there was just no way to source a giant spring in two days, so [Jaryd] printed a cylinder with a hole in it to chuck into a drill and stand in for a lathe. Ten attempts later, and the perfect spring was in there somewhere.

We love the level of detail here — making a pudding-style keycap to match the main keyboard is the icing on this clacky cake. But the best part is hidden away inside: the stem of the giant switch actuates a regular-sized key switch because it’s funnier that way. Since it’s a giant Gateron red, it doesn’t exactly clack, but it doesn’t sound linear, either, mostly because you can hear the printed pieces rubbing together. Check out the build video after the break, and hit up the second video if you just want to hear the thing.

Seeing things embiggened is one of our favorite things around here. Some things are just for looks, but other times they’re useful tools.
Continue reading “Big ‘F’ Key To Pay Big Respects”

An open-source chording keyboard with trackball support.

Chordie Chording Keyboard Speaks No Qwerty

What is the fastest way to get thoughts out of your brain and into relative permanence? Well, yeah, probably a voice recorder. But after voice recorders comes typing in a distant second. Typing, especially QWERTY-style, has its limitations. The holy grail method it comes to typing quickly has got to be a chording keyboard, hands down. How can court reporters possibly keep up with everything that’s uttered during a trial? When you can press a few keys at the same time and type entire words, it’s not that difficult. It just takes a whole lot of memorization and muscle memory to get to that point.

An open-source chording keyboard with trackball support.So if you’re going to go for the glory, check out Chordie, a snazzy little chording keyboard that does it all with just 14 keys. [kbjunky] based Chordie on the Ginny, a cute little bare-bones bat-wing chording keyboard that uses the ASETNIOP chording engine originally built for soft keyboards.[kbjunky] added open-face trackball support via printed cradle, but it’s not necessary to use a trackball since there’s a pair of rotary encoders and a mouse layer.

This keyboard looks fantastic with its rocket ship MCU holder and its flush-mounted I/O expander breakout boards. Apparently [kbjunky] used polyimide tape to keep the solder from making blobs. It’s all there in the nice build guide.

We would probably argue that chording is not totally ergonomic. Sure, you barely move your hands or wrists, but chording itself can be hard on the digits, especially the pinkies. To that end, [kbjunky] used low-profile switches with light springs. Totally ergonomic or not, we have to admit that we love the idea of clacking along at 300 WPM someday far, far down the learning curve of ASETNIOP. Take a look at the key map, and check out [kbjunky]’s follow-up post if you want to see a demo.

Maybe you prefer a completely different typing experience. Well, ASETNIOP works with digital pianos, too.

Via r/ErgoMechKeyboards