Soviet Scientific Calculator Gives Up Its Cold War-Era Secrets

Say what you want about Soviet technology, but you’ve got to admit there was a certain style to Cold War-era electronics. Things were perhaps not as streamlined and sleek as their Western equivalents, but then again, just look at the Nixie tube craze to see where collectors and enthusiasts stand on that comparison.

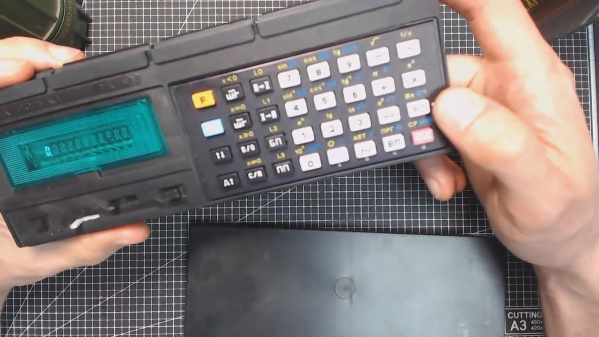
One particularly interesting artifact from the later part of that era was the lovely Elektronika MK-52 “microcalculator”. [Paul Hoets] has done a careful but thorough teardown of a fine example of this late-80s machine. The programmable calculator was obviously geared toward scientific and engineering users, but [Paul] relates how later versions of it were also used by the financial community to root out banking fraud and even had built-in cryptographic functions, which made encrypting text easy.

[Paul] has put together a video of the teardown, detailing the mostly through-hole construction and the interesting use of a daughter-board, which appears to hold the high-voltage section needed to drive the 11-character VFD tube. The calculator appears to be very well cared for, and once reassembled looks like it would be up for another ride on a Soyuz, where once it served as a backup for landing calculations.

We love the look of this machine and appreciate [Paul]’s teardown and analysis. But you say that the Cyrillic keyboard has you stumped and you need a bilingual version of the MK-52? That’s not a problem.

Finding Fractals In The 1930’s

The mesmerizing properties of fractals are surprising as their visual complexity often arises from simple equations. [CodeParade] set out to show how simple a fractal is by creating them using technology from the 1930s. The basic idea is based on projectors and cameras, which were both readily available and widely used in television (CRT projectors were in theaters by 1938, though they weren’t in color until the 1950s).

By projecting two overlapping images on the wall, pointing a camera at the resulting image, and then feeding it back into the projectors, you get some beautiful fractals. [CodeParade] doesn’t have a projector, much less two. So he did what any hacker might do and came up with a clever workaround. He made a simple app that “projects” onto his monitor and all he has to do is point an external webcam at the screen. The resulting analog fractals are quite beautiful and tactile. Rather than tweaking a variable and recompiling, you simply just add a finger or move the camera to introduce new noise that quickly becomes signal.

Better yet, there’s a web version that you can play around with right now. For more fractals implemented in hardware rather than software, there’s this FPGA with a VHDL Mandelbrot set we covered.

Continue reading “Finding Fractals In The 1930’s”

High-Tech Paperweight Shows Off Working 60s-era Thin-Film Electronics

[Ken Shirriff]’s analysis of a fascinating high-tech paperweight created by GE at the height of the space race is as informative as it is fun to look at. This device was created to show off GE’s thin-film electronics technology, and while it’s attractive enough on its own, there’s an added feature: as soon as the paperweight is picked up, it begins emitting a satellite-like rhythmic beep. It is very well-made, and was doubtlessly an impressive novelty for its time. As usual, [Ken] dives into what exactly makes it tick, and shares important history along the way.

Thin-film module with labels, thanks to [Ken]’s vintage electronics detective work. Click to enlarge.
In the clear area of the paperweight is a thin-film circuit, accompanied by a model of an early satellite. The module implements a flip-flop, and the flat conductors connect it to some additional components inside the compartment on the left, which contains a power supply and the necessary parts to create the beeps when it is picked up.

Thin-film electronics reduced the need for individual components by depositing material onto a substrate to form things like resistors and capacitors. The resulting weight and space savings could be considerable, and close-ups of the thin film module sure look like a precursor to integrated circuits. The inside of the left compartment contains a tilt switch, a battery, a vintage earphone acting as a small speaker, and a small block of components connected to the thin-film module. This block contains two oscillators made with unijunction transistors (UJTs); one to create the beep, and one to control each beep’s duration. The construction and overall design of the device is easily recognizable, although some of the parts are now obsolete.

If you’d like a bit more detail on exactly how this device worked, including circuit diagrams and historical context, be sure to click that first link, and pay attention to the notes and references at the end. One other thing that’s clear is that functional electronics embedded in clear plastic shapes simply never go out of style.

Chip Transplant Brings Timex 2048 Back From Grave

The 1984 Timex Computer 2048 that [Drygol] recently got his hands on was in pretty poor shape. Not only did it have the mangled exterior that comes from several decades of hard use and furious typing, but the internals appeared to be shot as well, with the machine showing nothing but vertical lines when powered up. Thankfully, this retro computer virtuoso was more than up to the challenge of bringing it back from the brink.

After a good cleaning and the installation of a reproduction front panel, the Timex was already looking much better. Unfortunately [Drygol] says he doesn’t currently have the equipment necessary to touch up the graphics and lettering on the key caps, but the fact that he had to qualify that statement with “currently” has us all sorts of excited to see what he’s planning down the line.

A bevy of fresh chips.

Of course beauty is only skin deep, and this particular TC-2048 was still bad to the bone. [Drygol] had a hunch its Z80 processor was dead, but after swapping it and its socket out, the machine still wouldn’t start. Though he did note that the garbled graphics shown on the screen had changed, which made him think he was on the right track. He then replaced all the RAM on the board, but that didn’t seem to change anything.

There isn’t a whole lot else to go wrong on these old machines, so the final step was to try and replace the ROM. Sure enough, after installing a new Winbond W27C512 chip with the appropriate software burned onto it, the nearly 40 year old computer sprang back to life.

Another classic computer saved from the trash heap, but it’s all in a day’s work for [Drygol]. Over the years we’ve seen him perform meticulous repairs on computer hardware that any reasonable person would have given up on. Even if you’re not into retro hardware, his restorations are always full of fascinating tips and tricks that can be applied when repairing gadgetry from whatever era happens to tickle your fancy.

The First New Vacuum Tube Computer Design For Well Over Half A Century

In a few museums around the world, there lies the special experience of seeing some of the earliest computers. These room-filling monsters have multiple racks of vacuum tubes that are kept working by the dedication and care of their volunteer maintainers. A visit to the primordial vacuum tube computer, Colossus at Bletchley Park, UK, led [Mike] on the path towards designing an entirely new one. He thinks it’s the first to see the light of day in over five decades. ENA, the Electron tube New Automatic Computer, is the result.

It uses 550 Soviet 6N3P double triodes, and its 8-bit Von Neumann architecture is constructed from the tubes wired up as 5-input NOR gates. ROM is a diode matrix, and RAM comes courtesy of reed relays. The whole thing is assembled as eleven PCBs on a wall-mounted frame, with a console that holds the piece de resistance, a display made from an array of LEDs. A Pong game is in development, meanwhile the machine makes an impressive room heater.

If you’d like to see some more vacuum tube computational goodness, we saw Colossus at the National Museum of Computing, back in 1996.

Zooming Through The Mandelbrot Set On An Atari

The Mandelbrot set, according to Wikipedia, is “the set of complex numbers c for which the function f_{c}(z)=z^{2}+c 
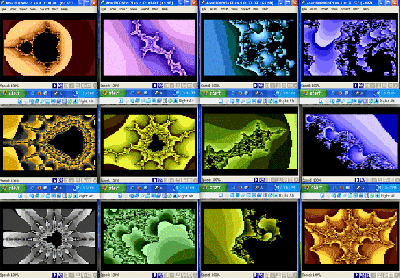
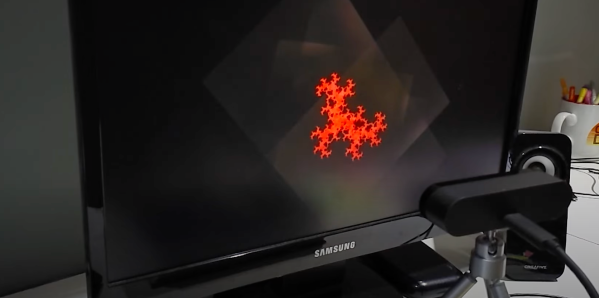
does not diverge.” Even if you don’t understand the mathematics behind it, you’ve likely seen the complicated fractal images generated by zooming in on the border of the Mandelbrot set. [Scott Williamson] not only got this set rendering on an Atari, but managed to create animated videos of the results. 

Emulators were key to the project’s success.

Doing the work was no mean feat. While it takes just 10 lines of Atari BASIC to render the set on an Atari 800, getting the animations made and into a modern video format took much effort. [Scott] used the Atari800Win-PLus emulator to zoom in on a variety of locations on the fractal curve and recorded the results over a weekend.

However, compositing the various frames into smooth-scrolling videos took more effort, with a Python script and ffmpeg required to stitch everything together into the results you see on YouTube. The final videos were combined with Atari chiptune music from [Adam Sporka] to help round out the presentation.

The result is reminiscent of an old-school demo, even if everything here was assembled slowly on modern computers from the raw Atari output. We’ve seen other great Mandelbrot feats before, too, like this real-time explorer built on an FPGA. Video after the break.

Continue reading “Zooming Through The Mandelbrot Set On An Atari”

C64 Demo, No C64

Never underestimate the ingenuity of the demoscene. The self-imposed limitations lead to incredible creativity, and, the range of devices they manage to get their demos running on never ceases to amaze us. But we never thought we’d see a C64 demo without one central component: the C64.

Full disclosure: [Matthias Kramm]’s demo, called “Freespin”, does need a C64 to get started. The venerable 6502-based computer runs a loader program on a 1541 disk drive.  But from then on, it’s all floppy drive. And [Matthias] has laid bare all his tricks.

The video below shows the demo in full, including a heart-stopping on-camera cable mod. By adding a single 100 Ω resistor, [Matthias] turned the serial clock and data lines into a two-bit digital-to-analog converter, good enough to generate signals for both black and white pixels and the sync pulses needed for the display.

No demo would be complete without sound, and Freespin’s tunes come from controlling the drive’s stepper motor, like a one-voice Floppotron.

Watching nothing but a floppy drive run a cool demo is pretty amazing. Yes, we know there’s a full-fledged computer inside the floppy, but the bit-banging needed to make this work was still mighty impressive. It might be cool to see what you could do with multiple drives, but we understand the minimalistic aesthetic as well. And speaking of tiny little demos:  the 256 bytes of [HellMood]’s “Memories” or [Linus Åkesson]’s “A Mind is Born” still leave us speechless.

Continue reading “C64 Demo, No C64”