Build Retro Games With Script-8

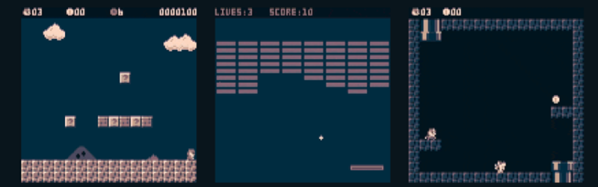
A whole generation of programmers learned to program by writing — or at least typing in — game programs for relatively simple computers like a TRS-80, a Commodore 64, or any of a handful of similar machines. These days, games are way more complicated and so are computers. Sure, it is more fun to play Skyrim than Snake, but for learning, you are probably going to get more out of starting with a simple game. If you want to learn programming today — or maybe start someone else on that same journey, you should check out Script-8, a project by [Gabriel Florit]. You can get a taste of how it looks in the video below, or just surf over to the site and play or modify a game (hint: press “a” to launch the ball).

Instead of paraphrasing, here’s the excellent elevator speech from the web site:

SCRIPT-8 is a fantasy computer for making, sharing, and playing tiny retro-looking games (called cassettes). It’s free, browser-based, and open-source. Cassettes are written in JavaScript.

Continue reading “Build Retro Games With Script-8”

Hack Your Gmail: A Quick Start For Google App Scripting

For many people, Gmail is synonymous with e-mail. Some people like having cloud access to everything and some people hate having any personal data in the cloud. However you feel about it, one thing that was nice about having desktop software is that you could hack it relatively easily. If you didn’t like how your desktop mail client worked, you had a lot of options: use a different program, write your own, hack the executable of your current program, or in the case of open source just fork it and make any changes you are smart enough to make.

Google provides a lot of features with all of its products, but however you slice it, all the code runs on their servers out of your reach. Sort of. If you know JavaScript, you can use Google Apps Script to add features to many Google products including Gmail. If you’ve used Office scripting, the idea is the same, although obviously the implementation is very different.

With scripting you can make sophisticated filters that would be very hard to do otherwise. For example,  monitor for suspicious messages like those with more than 4 attachments, or that appear to come from a contact between the hours of 2AM and 5AM.

For our example today, I’m going to show you something that is easy but also highly useful.

Continue reading “Hack Your Gmail: A Quick Start For Google App Scripting”

35C3: Safe And Secure Drivers In High-Level Languages

Writing device drivers is always a good start for a journey into the Linux kernel code. Of course, the kernel is a highly complex piece of software, and if you mess up your code properly, you might take down the entire system with you. User-space drivers on the other hand might not look as good on your CV, but they can help to work around some of the dangers and complexity of the kernel space. Plus, you don’t necessarily have to limit yourself to C to write them, especially if you are concerned about the usual C pitfalls and the security issues they can lead to.

With that in mind, [Paul Emmerich] is researching the concept of Linux user-space drivers for Intel’s 10Gbit network cards using other high-level languages, and recruits his students to write their final theses about the implementation details of as many languages as possible.

At last year’s 34c3, [Paul] already demonstrated the basics of writing such a user-space network driver for Linux, which serves now as reference implementation for his students. We won’t see Bash or JavaScript here, but we will see a brief summary of what it generally means to develop user-space drivers in C#, Swift, OCaml, or Haskell, along a more detailed insight from [Sebastian Voit] and [Simon Ellmann] about Go and Rust. A collection of each language’s implementation can be found on GitHub.

Since some of these languages bring their own memory handling and perform unpredictable garbage collection, performance and latency are two big topics to cover here. But then, the general concept is language-independent, so even if nothing in the world could ever make you give up on C, you might at least take away some new ideas for driver development.
Continue reading “35C3: Safe And Secure Drivers In High-Level Languages”

When Unfolding An STL In Software, Math Isn’t The Tricky Part

Some time ago, [Trammell Hudson] took a shot at creating a tool that unfolds 3D models in STL format and outputs a color-coded 2D pattern that can be cut out using a laser cutter. With a little bending and gluing, the 3D model can be re-created out of paper or cardboard.

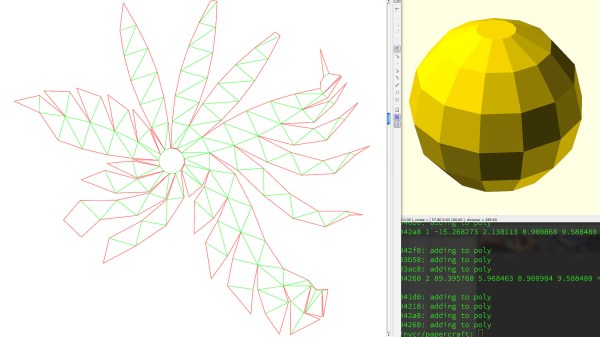
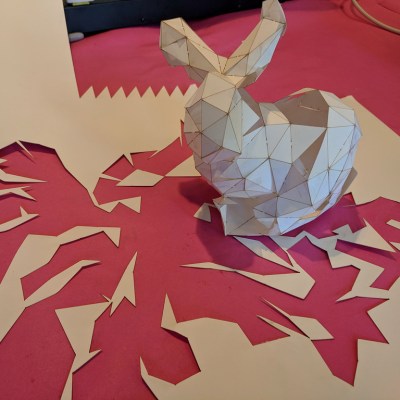
There are of course other and more full-featured tools for unfolding 3D models: Pepakura is used by many, but is not free and is Windows only. There is also a Blender extension called Paper Model that exists to export 3D shapes as paper models.

What’s interesting about [Trammell]’s project are the things he discovered while making it. The process of unfolding an STL may be conceptually simple, but the actual implementation is a bit tricky in ways that have little to do with number crunching.

For example, in a logical sense it doesn’t matter much where the software chooses to start the unfolding process, but in practice some start points yield much tighter groups of shapes that are easier to work with. Also, his software doesn’t optimize folding patterns, so sometimes the software will split a shape along a perfectly logical (but non-intuitive to a human) line and it can be difficult to figure out which pieces are supposed to attach where. The software remains in beta, but those who are interested can find it hosted on GitHub. It turns out that it’s actually quite challenging to turn a 3D model into an unfolded shape that still carries visual cues or resemblances to the original. Adding things like glue tabs in sensible places isn’t trivial, either.

Tools to unfold 3D models feature prominently in the prop-making world, and it’s only one of the several reasons an economical desktop cutter might be a useful addition to one’s workshop.

Machine Learning On Tiny Platforms Like Raspberry Pi And Arduino

Machine learning is starting to come online in all kinds of arenas lately, and the trend is likely to continue for the forseeable future. What was once only available for operators of supercomputers has found use among anyone with a reasonably powerful desktop computer. The downsizing isn’t stopping there, though, as Microsoft is pushing development of machine learning for embedded systems now.

The Embedded Learning Library (ELL) is a set of tools for allowing Arduinos, Raspberry Pis, and the like to take advantage of machine learning algorithms despite their small size and reduced capability. Microsoft intended this library to be useful for anyone, and has examples available for things like computer vision, audio keyword recognition, and a small handful of other implementations. The library should be expandable to any application where machine learning would be beneficial for a small embedded system, though, so it’s not limited to these example applications.

There is one small speed bump to running a machine learning algorithm on your Raspberry Pi, though. The high processor load tends to cause small SoCs to overheat. But adding a heatsink and fan is something we’ve certainly seen before. Don’t let your lack of a supercomputer keep you from exploring machine learning if you see a benefit to it, and if you need more power than just one Raspberry Pi you can always build a cluster to get your task done just a little bit faster, too.

Thanks to [Baldpower] for the tip!

Clever Wedges That Will Increase Your PCB Assembly Yield

If there’s one thing that will bring down the yield of your PCB assembly, it’s your solder paste. Put too much on, and you’ll get bridged leads. If you don’t put enough on, that pad might not make good contact. [ScalarElectric] has an amazing trick that’s sure to astonish and astound. Just use wedges and you’ll get better yield with fine-pitched components.

The trick here is to define the cream/solder paste layer of each package as a wedge on each pad instead of the usual rectangle. This gives a few benefits, the largest being the increased gap between paste shapes. You’re also getting a reduction in the total amount of paste applied, and a subsequent improvement in yield. (Reportedly, we’d love to see some data on this.)

PCB design tools usually have a way to alter the size of the cream/solder paste layer of a design, and indeed one option is to simply shrink the size of the paste layer elements. The trick to the wedges is increasing the total distance between solderpaste blobs while keeping the total amount of solderpaste high. This technique can be used down to 0.5mm pitch parts, and everything works like a charm.

While this is a little outside of our wheelhouse here at Hackaday — it is, after all, a novel use of existing tools that is mostly applicable to electronic design and production. [Ed Note: Sarcasm.] You can check out a few pics of this technique in the slideshow below. If you test this technique out, be sure to let us know how it went!

Maze Generator Keeps Plotter (and Kids) Busy

We can tell that [Jon Howell] is our kind of guy. After updating his vintage 1985 Hewlett-Packard plotter with WiFi and the ability to load SVG files, he obviously needed to find a bunch of stuff to run off with it. Gotta justify those hacks somehow. So he doubled down and decided support a hack with another hack by writing a maze generator to keep his plotter well fed. He was kind enough to unleash his creation on an unsuspecting Internet as an open source project, and now we all can benefit from a couple of reams worth of mazes.

The generator itself is written in Java, and should work on whatever operating system your box happens to be running thanks to the *nix and Windows wrapper scripts [Jon] provides. To create a basic maze, one simply needs to provide the script with the desired dimensions and the paper size. You can define the type of paper with either standard sizes (such as --paper a4) or in the case of a plotter with explicit dimensions (--paper 36x48in).

If you aren’t a big fan of right angles, there’s support for changing the internal geometry of the maze to use a hexagonal or triangle grid. You can even pass the program a black and white PNG “mask” which it will use as the boundaries for the maze itself, allowing for personalized puzzles of whatever shape catches your fancy. [Jon] even ran the Wrencher though his software, leading to the creation of a maze which we can neither confirm nor deny will be making an appearance on our Christmas cards this year.

Whether you need to prove to your significant other that the hours you spent fiddling with your plotter are well spent, or an easy way to entertain the junior humans in your life, you can thank [Jon] for your solution.