1985 Electric Vehicle Restoration

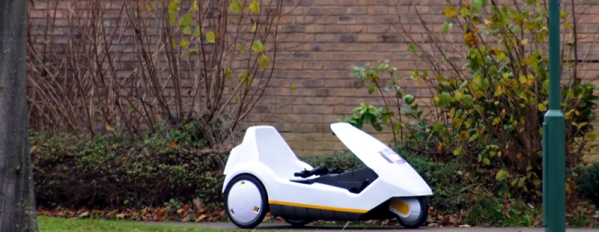
We tend to think of electric vehicles as a recent innovation, however many successful products are not the first ones to appear on the market. We have a habit of forgetting the progenitors such as mechanical scanned TVs or the $10,000 Honeywell kitchen computer. A case in point is [Clive Sinclair]’s C5 electric vehicle from 1985. If you’ve heard of it at all, you probably recall it was considered a stellar disaster when it was released. But it is a part of electric vehicle history and you can see [RetroManCave] talk to [Dave] about how he restored and operates a C5 of his own in the video below. If you want to dig into the actual restoration, [Dave] has three videos about the teardown and rebuild on his channel.

Sinclair saw this as the first shot across the bow with a series of electric vehicles, but it was doomed from the start. It isn’t a car. In fact, it is more like a bicycle with a battery. It seats one occupant who is exposed to the elements. It had a very tiny trunk. It can go — optimistically — 15 miles per hour and runs out of juice after about 20 miles — if you helped out by pedaling. If you weren’t up for the exercise, you’d get less out of the lead-acid battery.

Continue reading “1985 Electric Vehicle Restoration”

When Unfolding An STL In Software, Math Isn’t The Tricky Part

Some time ago, [Trammell Hudson] took a shot at creating a tool that unfolds 3D models in STL format and outputs a color-coded 2D pattern that can be cut out using a laser cutter. With a little bending and gluing, the 3D model can be re-created out of paper or cardboard.

There are of course other and more full-featured tools for unfolding 3D models: Pepakura is used by many, but is not free and is Windows only. There is also a Blender extension called Paper Model that exists to export 3D shapes as paper models.

What’s interesting about [Trammell]’s project are the things he discovered while making it. The process of unfolding an STL may be conceptually simple, but the actual implementation is a bit tricky in ways that have little to do with number crunching.

For example, in a logical sense it doesn’t matter much where the software chooses to start the unfolding process, but in practice some start points yield much tighter groups of shapes that are easier to work with. Also, his software doesn’t optimize folding patterns, so sometimes the software will split a shape along a perfectly logical (but non-intuitive to a human) line and it can be difficult to figure out which pieces are supposed to attach where. The software remains in beta, but those who are interested can find it hosted on GitHub. It turns out that it’s actually quite challenging to turn a 3D model into an unfolded shape that still carries visual cues or resemblances to the original. Adding things like glue tabs in sensible places isn’t trivial, either.

Tools to unfold 3D models feature prominently in the prop-making world, and it’s only one of the several reasons an economical desktop cutter might be a useful addition to one’s workshop.

Improving Router-Based Dev Boards With The Onion Omega2 Pro

Before we had Raspberry Pis and Beaglebones, the art of putting a Linux system in a small, portable project was limited to router hacking. The venerable WRT54G controlled Internet-connected robots with a careful application of a Unix-ey firmware. Now, things are different but there’s still a need for a cheap, portable Linux system that’s just good enough to get the job done. Now, there’s an upgrade to the board that follows in the footsteps of that router hacking The Onion Omega2 Pro is up on Crowd Supply, and it’s got more buttons, more switches, and it’s still smaller than a breadboard.

The Onion Omega2 Pro is a slight upgrade over the breadboard-friendly SoM launched a few years ago. The Pro version features a 580 MHz MIPS CPU, 512 MB of RAM (Update: this is 128 MB physical RAM and 384 MB flash swap file), 8 GB of storage, and connectivity with b/g/n WiFi. Unlike the previous version, this is a far more functional system with a 30-pin expansion header, support for battery charging, a micro USB for charging and serial, and a USB host port. Because this is at its heart the guts of a router on a development board, you also get all the fun of WiFi networking. The expansion header connects to various add-ons including a GPS module, OLED display, and an Ethernet port.

Now we have Raspberry Pis and other various boards based on smartphone Systems on Chip, but sometimes you don’t need that much overhead. You don’t need weird Linux distributions dealing with ARM bootloaders. Sometimes you just need something simple, and the Onion Omega2 Pro does just that.

Motorize Your Camera Slider, The Hacker Way

Camera sliders are a fantastic tool for those who wish to shoot beautiful and smooth panning video, or take expressive time-lapse shots. They can also be remarkably expensive, which creates an incentive for the DIYer to innovate at home. [Richard] wanted a motorized slider and didn’t want to break the bank, and thus, a build was born.

Starting with an existing non-motorized camera slider makes things easier, though there’s no reason [Richard]’s techniques couldn’t be applied to a completely DIY build. A NEMA stepper motor is fitted to the frame, and connected to the camera shuttle with a toothed belt. The stepper is controlled by an Arduino, which allows for both timelapse and smooth panning modes, and can be controlled with an IR remote sourced from Amazon. The slider is also interfaced with a Processing sketch, which gives a graphical representation of the slider’s current position on the laptop’s screen, which helps for setting up a shot.

[Richard] has shared the code and a shopping list, and is confident that the build can be completed for under $100. That’s a satisfying price given the quality of shots possible with a good slider.

We see plenty of slider builds here, including this impressive pantograph-type build. Video after the break.

[Thanks to Baldpower for the tip!]

Continue reading “Motorize Your Camera Slider, The Hacker Way”

Does Electronic Current Flow Like Water?

If you think about an asylum, there are two kinds of people in it: staff and patients. We aren’t sure which one [Nick Lucid] is in the latest The Science Asylum video that tries to answer the question: does electricity really flow like water?

If you think about it, that isn’t such a strange question. We talk about electrical current — just like current in a stream. Many introductory books on electricity try to relate voltage to water pressure, electric current to water flow, and resistance to changes in pipe volume. Of course, you probably figured out that analogy doesn’t — ahem — hold water to some level of detail, but just how far off is it? We won’t spoil the surprise so you can watch the video to find out, but there were several really interesting tidbits. How fast do electrons drift through a conductor? The speed of light? Actually, no — remember, drift velocity is the average speed of an individual electron, not the speed of the electric current.

Continue reading “Does Electronic Current Flow Like Water?”

Printed It: Parametric Hex Key Holder

Desktop 3D printing is an incredible technology to be sure, but it’s not a cure-all. If you’re interested in making something in large numbers, or if production speed is a concern, 3D printing probably isn’t what you’re looking for. But on the flip side, if you want to make a few highly specialized or customized objects, desktop 3D printing represents an absolute revolution in capability for the individual hacker and maker.

In our ongoing mission to prove that desktop 3D printing isn’t just a novelty, we keep a close eye out for printable objects which play to the strengths of the technology. You won’t find any benchmarks or dust collectors here; everything featured in Printed It is a bona fide practical object. An ideal entry into this series is something that you wouldn’t need to print more than a few times, isn’t easily sourced or made via traditional means, and if possible, offers some form of customization which makes it more suitable to the individual’s needs than what’s commercially available.

Not every object we feature hits all of these marks, but this parametric hex key holder designed by [Daniel Leitner] absolutely does. This object was created to address a problem that we imagine most Hackaday readers share: taming an ever-growing collection of hex keys. What’s more, this design is something of an open source success story. It’s an idea that passed through the hands of multiple community members, becoming more refined and functional as it went. Even if you don’t personally need to wrangle some unruly hex keys, this object is a fascinating look at how 3D printing and the community that has sprouted up around it is truly evolving the process of going from concept to execution.

Continue reading “Printed It: Parametric Hex Key Holder”

HD Video And Telemetry Link Uses Standard WiFi Hardware

[GlytchTech] decided to implement his own Digital Data Link (DDL) for his drone experiments, and by using a Raspberry Pi Zero and some open-source software, he succeeded in creating a mostly self-contained system that delivers HD video and telemetry using an Android phone as a display.

USB tethered Android phone used as a display and touch interface.

The link uses standard WiFi hardware in a slightly unusual way to create a digital data link that acts more like an analog system, with a preference for delivering low latency video and a graceful drop-off when signal quality gets poor. A Raspberry Pi Zero, Alfa NEH WiFi card, external antenna, battery, and a 3D printed enclosure result in a self-contained unit. Two are needed: one for each end of the link. One unit goes on the drone and interfaces to the flight controller, and the other is for the ground station.

A companion android app allows for just about any old Android phone to serve as video feed, on-screen display of telemetry data, and touchscreen interface.

The software is DroneBridge (GitHub repository) and it implements Wifibroadcast which uses WiFi radios, but without the usual WiFi functionality. A Raspberry Pi is the usual platform, but there’s also an ESP32 port. The software is capable of even more, but so far suits [GlytchTech]’s needs just fine, and he was able to refine his original Watch_Dogs-inspired hacking drone with it.