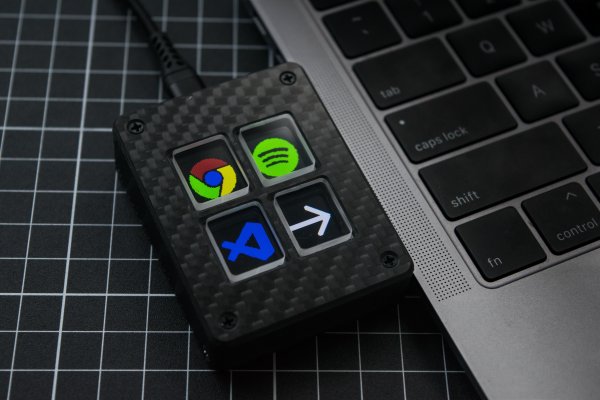
A small keyboard form factor retrocomputer with blue keys on a black background sits in front of a display and a LEGO model of the Space Shuttle. There are a number of jumper wires and a breadboard coming from an open panel on the right side of the machine.

Aqua PCB Is A Big Upgrade For The Mattel Aquarius

In case you weren’t around in the 80s, or you happened to blink, you may have missed the Mattel Aquarius computer. [Nick Bild] has a soft spot in his heart for the machine though and built the Aqua cartridge to make the Aquarius into a more usable machine.

Originally equipped with a mere 4 KB of RAM and a small, rubbery keyboard, it’s not too surprising that the Aquarius only lasted five months on the market. [Nick] decided on the cartridge slot to beef up the specs of this little machine given the small number of expansion ports on the device. Adding 32 KB of RAM certainly gives it a boost, and he also designed an SD card interface called Aqua Write that connects to the Aqua cartridge for easily transferring files from a more modern machine.

The Aqua Write uses an Arduino Mega 2560 to handle moving data between the SD card and the system’s memory. This is complicated somewhat because a “PLA sits between the Z80 and data bus that XORs data with a software lock code (initialized to a random value on startup).” [Nick] gets around this by running a small program to overwrite the lock code to zero after startup.

Getting data on and off retrocomputers can certainly be a challenge. If you’re trying to get files on or off another old machine, check out this Simple Universal Modem or consider Using a Raspberry Pi as a Virtual Floppy Drive.

Arduino Lo-Fi Orchestra closeup thumbnail

Lo-Fi Orchestra Learns Tubular Bells

Hardware projects often fall into three categories: Those that flash lights, those that make sounds and those that move. This virtuoso performance by [Kevin]’s “Lo-Fi Orchestra” manages all three, whilst doing an excellent job of reproducing the 1973 musical classic Tubular Bells by Mike Oldfield.

Producing decent polyphonic sounds of different timbres simultaneously is a challenge for simple microcontroller boards like Arduinos, so [Kevin] has embraced the “More is more” philosophy and split up the job of sound generation in much the same way as a traditional orchestra might. Altogether, 11 Arduino Nanos, 6 Arduino Unos, an Arduino Pro Mini, an Adafruit Feather 32u4, and a Raspberry Pi running MT32-Pi make up this electronic ensemble.

Arduino servo drumkit
Arduino Servo & Relay Drumkit

The servo & relay drumkit is a particular highlight, providing some physical sounds to go along with the otherwise solid-state generation.

The whole project is “conducted” over MIDI and the flashing sequencer in the middle gives a visual indication of the music that is almost hypnotic. The performance is split into two videos (after the break), and will be familiar to fans of 70’s music and classic horror movies alike. We’re astonished how accurately [Kevin] has captured the mood of the original recording.

If this all looks slightly familiar, it may be because we have covered the Lo-Fi Orchestra before, when it entertained us with a rousing rendition of Gustav Holst’s Planets Suite. If you’re more interested in real Tubular Bells than synthesized ones, then check out this MIDI-controlled set from 2013. Continue reading “Lo-Fi Orchestra Learns Tubular Bells

Tiny Thin Client Is Small But Compatible

We were impressed with [moononournation’s] tiny thin client project. It claims to use an Arduino, but as you might guess it is using the Arduino software along with a network-enabled microcontroller like an ESP32. The impressive part is that it is standards-compliant and implements VNC’s RFB protocol.

The original coding for RFB on Arduino is from [Links2004] and armed with that, the thin client is probably easier to create than you would guess. However, this project wanted to use a larger screen and found that it led to certain problems. In particular, the original code had a 320×240 display. This project was to use an 800×480 display, but with the limits on the ESP32, the frame rate possible would be under 7 frames per second. The answer was to combine a 16-bit parallel interface with better compression back to the VNC server.

The little keyboard is probably not very practical, but it is compact. That would be another easy thing to modify. Currently, the keyboard uses I2C, but it would be straightforward to change things up. This would be a worthy base to build a bigger project on top. A 3D printed enclosure would be nice, too.

We’ve seen a number of projects built around commercial thin clients. Some from defunct businesses are good sources for obscure parts, too.

Continue reading “Tiny Thin Client Is Small But Compatible”

Simple CNC Gear Production With Arduino

We’ve seen plenty of people 3D printing custom gears over the years, but [Mr Innovative] decided against an additive process for his bespoke component. He ended up using a simple CNC machine that makes use of several components that were either salvaged from a 3D printer or produced on one. Using a small saw blade, the machine cuts gear teeth into some plastic material and — presumably — could cut gears into anything the saw blade was able to slice into, especially if you added a little lubrication, cooling, and dust removal.

If you’ve built a 3D printer, you’ll see a lot of familiar parts. Stepper motors, aluminum extrusion, straight rods, bearing blocks, and rod holders are all used in the build. There’s also a lead screw and the associated components you usually see in a printer’s Z-axis. Naturally, an Arduino drives the whole affair.

The saw blade was custom-made from a washer, grinding an edge and using a 3D printed template to cut teeth in it. We might have been more inclined to use a cut-off wheel from a rotary tool, but this certainly did the trick. An LCD accepts the gear diameter and number of teeth. The stepper rotates the correct number of degrees and another stepper lowers the cutting head which is spinning with a common DC motor.

As impressive as this machine is, the fact remains that a 3D printer can produce more complex designs. For example, a herringbone pattern can help with alignment issues. It has been done many times. You can even use a resin printer, although you might prefer to stick with FDM.

Continue reading “Simple CNC Gear Production With Arduino”

DIy Arduino FM radio enclosure with the lid off, showing the electronics inside

DIY Arduino Due TEA5767 FM Radio

Older hackers will remember that a crystal set radio receiver was often one of the first projects attempted.  Times have changed, but there’s still something magical about gathering invisible signals from the air and listening to the radio on a homemade receiver. [mircemk] has brought the idea right up to date by building an FM radio with an OLED display, controlled with a rotary encoder.

The design is fairly straightforward, based as it is on another project that [mircemk] found on another site, but the build looks very slick and would take pride of place on any hacker’s workbench. An Arduino Due forms the heart of the project, controlling a TEA5767 module, an SH1106 128×64 pixel OLED display and a rotary encoder. The sound signal is passed through an LM4811 headphone amplifier for private listening, and a PAM8403 Class D audio amplifier for the built-in loudspeaker. The enclosure is made from PVC panels, and accented with colored adhesive tape for style.

It’s easier than ever before to quickly put together projects like this by connecting pre-built modules and downloading code from the Internet, but that doesn’t mean it’s not a worthwhile way to improve your skills and make some useful devices like this one. There are so many resources available to us these days and standing on the shoulders of giants has always been a great way to see farther.

We’ve shown some other radio projects using Arduinos and the TEA5767 IC in the past, such as this one on a tidy custom PCB, and this one built into an old radio case.

Continue reading “DIY Arduino Due TEA5767 FM Radio”

close-up image of a philodendron houseplant with electrodes attached, connected to a robot arm holding a machete

(Mostly) Harmless Houseplant Wields Machete

In a straight fight between a houseplant and a human, you might expect the plant to be at a significant disadvantage. So [David Bowen] has decided to even the odds a little by arming this philodendron with a robot arm and a machete.

The build is a little short on details but, from the video, it appears that adhesive electrodes have been attached to the leaves of the recently-empowered plant and connected directly to analog inputs of an Arduino Uno.  From there, the text tells us that the signals are mapped to movements of the industrial robot arm that holds the blade.

It’s not clear if the choice of plant is significant, but an unarmed philodendron appears to be otherwise largely innocuous, unless you happen to be a hungry rodent. We hope that there is also a means of disconnecting the power remotely, else this art installation could defend itself indefinitely! (or until it gets thirsty, at least.) We at Hackaday welcome our new leafy overlords.

We have covered the capabilities of plants before, and they can represent a rich seam of research for the home hacker.  They can tell you when they’re thirsty, but can they bend light to their will?  We even held a Plant Communication Hack Chat in 2021.

Continue reading “(Mostly) Harmless Houseplant Wields Machete”

Arduino IDE v2.0 screen with callout tags to identify features

Arduino IDE 2.0 Is Here

Arduino have released the latest version of their Integrated Development Environment (IDE), Version 2.0 and it is a big step up from the previous release, boasting plenty of new features to help you to develop your code more easily.

As the de-facto way for beginners to get into programming hardware, more experienced users have sometimes complained about what they see as the over-simplistic IDE — even lacking relatively basic features such as autocomplete. The new version provides this, and much more besides. Continue reading “Arduino IDE 2.0 Is Here”