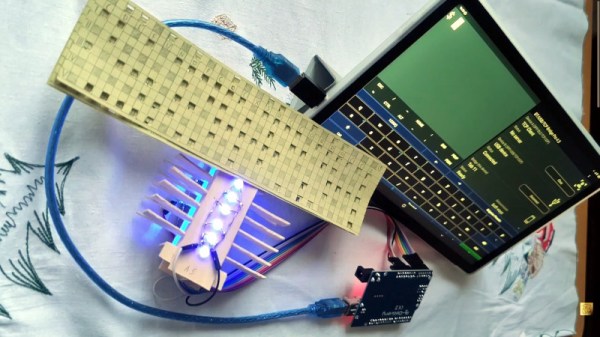
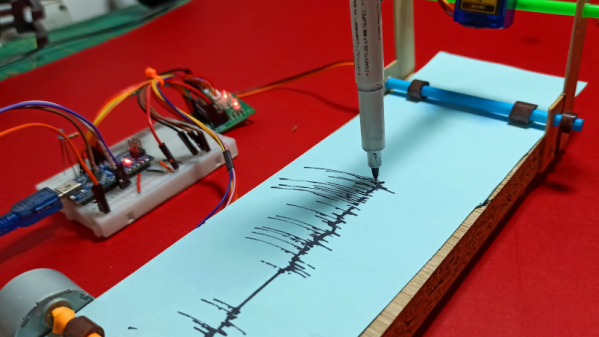
Adding A Third Wheel (And Speed Boost) To An Electric Scooter

The story of how [Tony]’s three-wheeled electric scooter came to be has a beginning that may sound familiar. One day, he was browsing overseas resellers and came across a new part, followed immediately by a visit from the Good Ideas Fairy. That’s what led him to upgrade his DIY electric scooter to three wheels last year, giving it a nice speed boost in the process!

The part [Tony] ran across was a dual brushless drive unit for motorizing a mountain board. Mountain boards are a type of off-road skateboard, and this unit provided two powered wheels in a single handy package. [Tony] ended up removing the rear wheel from his electric scooter and replacing it with the powered mountain board assembly.

He also made his own Arduino-based interface to the controller that provides separate throttle and braking inputs, because the traditional twist-throttle of a scooter wasn’t really keeping up with what the new (and more powerful) scooter could do. After wiring everything up with a battery, the three-wheeled electric scooter was born. It’s even got headlights!

[Tony]’s no stranger to making his own electric scooters, and the fact that parts are easily available puts this kind of vehicular experimentation into nearly anybody’s hands. So if you’re finding yourself inspired, why not order some stuff, bolt that stuff together, and go for a ride where the only limitation is personal courage?

Minimal Tic Tac Toe Business Card

The PCB business card has long been a way for the aspiring electronics engineer to set themself apart from their peers. Handing out a card that is also a two player game is a great way to secure a couple minutes of a recruiter’s time, so [Ryan Chan] designed a business card that, in addition to his contact information, also has a complete Tic-Tac-Toe game built in.

[Ryan] decided that an OLED display was too expensive for something to hand out and an LED matrix too thick, so he decided to keep it simple and use an array of 18 LEDs—9 in each of two colors laid out in a familiar 3×3 grid. An ATmega328p running the Arduino bootloader serves as the brains of the operation. To achieve a truly minimal design [Ryan] uses a single SMD pushbutton for control: a short press moves your selection, a longer press finalizes your move, and a several-second press switches the game to a single-player mode, complete with AI.

If you’d like to design a Tic-Tac-Toe business card for yourself, [Ryan] was kind enough to upload the schematics and code for his card. If you’re still pondering what kind of PCB business card best represents you, it’s worth checking out cards with an updatable ePaper display or a tiny Tetris game.

Continue reading “Minimal Tic Tac Toe Business Card”

Sketch of a Tandy TRS-80 Model 100 with Arduino Mega 2560

TRS-80 Model 100 Gets Arduino Heart Transplant

When [Stephen Cass] found himself with a broken Tandy TRS-80 Model 100 portable computer, the simplest solution was to buy another broken one and make one working computer from two non-working computers. However, this left him with a dilemma — what to do with the (now even more) broken one left over?

LCD layout is unusual by modern standard, but optimized for fast updates

Naturally, he did what a lot of us would do and used modern hardware to interface with the original parts that still work. In this case it meant replacing the motherboard with an Arduino Mega 2560.

Luckily, the Model 100 has a substantial fanbase and there’s a lot of helpful information available online, including the detailed service manual, that helped [Stephen] to understand how to drive the unusual display.  The LCD has a resolution of 240×64 pixels, which are broken down into eight zones of 50×32 pixels, and two zones of 40×42 pixels.  Each zone is then further divided into four banks, eight pixels tall, so that each column of eight pixels corresponds to a single byte.

Every one of the ten zones is controlled by an individual HD44102 driver IC, connected to a 30-bit wide bus for selecting the correct chip, bank and column.

With the Arduino handling the data, the old LCD still needed a -5 V supply for contrast and an RC filter to smooth out the PWM signal [Stephen] is using to adjust the viewing angle.

With the new interface, [Stephen] is able to access all of the pixels on the original display, and to use modern graphics libraries such as displayio. With the display issue solved, he intends to use a separate Teensy 4.1 to connect with the keyboard matrix and provide a VT100 terminal interface.

Schematic of the HD44102 driver circuit

Upcycling old, broken hardware can be a lot of fun and is always educational.  Understanding why certain design decisions were made at a time when the engineering trade-offs were different can lead to insights that are directly relevant to modern designs when resources get tight. In this case, the quirky LCD drivers were a response to making the display of text as efficient as possible, so as not to overburden the processor.

The TRS-80 computers are ripe for hacking, with their “built-for-service” designs, and we’ve featured a few in the past.  Some have replaced the motherboard with something newer, like [Stephen], whereas others have also replaced the display, or connected them to the cellphone network.

Have you found new ways to get old hardware working? Tell us in the comments below or send us a message on the Hackaday tips line.

Thanks to [nb0x0308] for the tip!

Trojans Can Lurk Inside AVR Bootloaders

If there’s one thing we’ve learned over the years, it’s that if it’s got a silicon chip inside, it could be carrying a virus. Research by one group focused on hiding a trojan inside an AVR Arduino bootloader, proving even our little hobbyist microcontrollers aren’t safe.

The specific aim of the research was to hide a trojan inside the bootloader of an AVR chip itself. This would allow the trojan to remain present on something like a 3D printer even if the main firmware itself was reinstalled. The trojan would still be able to have an effect on the printer’s performance from its dastardly hiding place, but would be more difficult to notice and remove.

The target of the work was the ATmega328P, commonly used in 3D printers, in particular those using the Marlin firmware. For the full technical details, you can dive in and read the research paper for yourself. In basic terms, though, the modified bootloader was able to use the chip’s IVSEL register to allow bootloader execution after boot via interrupt. When an interrupt is called, execution passes to the trojan-infected bootloader’s special code, before then returning to the program’s own interrupt to avoid raising suspicion. The trojan can also execute after the program’s interrupt code too, increasing the flexibility of the attack. Continue reading “Trojans Can Lurk Inside AVR Bootloaders”

An orange and white cat eats from a bowl with a hinged cover. The cat and the bowl are on top of an MDF platform.

Load Cells To Get The Right Pet The Right Food

If you have more than one pet, you may know how hard it is to tell how much each furry friend is eating. If you introduce prescription foods, then this minor annoyance can have a major impact on your pet’s health. Facing this dilemma, [tomasdiazwahl] set out to make a pet feeder that feeds his pets exactly what they need when they approach the feeder.

Using the ever-popular Arduino Uno, the feeder is connected to a platform that uses load cells to detect the pet’s weight. The weight data is then used to identify which animal is looking for food. Once the pet is identified, the correct food bowl opens. It seems this prototype only has one food chamber to keep unauthorized pets from eating the special food, but the basic idea should be extensible to two or more chambers. While some existing solutions read the pet’s microchip or NFC collars to determine who’s at the feeder, [tomasdiazwahl] decided against these given the fickleness of trying to reliably get a reader at the correct position relative to the pet. As long as you don’t have multiple pets with the same weight, it should work just fine.

This project has a nice mix of woodworking, 3D printing, and electronics showing what can be accomplished when you aren’t afraid to mix techniques. We also really appreciate that [Tomasdiazwahl] spent the extra time to include a testing procedure and safety mechanism into the project. Designing a device to improve your pet’s health shouldn’t come with a safety risk!

This isn’t the first cat feeder we’ve covered that uses weight to tell the difference between the pets, and if you want a simpler project to start with, check out this Simple Auger Pet Feeder.

Arduino Nano Powers Reverse Polish Notation Calculator

There’s something about Reverse Polish Notation (RPN) and the calculators that use it. It calls to mind a time when a calculator was a serious tool, and not just a throwaway toy. Created in the legacy of such calculators by HP and Texas Instruments, [Simon Boak] shows off his SB116, sporting an Arduino Nano under the hood. It’s a fully custom design, with a hand-built metal case, a custom PCB for the keyboard, and a tiny OLED display for maximum retro green goodness.

The impetus for this build was to replace a particular calculator, a well-used TI Programmer, that’s useful for working with 6502 assembly. The SB116 supports binary, octal, decimal, and hex; and boasts some downright useful functions — AND, NOT, OR, XOR, and bitshifts. The source code is available, but you’re on your own for the case and keyboard. And for maximized retro faux-nostalgia, [Simon] designed a box that would have looked right at home on an 80s store shelf.

Stick around for more retro-modern takes on calculators, or tales of repairing a genuine vintage model.

Ethersweep: An Easy-To-Deploy Ethernet Connected Stepper Controller

[Neumi] over on Hackaday.IO wanted a simple-to-use way to drive stepper motors, which could be quickly deployed in a wide variety of applications yet to be determined. The solution is named Ethersweep, and is a small PCB stack that sits on the rear of the common NEMA17-format stepper motor. The only physical connectivity, beside the motor, are ethernet and a power supply via the user friendly XT30 connector. The system can be closed loop, with both an end-stop input as well as an on-board AMS AS5600 magnetic rotary encoder (which senses the rotating magnetic field on the rear side of the motor assembly – clever!) giving the necessary feedback. Leveraging the Trinamic TMC2208 stepper motor driver gives Ethersweep silky smooth and quiet motor control, which could be very important for some applications. A rear-facing OLED display shows some useful debug information as well as the all important IP address that was assigned to the unit.

Control is performed with the ubiquitous ATMega328 microcontroller, with the Arduino software stack deployed, making uploading firmware a breeze. To that end, a USB port is also provided, hooked up to the uC with the cheap CP2102 USB bridge chip as per most Arduino-like designs. The thing that makes this build a little unusual is the ethernet port. The hardware side of things is taken care of with the Wiznet W5500 ethernet chip, which implements the MAC and PHY in a single device, needing only a few passives and a magjack to operate. The chip also handles the whole TCP/IP stack internally, so only needs an external SPI interface to talk to the host device.

Continue reading “Ethersweep: An Easy-To-Deploy Ethernet Connected Stepper Controller”