Polar Platform Spins Out Intricate String Art Portraits

We have semi-fond memories of string art from our grade school art class days. We recall liking the part where we all banged nails into a board, but that bit with wrapping the thread around the nails got a bit tedious. This CNC string art machine elevates the art form far above the grammar school level without all the tedium.

Inspired by a string art maker we recently feature, [Bart Dring] decided to tackle the problem without using an industrial robot to dispense the thread. Using design elements from his recent coaster-creating polar plotter, he built a large, rotating platform flanked by a thread handling mechanism. The platform rotates the circular “canvas” for the portrait, ringed with closely spaced nails, following G-code generated offline. A combination of in and out motion of the arm and slight rotation of the platform wraps the thread around each nail, while rotating the platform pays the thread out to the next nail. Angled nails cause the thread to find its own level naturally, so no Z-axis is needed. The video below shows a brief glimpse of an additional tool that seems to coax the threads down, too. Mercifully, [Bart] included a second fixture to drill the hundreds of angled holes needed; the nails appear to be inserted manually, but we can think of a few fixes for that.

We really like this machine, both in terms of [Bart]’s usual high build-quality standards and for the unique art it creates. He mentions several upgrades before he releases the build files, but we think it’s pretty amazing as is.

Continue reading “Polar Platform Spins Out Intricate String Art Portraits”

What Happens When You Cross A Brick With A Pixel?

There are a great many technologies we use to display information every day. We’re all familiar with plasma displays and LCDs, and then there’s more esoteric hardware like the split flap displays on municipal buses and around train stations.  However, Breakfast have been working on something that turns architectural features into a display at the same time. Enter Brixels.

The name is a portmanteau of brick and pixel, indicating that each individual brick can be independently addressed as a visual element. A Brixel installation consists of a series of columns, stacked with Brixel elements. Each individual brick on the column contains a stepper motor which can set the rotational position of the brick. The outer appearance of the individual bricks is highly customizable, as the motor hardware is integrated into the column itself. A Linux machine is used as a primary controller, which passes commands to each column’s controller over RS485, and the column controllers then pass instructions to each individual Brixel.

The Brixels are capable of continuous 360 degree rotation and also contain LEDs for various illumination based effects. The largest current installation is the Brixel Mirror, standing at 18 feet wide, 6 feet high, and containing 540 individually addressable Brixels. These are built with one half covered in a mirror finish, and combined with a depth-sensing camera for all kinds of fun interactive effects.

Brixels show that architectural features don’t have to be static – they can become kinetic, living things that can be aesthetically beautiful and also useful. Breakfast are known for their installations which use modern electronics to push the limits in their artistic installations. Their work on high-speed flip dot displays is particularly impressive. Video after the break.

[Thanks to Sheldon for the tip!]

Continue reading “What Happens When You Cross A Brick With A Pixel?”

Relive The Dot Matrix Glory Days With Your 3D Printer

With the cost of 3D printers dropping rapidly, we’ve started to see a trend of hackers re-purposing them for various tasks. It makes perfect sense; with the hotend and extruder turned off (or removed entirely), you’ve got a machine that can move a tool around in two or three dimensions with exceptional accuracy. Printers modified to carry lasers, markers, and even the occasional rotary tool, are becoming a common sight in our tip line.

Last year [Matthew Rayfield] attached a marker to his 3D printer and had it sketch out some pictures, but recently he decided to revisit the idea and try to put a unique spin on it. The end result is a throwback to the classic dot matrix printers of yore utilizing decidedly modern hardware and software. There’s something undeniably appealing about the low-fi nature of dot matrix printing, and when fed the appropriate images this setup is capable of producing something which we’ve got to admit is dangerously close to being art.

To create these images, [Matthew] has created “Pixels-to-Gcode”, an online service that anyone can use to turn an arbitrary image into GCode they can feed their 3D printer. There’s a number of options available for you to play with so you can dial in the specific effect you’re looking for. Pointillist images can be created using a tight spacing of dots, but widen them up, and your final image becomes increasingly abstract.

The hardware side of this project is left largely as an exercise for the reader. [Matthew] has attached a fine-point pen to his printer’s head using a rubber band, but admits that it’s far from ideal. A more robust approach would be some kind of 3D printed device that allows you to quickly attach your pen or marker so the printer can be easily switched between 2D and 3D modes. We’d also be interested in seeing what this would look like if you used a laser mounted on the printer to burn the dots.

Back in the ancient days of 2012, we saw somebody put together a very similar project using parts from floppy and optical drives. The differences between these two projects, not only in relative difficulty level but end result, is an excellent example of how the hacker community is benefiting from the widespread availability of cheap 3D motion platforms.

Continue reading “Relive The Dot Matrix Glory Days With Your 3D Printer”

How To Make Bisected Pine Cones Look Great, Step-by-Step

[Black Beard Projects] sealed some pine cones in colored resin, then cut them in half and polished them up. The results look great, but what’s really good about this project is that it clearly demonstrates the necessary steps and techniques from beginning to end. He even employs some homemade equipment, to boot.

Briefly, the process is to first bake the pine cones to remove any moisture. Then they get coated in a heat-activated resin for stabilizing, which is a process that infuses and pre-seals the pine cones for better casting results. The prepped pine cones go into molds, clear resin is mixed with coloring and poured in. The resin cures inside a pressure chamber, which helps ensure that it gets into every nook and cranny while also causing any small air bubbles introduced during mixing and pouring to shrink so small that they can’t really be seen. After that is cutting, then sanding and polishing. It’s an excellent overview of the entire process.

The video (which is embedded below) also has an outstanding depth of information in the details section. Not only is there an overview of the process and links to related information, but there’s a complete time-coded index to every action taken in the entire video. Now that’s some attention to detail.

Continue reading “How To Make Bisected Pine Cones Look Great, Step-by-Step”

The Blackest Black, Now In Handy Pocket Size

If you thought “carbon nanotubes” were just some near-future unobtainium used in space elevators, don’t worry, you certainly aren’t alone. In reality, while the technology still has a way to go, carbon nanotube production has already exceeded several thousand tons per year and there are products you can buy today that are using this decidedly futuristic wonder material. Now there’s even one you can put in your pocket.

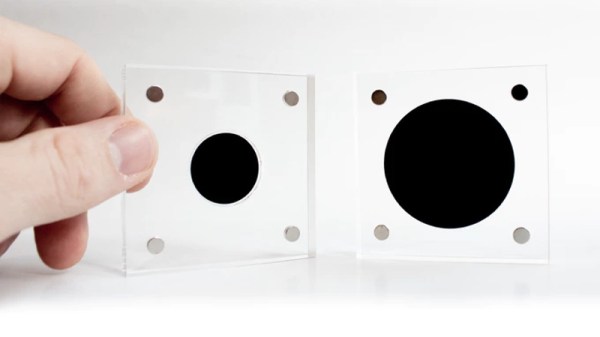
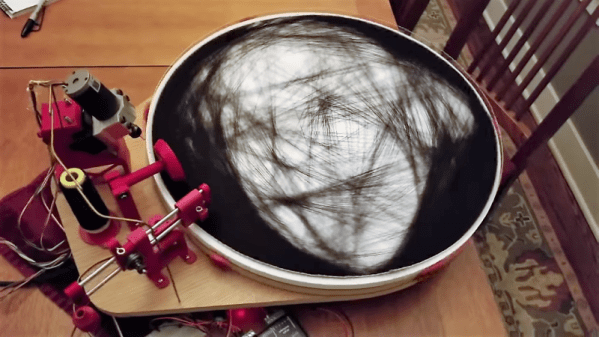
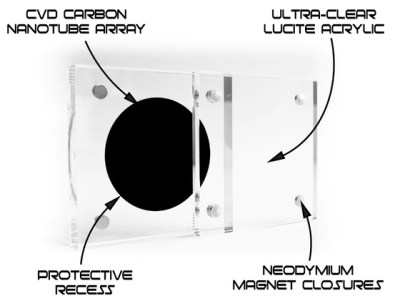
Created by [Simon], a designer in the UK, this small carbon nanotube array is described as “A simulated black hole” because the surface absorbs 99.9% of the visible light that hits it. Protected by a clear acrylic case, the sample of the material makes a circle that’s so black it gives the impression you’re looking into deep space. Unfortunately, no time-dilating gravitational forces are included at any of level of support in the ongoing Kickstarter campaign; but considering it was 100% funded in just a few hours, it seems like most people are OK with the trade-off.

[Simon] is well aware of the ongoing war between different methods of creating the “Blackest Black”, and he thinks he’s put his money (and by extension, his backer’s) money on the winner. Singularity is using a similar technology to the exclusively-licensed Vantablack, rather than a super-dark paint like “Black 3.0”. In fact he’s so confident that Singularity will appear darker than Black 3.0 that he mentions a head-to-head comparison is currently in the works.

If there’s a downside to the carbon nanotube array used in Singularity, it’s that you can’t actually touch it. [Simon] warns that while the acrylic case is only held together with magnets and can be opened for more careful inspection, actually touching the surface is absolutely not recommended. He says that even dust getting on the material is going to adversely effect its ability to absorb light, so you should really keep it buttoned up as much as possible.

While the Singularity looks like an interesting way to experience near perfect blackness, the concept itself is far from a novelty. A material that can absorb essentially all the light that hits it has important scientific, military, and of course artistic applications; so figuring out how to pull it off has become a pretty big deal.
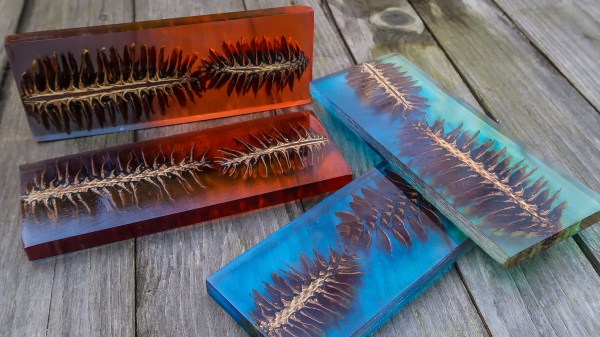
Simple Automata Extravaganza

[Federico Tobon] from [Wolfcat Workshop] spent Makevember in 2017 building a series of fascinating automata using the most basic of craft supplies and simple tools in his workshop. Using a combination of rigid materials such as wooden cubes, popsicle sticks, and paper clips and pliable ones like paper and rubber bands, his creations are way more delightful to play with compared to fidget spinners.

There are no assembly guides, instructions or building plans, but for a hacker, one look at these designs ought to be enough to glean how to build one, with some trial and error to get it right. And that is exactly what [Tobon] found to his delight. After sharing animated GIFs of his creations on social media, numerous other hackers built and shared their own versions of his designs as well as building some new ones.

He posts several other useful resources, some of which were the inspiration that got him started making these automata. All of them are pretty interesting, so do take a look at them too. There is a lot that young kids can learn from building these little machines, given some guidance and help from the elders. But the way we see it, it’s likely the old folks will enjoy them more.

The video after the break compiles all of the little machines for six minutes of viewing pleasure.

Continue reading “Simple Automata Extravaganza”

Create An Aurora Of Your Own

Throughout our day-to-day experiences, we come across or make use of many scientific principles which we might not be aware of, even if we immediately recognize them when they’re described. One such curiosity is that of caustics, which refers not only to corrosive substances, but can also refer to a behavior of light that can be observed when it passes through transparent objects. Holding up a glass to a light source will produce the effect, for example, and while this is certainly interesting, there are also ways of manipulating these patterns using lasers, which makes an aurora-like effect.

The first part of this project is finding a light source. LEDs proved to be too broad for good resolution, so [Neuromodulator] pulled the lasers out of some DVD drives for point sources. From there, the surface of the water he was using to generate the caustic patterns needed to be agitated, as the patterns don’t form when passing through a smooth surface. For this he used a small speaker and driver circuit which allows precise control of the ripples on the water.

The final part of the project was fixing the lasers to a special lens scavenged from a projector, and hooking everything up to the driver circuit for the lasers. From there, the caustic patterns can be produced and controlled, although [Neuromodulator] notes that the effects that this device has on film are quite different from the way the human eye and brain perceive them in real life. If you’re fascinated by the effect, even through the lens of the camera, there are other light-based art installations that might catch your eye as well.

Continue reading “Create An Aurora Of Your Own”