Apple’s Best Computer Gets WiFi

The greatest computer Apple will ever make isn’t the Apple II, it isn’t the Bondi Blue iMac, it isn’t the trash can, and it certainly isn’t whatever overheating mess they’re pushing out now. The best computer Apple will ever make is the SE/30, at its time a server in a tiny portable shell, and capable of supporting 128 Megabytes of RAM thirty years ago.

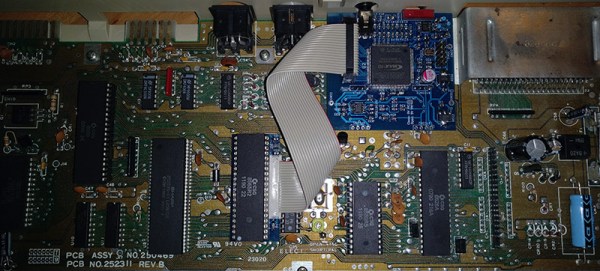
Over the years, people have extended and expanded the SE/30 to absolutely ludicrous degrees, but now we have a simple way of adding WiFi to this classic computer. Over on the 68kmla forums, [ants] discovered a tiny cheap card that could easily serve as an Ethernet to WiFi bridge. After attaching this card to a Danaport Ethernet card and bending some aluminum for a bracket, they had a WiFi antenna sticking out of the back of a 30-year-old computer.

But adding a WiFi card to an old computer is nothing new — this could have been done with a Pi, or if you’re a hacker, a TP-Link router flashed with OpenWRT. To really do this right, you’ll need integration with the operating system, and that’s where this build goes off the rails. [ants] wrote a WiFi extension for System 7 (with the relevant GitHub)

The problem with the Vonets WiFi card is that configuration has to be done through a browser. Since there are no modern browsers for classic macs, this meant either pulling out a PowerBook or doing the configuration through your daily driver desktop PC. The WiFi extension gets around that by giving a classic mac the ability to configure the Vonets card almost automatically. This extension also looks like how you would configure the WiFi on a modern mac, complete with the WiFi icon in the toolbar. It’s beautiful, and one of the rare examples of modern 68k mac programming.

As for what you can do by adding WiFi to a 30-year-old computer with a 16MHz processor, the answer is a resounding, ‘not much’. Your choice of browsers is limited (iCab seems to be the best), but you can load the Google homepage slowly. HTTPS isn’t going to work, and the Internet right now is full of megabytes of Javascript cruft. If you find a nice, lightweight web page — such as the Hackaday Retro Edition, for example — you’re looking at a capable web browsing machine. Of course, the real use case for giving the SE/30 WiFi is file transfer around the home network, but still: it’s WiFi for the best computer Apple ever made.

Bask In The Warm Glow Of DIY Incandescent Bulbs

With most of the apparatus and instruments we now take for granted yet to be developed, the early pioneers of the Electric Age had to bring a lot to the lab besides electrical skills. Machining, chemistry, and metallurgy were all basic skills that the inventor either had to have or hire in. Most of these skills still have currency of course, but one that was once crucial – glassblowing – has sadly fallen into relative obscurity.

There are still practitioners of course, like [2SC1815] who is learning how to make homemade incandescent light bulbs. The Instructable is in both English and Japanese, and the process is explained in some detail. Basic supplies include soda-lime glass tubing and pre-coiled tungsten filaments. Support wires are made from Dumet, an alloy of iron, nickel, and cobalt with an oxidized copper cladding which forms a vacuum-tight seal with molten glass. The filament is crimped to the Dumet leads and pinched into a stem of glass tubing. A bulb is blown in another piece of tubing and the two are welded together, evacuated with a vacuum pump, and sealed. The bulbs are baked after sealing to drive off any remaining water vapor. The resulting bulbs have a cheery glow and a rustic look that we really like.

Of course, it’s not a huge leap from DIY light bulbs to making your own vacuum tubes. That’s how [Dalibor Farny] got started on his handmade Nixie business, after all.

Building A Hardware Store Faraday Cage

Most Hackaday readers are no doubt familiar with the Faraday cage, at least in name, and nearly everyone owns one: if you’ve ever stood watching a bag of popcorn slowly revolve inside of a microwave, you’be seen Michael Faraday’s 1836 invention in action. Yet despite being such a well known device, the average hacker still doesn’t have one in their arsenal. But why?

It could be that there’s a certain mystique about Faraday cages, an assumption that their construction requires techniques or materials outside the realm of the home hacker. While it’s true that building a perfect Faraday cage for a given frequency involves math and careful attention to detail, putting together a simple model for general purpose use and experimentation turns out to be quick and easy.

As an exercise in minimalist hacking I recently built a basic Faraday cage out of materials sourced from Home Depot, and thought it would be interesting to not only describe its construction but give some ideas as to how one can put it to practical use in the home lab. While it’s hardly a perfect specimen, it clearly works, and it didn’t take anything that can’t be sourced locally pretty much anywhere in the world.

Continue reading “Building A Hardware Store Faraday Cage”

Box Forts For Adults: Best Practices And Design Strategies

Many a grown up can reminisce about building various architectural wonders in their youth. Forts, whether based on boxes or blankets, were the order of the day, and an excellent way to spend a rainy Sunday afternoon.

It just so happens that there is no law against scaling up such activities once one has reached the age of majority. However, to build a structure at this level takes some careful planning and consideration, and that is the purpose of our article here today.

Location, Location, Location

To avoid an awkward conflict, be sure to warn your housemates of impending construction well ahead of time.

The first major consideration when starting your build should be the area in which you wish to do it. Building inside has the advantage of avoiding the weather, however hard floors can lead to sore knees when crawling around. Additionally, you’re a grown up now, so it’s less likely your peers will be impressed to hear you sat inside a box in your living room.

No, if you’re going to do this right, you’ll want to go outside. A nice flat lawn is best, providing soft ground and plenty of space. The challenges of the elements will guide your work – sitting inside your cardboard home feels all the more satisfying when you’re cosy and dry as you listen to the patter of rain on the roof. There’s a real sense of accomplishment when you’ve built something that can survive the harsh outdoors, and besides, the views are better, too. Continue reading “Box Forts For Adults: Best Practices And Design Strategies”

World’s Smallest LED Blinky

[Mike Harrison] is known for incredibly tiny soldering. Now he’s claiming a “world’s smallest” in the form of a stand-alone LED blinker, and we think he’s got the record.

He brought it along with him to Friday’s Beagleboard Bring-a-Hack, and we got a close look at the diminutive assembly. The project was dreamed up when [Mike] saw an announcement from Seiko about a new supercapacitor in a tiny package (likely the CPH3225A giving the blinky a footprint of 3.2 x 2.5 mm). With that in hand he added a PIC 10f322 microcontroller in a SOT23 package, an 0603 smoothing capacitor, and an SMD LED.

With such a tiny package, the trickiest part is figuring out how to charge that supercap. [Mike] used a drill and hand files to make a square hole in a CR2032 battery holder to serve as a jig. The bottom of the supercap rests against the battery as a pogo pin makes the second connection to a terminal on the side of his assembly. It charges quickly and will happily blink away for about six minutes after charging.

Mike set out to make two of these, but dropped the second supercap when at his workbench to be forever lost in the detritus common to every electronics workshop. When he first pulled it out at the meetup we were on a rooftop terrace and we were more than a bit concerned that this would just blow away. How do you begin to fabricate such a tiny assembly? He used UV cured epoxy to glue them together first, then somehow completed the soldering by hand!

Continue reading “World’s Smallest LED Blinky”

Soldering Like It’s 205 BC

Did you ever stop to think how unlikely the discovery of soldering is? It’s hard to imagine what sequence of events led to it; after all, metals heated to just the right temperature while applying an alloy of lead and tin in the right proportions in the presence of a proper fluxing agent doesn’t seem like something that would happen by accident.

Luckily, [Chris] at Clickspring is currently in the business of recreating the tools and technologies that would have been used in ancient times, and he’s made a wonderful video on precision soft soldering the old-fashioned way. The video below is part of a side series he’s been working on while he builds a replica of the Antikythera mechanism, that curious analog astronomical computer of antiquity. Many parts in the mechanism were soldered, and [Chris] explores plausible methods using tools and materials known to have been available at the time the mechanism was constructed (reported by different historians as any time between 205 BC and 70 BC or so). His irons are forged copper blocks, his heat source is a charcoal fire, and his solder is a 60:40 mix of lead and tin, just as we use today. He vividly demonstrates how important both surface prep and flux are, and shows both active and passive fluxes. He settled on rosin for the final joints, which turned out silky smooth and perfect; we suspect it took quite a bit of practice to get the technique down, but as always, [Chris] makes it look easy.

If you’d like to dig a bit deeper into modern techniques, we’ve covered the physics of solder and fluxes in some depth. And if you need more of those sweet, sweet Clickspring videos, we’ve got you covered there as well.

Continue reading “Soldering Like It’s 205 BC”

A Dozen Tubes Make An Educational Amplifier

If you asked [Hans_Daniel] what he learned by building a tube audio amplifier with a dozen tubes that he found, the answer might just be, “don’t wind your own transformers.” We were impressed, though, that he went from not knowing much about tubes to a good looking amplifier build. We also like the name — NASS II-12 which apparently stands for “not a single semiconductor.”

Even the chassis looked really good. We didn’t know textolite was still a thing, but apparently, the retro laminate is still around somewhere. It looks like a high-end audio component and with the tubes proudly on display on the top, it should be a lot of fun to use.

Continue reading “A Dozen Tubes Make An Educational Amplifier”