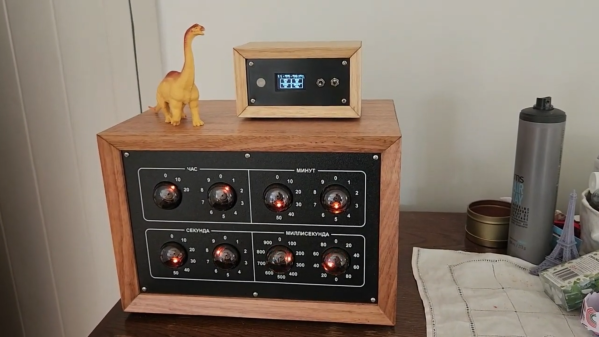
A vintage pocket calculator with extra exposed circuitry added

I2C Breathes New Life Into Casio Pocket Calculator

When is a pocket calculator more than just a calculator? [Andrew Menadue] has been pushing the limits of his 1970s Casio FX-502P by adding all sorts of modern functionality via the calculator’s expansion port.

Several older Casio calculators included an expansion port for connecting cassette tape storage and printing functionality. Data on the FX-502P could be saved on cassette tape using the well-known Kansas City standard, however this signal was produced by Casio’s FA-1 calculator cradle, not the FX-502P itself. To interact with the calculator itself would require an understanding of whatever protocol Casio designed for this particular model.

It turns out that the protocol is a little quirky compared to its contemporaries, with variable length data packets and inverted data logic, (zero volts is ‘1’ and three volts is ‘0’). Once the protocol was untangled, it was ‘simply’ a matter of connecting the calculator to the GPIO interface on the STM32, and using some software wizardry to start shooting data packets back and forth.

This hack can be used to send and receive data from an SD card (via a RAM buffer), however it’s the other expansion capabilities that really make us wonder. [Andrew] has demonstrated how easy it is to add a real-time clock or thermal printer. Using the I2C capabilities of the STM32, it’s likely that all sorts of gadgets and sensors could be coupled with this vintage calculator, and many others like it.

You can find even more details about this hack over here, including some follow up videos to the original hack. No stranger to vintage calculators, we last featured [Andrew] after he retrofitted a modern LCD display to an old Casio. It’s charming to see how these calculators are far from obsolete.

Continue reading “I2C Breathes New Life Into Casio Pocket Calculator”

It’s Bad Apple, But On A 32K EPROM

The Bad Apple!! video with its silhouette animation style has long been a staple graphics demo for low-end hardware, a more stylish alternative to the question “Will it run DOOM?”. It’s normal for it to be rendered onto a screen by a small microcomputer or similar but as [Ian Ward] demonstrates in an unusual project, it’s possible to display the video without any processor being involved. Instead he’s used a clever arrangement involving a 32K byte EPROM driving a HD44780-compatible parallel alphanumeric LCD display.

While 32K bytes would have seemed enormous back in the days of 8-bit computing, even when driving only a small section of an alphanumeric LCD it’s still something of a struggle to express the required graphics characters. This feat is achieved by the use of a second EPROM, which carries a look-up table.

It’s fair to say that the result which can be seen in the video below the break isn’t the most accomplished rendition of Bad Apple!! that we’ve seen, but given the rudimentary hardware upon which it’s playing we think that shouldn’t matter. Why didn’t we think of doing this in 1988!

Continue reading “It’s Bad Apple, But On A 32K EPROM”

PS2 Memory Card ISO Loader Offers Classic Gaming Bliss

It used to be that to play a console game, you just had to plug in a cartridge or put a CD/DVD in the optical drive. But these days, with modern titles ballooning up to as much as 100 GB, you’ve got no choice but to store them on the system’s internal hard disk drive. While that can lead to some uncomfortable data management decisions, at least it means you don’t have to get up off the couch to switch games anymore.

Which is precisely why the MC2SIO project for the PlayStation 2 is so exciting. As [Tito] explains in his latest
Macho Nacho Productions video, this simple adapter lets you connect an SD card up to the console’s Memory Card slots and use that to hold ISOs of your favorite games. With the appropriate homebrew software loaded up, your PS2 becomes a veritable jukebox of classic games.

Continue reading “PS2 Memory Card ISO Loader Offers Classic Gaming Bliss”

Tiny TV Celebrates The Forgotten Tech Of CRTs

For those of us who grew up before the Internet, the center of pretty much every house was the TV. It was the shrine before which we all worshipped, gathering together at the appointed times to receive the shared wisdom of mass entertainment. In retrospect, it really wasn’t that much. But it’s what we had.

Content aside, one thing all these glowing boxes had in common was that which did the glowing — the cathode ray tube (CRT). Celebrating the marvel of engineering that the CRT represents is the idea behind [Matt Evan]’s tiny desktop TV. The design centers around a 1.5″ CRT that once served as a viewfinder on a 1980s-vintage Sony camcorder. [Matt] salvaged the tube and the two PCB assemblies that drive it, mounting everything in a custom-built acrylic case, the better to show off the bulky but beautiful tube.

The viewfinder originally used a mirror to make the optical path more compact; this forced [Matt] to adapt the circuit to un-reverse the image for direct viewing. Rather than receiving analog signals off the air as we did in the old days — and we liked it that way! — the mini monitor gets its video from a Raspberry Pi, which is set to play clips of TV shows from [Matt]’s youth. Rendered in glorious black and white and nearly needing a magnifying glass to see, it almost recaptures the very earliest days of television broadcasting, when TVs all had screens that looked more like oscilloscope CRTs.

This project is a nice homage to a dying technology, and [Matt] says it has spurred more than one conversation from people you grew up knowing only LCD displays. That’s not to say CRTs are totally dead — if you want to build your own old-school TV, there’s a kit for that.

Build Your Own CRT TV

There was a time following the Second World War when TV sets for the nascent broadcast medium were still very expensive, but there was an ample supply of war-surplus electronic parts including ex-radar CRTs. Thus it wasn’t uncommon at all for electronics enthusiasts of the day to build their own TV set, and magazines would publish designs to enable them. With a burgeoning consumer electronics industry the price of a new TV quickly dropped to the point of affordability so nobody would consider building one themselves today. Perhaps that should be amended to almost nobody, because [Retro Tech or Die] has assembled a small black-and-white CRT TV from a kit he found on AliExpress.

We have to admit to having seen the same kit and despite a sincere love for analogue telly, to have balked at the price. It’s an exceptionally cheap set of the type that was available from discount stores for a laughably low price around the final few years of mainstream analogue TV broadcasting, and having a couple in the stable we can confirm that the value here lies in building the thing rather than owning it.

The unboxing and building proceeds as you might expect, with the addition of very poor documentation and extremely low-quality parts. Satisfyingly it works on first power-up, though some adjustment and the reversing of a deflection yoke connection is required for a stable picture. The scanned area doesn’t fill the screen and he doesn’t find the solution in the video, we hope that by his next video someone will have suggested moving the deflection yoke forwards.

Perhaps merely assembling a kit might not seem the most exciting subject for a Hackaday story, but this one is a little different here in 2022. CRT TV sets are now a long-gone anachronism, so for a younger generation there is very little chance to see them up close and thus watching one built has some value. If you want to spend the cash and build your own he’s dropped the link in the YouTube description, otherwise watch the progress in the video below the break.

Fancy learning a bit more about analogue TV? Have a dive into the video waveform. Or for a bit more CRT goodness, learn about converging a delta-gun colour set from the days when a TV weighed almost as much as you did.

Continue reading “Build Your Own CRT TV”

A USB interface connected to a Psion Organiser II

Arduino Nano Adds USB Interface To The Psion Organiser II

Introduced in 1984, the Psion Organiser series defined the first generation of electronic organizers or PDAs (personal digital assistants). Even though these devices are now over 30 years old, the Psion Organiser scene is alive and well: with new hardware and software is still being developed by enthusiasts the world over.

A USB interface connected to a Psion Organiser II
The Organiser II, with its brand-new USB interface

One of those enthusiasts is [James Stanley], who designed and built a USB interface for the Psion Organiser II. Although a “CommsLink” module providing an RS-232 port was available back in the day, it’s become hard to find, inspiring [James] to design a completely new module based on an Arduino Nano. Hooking it up to the Psion’s data bus was a simple matter of wiring up the eight data lines to the Nano’s GPIO ports. A set of series resistors served to prevent bus contention without having to add glue logic.

Getting the software working was a bit more difficult: the Organiser’s native OPL programming language doesn’t allow the user to directly access the expansion port’s memory address, so [James] had to write a routine in HD6303 machine code to perform the read, then call that routine from OPL to display the result on the screen. Currently, the routine only supports reading data from the Arduino, but extending it to a bidirectional interface should be possible too.

Finally, [James] designed and 3D printed a neat enclosure for the Arduino-USB interface, which makes it look almost as sleek as the original CommsLink module. Perhaps with a bit of further development, this could turn into another way to connect old Psions to the internet. We’ve also featured a new type of Datapak to enhance the Organiser’s memory. Continue reading “Arduino Nano Adds USB Interface To The Psion Organiser II”

IBM PalmTop Running Modern (Modified) Linux

The handheld computing market might seem dominated by smartphones today, but before their mass adoption there were other offerings for those who needed some computing power on-the-go. If a 90s laptop was too bulky, there was always the IBM PalmTop which packed punch for its size-to-weight ratio, and for the era it was created in. [Mingcong Bai] still has one of these antiques and decided to see if it was still usable by loading a customized Linux distribution on it.

The PalmTop sported modest hardware even for its time with an Intel 486SL running at 33 MHz with 20 MiB of RAM. This one also makes use of a 1 GB CompactFlash card for storage and while [Mingcong Bai] notes that it is possible to run Windows 95 on it, it’s not a particularly great user experience. A Linux distribution customized for antique hardware, AOSC/Retro, helps solve some of these usability issues. With this it’s possible to boot into a command line and even do some limited text-based web browsing as long as the Ethernet adapter is included.

While the computer is running at its maximum capacity just to boot and perform basic system functions, it’s admirable that an antique computer such as this still works, especially given its small size and limited hardware functionality. If you’re curious about more PalmTop-style computers, take a look at the first one ever produced: the HP-200LX.

Continue reading “IBM PalmTop Running Modern (Modified) Linux”