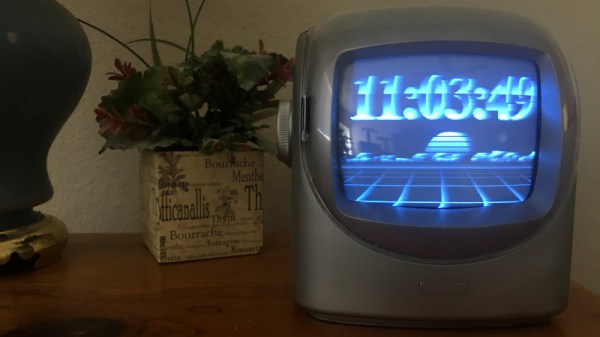
Steampunk Geiger Counter Is A Mix Of Art And Science

It took nearly a year for [Chris Crocker-White] to assemble this glorious mahogany and brass Geiger counter, but we think you’ll agree with us that it was time well spent. From the servo-actuated counter to the Nixie tubes and LED faux-decatrons, this project is an absolute love letter to antiquated methods of displaying information. Although for good measure, the internal Raspberry Pi also pushes all the collected radiation data into the cloud.

[Chris] says the design of this radiation monitor was influenced by his interest in steampunk and personal experience working on actual steam engines, but more specifically, he also drew inspiration from a counter built by [Richard Mudhar].

Based on a design published in Maplin back in 1987, [Richard] included a physical counter and LED “dekatron” displays as an homage to a 1960s era counter he’d used back in his school days. [Chris] put a modern spin on the electronics and added the glowing display of real-time Counts Per Minute (CPM) as an extra bonus; because who doesn’t like some Nixies in their steampunk?

Internally, the pulses generated by a common Geiger counter board are picked up by some custom electronics to drive the servo and LEDs. Triggered by those same pulses, the Raspberry Pi 3A+ updates the Nixie display and pushes the data out to the cloud for analysis and graphing. Note that the J305β Geiger tube from the detector has been relocated to the outside of the machine, with two copper elbows used as connectors. This improves the sensitivity of the instrument, but perhaps even more importantly, looks awesome.

We’ve seen some very high-tech DIY radiation detection gear over the years, but these clever machines that add a bit of whimsy to the otherwise mildly terrifying process of ionizing radiation are always our favorite.

Continue reading “Steampunk Geiger Counter Is A Mix Of Art And Science”

Finding A Secret Message From A Gaming Legend

Satoru Iwata is perhaps best remembered for leading Nintendo through the development of the DS and Wii, two wildly successful systems which undeniably helped bring gaming to a wider and more mainstream audience. But decades before becoming the company’s President in 2002, he got his start in the industry as a developer working on many early console and computer games. [Robin Harbron] recently decided to dig into one of the Iwata’s earliest projects, Star Battle for the VIC-20.

Finding the message was easy, if you knew were to look.

It’s been known for some time that Iwata, then just 22 years old, had hidden his name and a message in the game’s source code. But [Robin] wondered if there was more to the story. Looking at the text in memory, he noticed the lines were actually null-terminated. Realizing the message was likely intended to get printed on the screen at one point during the game’s development, he started hunting for a way to trigger the nearly 40 year old Easter Egg.

As it turns out, it’s hidden behind a single flag in the code. Just change it from 0 to 1, and the game will display Iwata’s long-hidden credit screen. That proved the message was originally intended to be visible to players, but it still didn’t explain how they were supposed to trigger it during normal game play.

That’s where things really get interesting. As [Robin] gives us a guided tour through Star Battle’s inner workings, he explains that Iwata originally intended the player to hit a special combination of keys to tick over the Easter Egg’s enable flag. All of the code is still there in the commercial release of the game, but it’s been disabled. As Iwata’s life was tragically cut short in 2015 due to complications from cancer, we’ll perhaps never know the reason he commented out the code in question before the game was released. But at least we can now finally see this hidden message from one of gaming’s true luminaries.

Last time we heard from [Robin], he’d uncovered a secret C64 program hidden on a vinyl record. With his track record so far, we can’t wait to see what he digs into next. Continue reading “Finding A Secret Message From A Gaming Legend”

An RGB Backlight For The Nokia 5110 LCD

Hardware hackers love the Nokia 5110 LCD. Or at least, they love the clones of it. You can pick up one of these panels for a couple bucks wherever electronic bits and bobs are sold, and integrating it into your project is a snap thanks to all the code and documentation floating around out there. But while it might be cheap and reliable, it’s not a terribly exciting component.

Which is perhaps why [Miguel Reis] thought he’d spruce it up a bit with an RGB backlight. While we’ll admit that this hack is mostly about looking cool, it’s not entirely without practical application. If your gadget experiences some kind of fault, having it flash the LCD bright red is sure to get somebody’s attention from across the room.

The board itself is very straightforward, with four MHPA1010RGBDT RGB LEDs and a couple of passives to keep them happy. The Nokia 5110 LCD module just pops right on, and beyond the extra pins added for the three LED colors, gets wired up the same as before. The backlight LEDs just need a few spare GPIO pins on your microcontroller to drive them, and away you go.

[Miguel] is currently selling his RGB version of this iconic LCD on Tindie for only a couple dollars more than the standard version, so it looks like a pretty cheap way to add a little bling to your next project. (Tindie is owned by Supplyframe, which also owns Hackaday. But they didn’t put us up to adding this link.)

Make Your Own Microdot

If you spent your youth watching James Bond or similar movies on rainy Saturday afternoons, then you may be familiar with a microdot as a top-secret piece of spy equipment, usually revealed as having been found attached to a seemingly innocuous possession of one of the bad guy’s henchmen, which when blown up on the screen delivers the cryptic yet vital clue to the location of the Evil Lair. Not something you give much thought in 2020 you might think, but that’s reckoning without [Sister HxA], who has worked out how to make them herself and detailed the process in a Twitter thread.

A microdot is a tiny scrap of photographic film, containing the image of some secret document or other, the idea being that it is small enough to conceal on something else. The example she gives is hiding it underneath a postage stamp. Because of their origins in clandestine work there is frustratingly little info on how to produce them, but she found a set of British instructions. Photographing a sheet such that its image occupies a small portion of her negative she makes a postage-stamp-sized one, and with care photographing that she manages to produce another of only a few millimetres in size. The smaller one isn’t very legible, but it’s still a fascinating process.

While we’re shopping at Q branch, how about an air-gun pen worthy of James Bond?

Watch Conway’s Game Of Life Flutter Across A Flip-Dot Display

Like many of us, [John Whittington] was saddened with the news that John Horton Conway passed away a little earlier this year, and in honor of his work, he added the Game of Life to a flip-dot display that he has been working on. The physicality of an electromechanical display seems particularly fitting for cellular automata.

Like what you see? If you’re curious about what makes it all tick, the display shown is an Alfa-Zeta XY5 28×14 but [John] is currently working on building them into a much larger 256 x 56 display. GitHub hosts the flip-dot simulator and driver software [John] is using, and the Game of Life functions are here.

If you’re new to the Game of Life and are not really sure what you’re looking at, [Elliot Williams] tells you all you need to know in his writeup celebrating its profound impact and lasting legacy. Watch the flip-dot display in action in the video embedded below.

Continue reading “Watch Conway’s Game Of Life Flutter Across A Flip-Dot Display”

Reliving Heathkit’s Glory Days Through A Teardown And Rebuild

In its heyday, the experience offered by the Heath Company was second to none. Every step of the way, from picking something out of the Heathkit catalog to unpacking all the parts to final assembly and testing, putting together a Heathkit project was as good as it got.

Sadly, those days are gone, and the few remaining unbuilt kits are firmly in the unobtanium realm. But that doesn’t mean you can’t tear down and completely rebuild a Heathkit project to get a little taste of what the original experience was like. [Paul Carbone] chose a T-3 Visual-Aural signal tracer, a common enough piece that’s easy to find on eBay at a price mere mortals can afford. His unit was in pretty good shape, especially for something that was probably built in the early 1960s. [Paul] decided that instead of the usual recapping, he’d go all the way and replace every component with fresh ones. That proved easier said than done; things have changed a lot in five decades, and resistors are a lot smaller than they used to be. Finding hookup wire to match the original was also challenging, as was disemboweling some of the electrolytic cans so they could be recapped. The finished product is beautiful, though — even the Magic Eye tube works — and [Paul] reports that the noise level is so low he wasn’t sure if turned it on at first.

We’ve covered the rise and fall of Heathkit, as well as their many attempted comebacks, including an inexplicable solder-free radio and the “world’s most reliable” clock. Looking at these offerings, we think [Paul] may be onto something here.

Decapsulating A Dual Triode

We see quite a bit of work where people decapsulate ICs or other solid state devices to expose their inner workings. But how about hollow state? [Tomtektest] had a dual triode that has lost its vacuum integrity — gone to air, as he calls it — and decided to open it up to better expose its inner workings. (Video, embedded below.)

Of course, you can always see the innards through the glass, but it is interesting to have the envelope out of the way. Apparently, how you remove the glass is a bit tricky if you don’t want to damage the working bits as you remove it.

Continue reading “Decapsulating A Dual Triode”