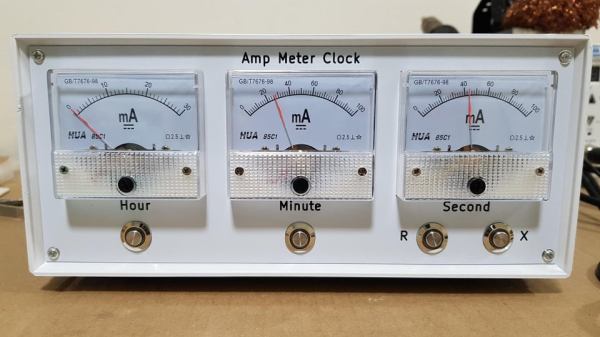
Day Clock Monitors Air Quality Of The Great Indoors

As the world settles into this pandemic, some things are still difficult to mentally reckon, such as the day of the week. We featured a printed day clock a few months ago that used a large pointer to provide this basic psyche-grounding information. In the years since then, [Jeff Thieleke] whipped up a feature-rich remix that adds indoor air quality readings and a lot more.

Like [phreakmonkey]’s original day tripper, an ESP32 takes care of figuring out what day it is and moves a 9 g servo accordingly. [Jeff] wanted a little more visual action, so the pointer moves a tad bit every hour. A temperature/humidity sensor and a separate CO₂ sensor output their readings to an LCD screen mounted under the pointer. Since [Jeff] is keeping this across the basement workshop from the bench, the data is also available from a web server running on the ESP32 via XML and JSON, and the day clock can get OTA updates.

Need a little more specificity than just eyeballing a pointer? Here’s a New Times clock that gives slightly more detail.

Matrix Of Resistors Forms The Hot Hands Behind This Thermochromic Analog Clock

If you’re going to ditch work, you might as well go big. A 1,024-pixel thermochromic analog clock is probably on the high side of what most people would try, but apparently [Daniel Valuch] really didn’t want to go to work that day.

The idea here is simple: heat up a resistor by putting some current through it, lay a bit of thermochromic film over it, and you’ve got one pixel. The next part was not so simple: expanding that single pixel to a 32 by 32 matrix.

To make each pixel square-ish, [Daniel] chose to pair up the 220-ohm SMD resistors for a whopping 2,048 components. Adding to the complexity was the choice to drive them with a 1,024-bit shift register made from discrete 74LVC1G175 flip flops. With the Arduino Nano and all the other support components, that’s over 3,000 devices with the potential to draw 50 amps, were someone to be foolish or unlucky enough to turn on every pixel at once. Luckily, [Daniel] chose to emulate an analog clock here; that led to additional problems, like dealing with cool-down lag in the thermochromic film when animating the hands, which had to be dealt with in software.

We’ve seen other thermochromic displays before, including recently with this temperature and humidity display. This one may not be the highest resolution display out there, but it’s big and bold and slightly dangerous, and that makes it a win in our book.

Is That An ESP32 On Your Wrist?

What could you do with a dual-core 240 MHz ESP32 that supports Arduino-style programming, with 16 MB of flash, 8 MB of PSRAM, and 520 k of RAM? Oh, let’s throw in a touchscreen, an accelerometer, Wifi, and Bluetooth. Besides that, it fits on your wrist and can show the time? That’s the proposition behind Lilygo T Watch 2020. If it sounds like a smartwatch, it is. At around $25 –and you can snag the hardware from a few different places — it is not only cheaper than the latest flagship smartwatch, but it is also infinitely more hackable.

OK, so the screen is only 1.54″, but then again, it is a watch. If Arduino isn’t your thing, you can use anything else that supports the ESP32 like Micropython or even Scratch. There are variants that have LoRA and GPS, at slightly higher prices. You can also find ones with heart rate monitors and other features.

Continue reading “Is That An ESP32 On Your Wrist?”

Passing The Time By Reading The Time

Binary clocks are a great way to confuse your non-technical peers when they ask the time from you — not that knowing about the binary system would magically give you quick reading skills of one yourself. In that case, they’re quite a nice little puzzle, and even a good alternative to the quarantine clocks we’ve come across a lot recently, since you can simply choose not to bother trying to figure out the exact time. But with enough training, you’ll eventually get the hang of it, and you might be in need for a new temporal challenge. Well, time to level up then, and the Cryptic Wall Clock built by [tomatoskins] will definitely keep you busy with that.

Example of the clock showing 08:44:47
Diagram of the clock showing 08:44:47

If you happen to be familiar with the Mengenlehreuhr in Berlin, this one here uses the same concept, but is built in a circular shape, giving it more of a natural clock look. And if you’re not familiar with the Mengenlehreuhr (a word so nice, we had to write it twice), the way [tomatoskins]’ clock works is to construct the time in 24-hour format by lighting up several sections in the five LED rings surrounding a center dot.

Starting from the innermost ring, each section of the rings represent intervals of 5h, 1h, 5m, 1m, and 2s, with 4, 4, 11, 4, and 29 sections per ring respectively. The center dot simply adds an additional second. The idea is to multiply each lit up section by the interval it represents, and add the time together that way. So if each ring has exactly one section lit up, the time is 06:06:02 without the dot, and 06:06:03 with the dot — but you will find some more elaborate examples in his detailed write-up.

This straightforward and yet delightfully unintuitive concept will definitely keep you scratching your head a bit, though you can always go weirder with the Roman numerals palm tree clock for example. But don’t worry, [tomatoskins] has also a more classic, nonetheless fascinating approach in his repertoire.

Clear Some Space And Build A Cosmo Clock

Like many of us, [Artistikk] is inspired by astronauts and space travel in general. To keep the inspiration coming, he made the Cosmo Clock — a sleek little clock that changes color whenever an astronaut is launched into space.

As awesome as space is, we’re inspired by the amount of Earth-saving reuse going on in this project. The actual time-telling is coming from a recycled wristwatch movement. [Artistikk] cut a bigger set of hands for it out of a plastic container, and used the lid from another container for the clock’s body.

The launch inquiries are handled by an ESP8266, which uses a Blynk app and some IFTTT magic to get notified whenever NASA yeets an astronaut into space. Then the ESP generates random RGB values and sends them to a single RGB LED. The clock body is small enough that a single LED is bright enough to light up all the parts that aren’t blacked out with thick paper. In case you’re wondering, the pattern around the edge isn’t random, it’s Morse code for ‘sky’, but you probably already knew that, right? Make a dash past the break to take the tour.

Clocks that wind up in space are much more complicated. Check out this tear-down of the clock from a late-90s Soyuz spacecraft.

Continue reading “Clear Some Space And Build A Cosmo Clock”

Beautiful Free-Form LED Clock Recreates 20-Year-Old Weekend Project

Here at Hackaday, we love a good clock project. And if it’s an artistically executed freeform sculpture, even better. But tell us that it’s also a new spin on a classic project from two decades ago, and we’re over the moon for it. Case in point: [Paul Gallagher’s] beautiful recreation of an LED clock riffing on one originally made as a weekend project in early 2000.

Wait, wait. Hold up.

*Ted unclips the microphone from his lapel and stands up from his chair*

OK, dear reader, if you’ll allow me, we’re going to do this one a little differently. Normally I’m supposed to write in the voice of Hackaday, but this project has personal meaning for me, so I’d like to break the rules a bit. You see, the original clock project was mine — one I did over a weekend a long time ago, as evidenced by the “2/13/2000” date on the PCB — and I was quite honored that [Paul] would choose my project as inspiration.

Original Clock Project dated 2/13/2000

When, on the 20th anniversary of creating this clock, I posted a Twitter thread to commemorate the event, [Paul] picked up the ball and ran with it. You can see the original Twitter thread here. Pictures of the home-etched single-sided board were all he needed to reverse-engineer the relatively simple design, and then re-create it with style.

The design uses a PIC16F84 microcontroller. This was one of the first microcontrollers to really become popular with hobbyists, the key features being the serial programming algorithm which allowed easy homebrew programmers, and the FLASH memory. If I recall correctly, my original programmer ran off a PC’s parallel port. I probably have it in a box somewhere. Each of the 12 LEDs is driven through a separate resistor from individual GPIO lines, while a 32.768 kHz crystal serves as the timebase. Finally, two buttons allow you to set the hours and minutes.

How do you represent three separate hands on such a display? In this case, each hand blinks at a different rate. The hour LED is solid, and the second LED blinks faster than the minute one. You can check it out in [Paul’s] video after the break, and admire the beautiful simplicity of his layout.

Since he was able to re-create the circuit exactly, [Paul] was able to drop-in the original assembly code that runs the clock. True-to-form, Microchip still manufactures the PIC16F84, and their latest tools have no problem with such legacy code — it just works.

Continue reading “Beautiful Free-Form LED Clock Recreates 20-Year-Old Weekend Project”

Sun-Seeking Sundial Self-Calibrates In No Time

Sundials, one of humanity’s oldest ways of telling time, are typically permanent installations. The very good reason for this is that telling time by the sun with any degree of accuracy requires two-dimensional calibration — once for cardinal direction, and the other for local latitude.

[poblocki1982] is an amateur astronomer and semi-professional sundial enthusiast who took the time to make a self-calibrating equatorial ‘dial that can be used anywhere the sun shines. All this solar beauty needs is a level surface and a few seconds to find its bearings.

Switch it on, set it down, and the sundial spins around on a continuous-rotation servo until the HMC5883L compass module finds the north-south orientation. Then the GPS module determines the latitude, and a 180° servo pans the plate until it finds the ideal position. Everything is controlled with an Arduino Nano and runs on a 9V battery, although we’d love to see it run on solar power someday. Or would that be flying too close to the sun? Check out how fast this thing calibrates itself in the short demo after the break.

Not quite portable enough for you? Here’s a reverse sundial you wear on your wrist.