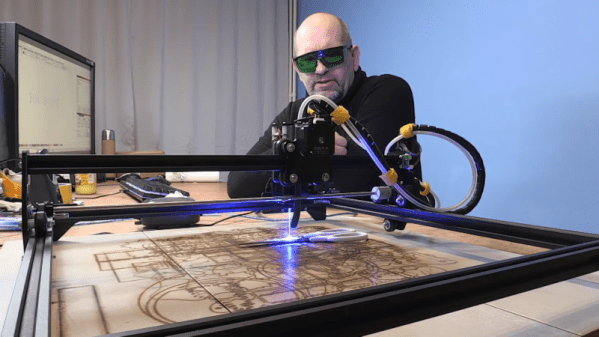
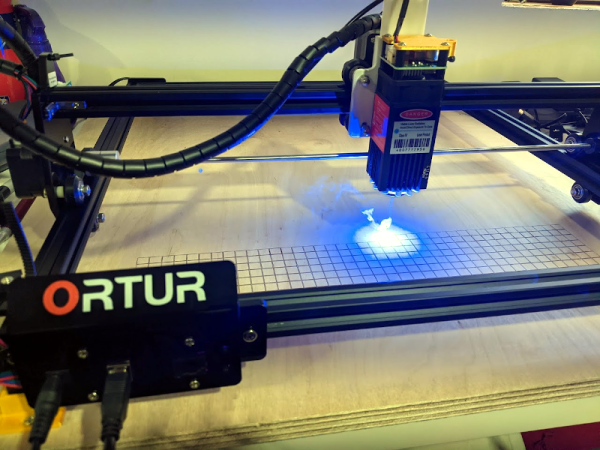
How To Retrofit A Pick And Place Machine For OpenPnP, In Detail

[Erich Styger] owns a Charmhigh CHM-T36VA pick and place machine, which he describes as well-built and a great value of hardware for the money. However, the software end is less impressive, with a proprietary controller that is functional but not great. The good news is that it is possible to retrofit the machine to use the OpenPnP framework, which is open-source and offers more features. Even better, [Erich] has already done and documented all the hard parts!

The CHM-T36VA has two heads, vision system, and uses drag feeders.

The conversion requires upgrading a few hardware parts such as the cameras, replacing the controller’s firmware, then installing and configuring OpenPnP (which runs on an attached PC.)

[Erich] does not recommend this conversion for anyone who is not very familiar with electronics, or has any worries about voiding warranties. Barring that, he suspects the conversion could be done in about a day or two’s worth of focused work. It took him two weeks, including time spent fine-tuning the first production job. He says the bulk of the time was spent on configuration, but he has shared his configuration on GitHub in the hopes that it will save a lot of time for anyone using the same hardware.

After populating some 300 boards and placing over 7000 parts, he’s very happy with the results. The machine places between 600 and 700 parts per hour, so speed might not be amazing but it’s perfectly serviceable. [Erich] finds that while the machine runs a little slower than it did with the original controller, it also runs much smoother and quieter overall. In return he gets what he truly wanted: a pick and place machine whose operation and configuration is entirely open and accessible. You can see it in action in the video, embedded below.

Continue reading “How To Retrofit A Pick And Place Machine For OpenPnP, In Detail”

Giant Bearing Is At The Heart Of A Camera Mount

We bet you have all some cool part in your bin that is just gnawing at you to build something cool. That doodad, possibly from a garage sale, surplus store, or clearance rack deserves a project fitting of its near-infinite potential. [isaac879] finally marries a giant ball bearing with his passion for photography in the form of a pan-tilt camera mount for his Canon DSLR. The problem with tossing your golden-ticket part into a project is that not everyone has a MacGuffin, or a brand new one might be bank-breakingly expensive, so he does us a favor and makes a drop-in replacement that you can print and fill with 6mm brass bbs. This sort of thing is why we love hackers.

The camera mount has the features we expect to see in a robust stepper mount, such as infinite spinning, time delay, and an Xbox controller interface. Inside the base is the industrial bearing or its plastic replica, and that wide base won’t be tipping over anytime soon. Gearing all around is of the herringbone style, of the type you find in classroom pencil sharpeners because they transfer power smoothly. Speaking of things going smoothly, we enjoyed his assembly montage where every part fits together perfectly and there is not a naughty word to be uttered. Just like real life.

If you like homemade bearings, check out this slew bearing that looks like it was made with Perler beads, and we have a self-aligning camera tripod mount for the photography buffs.

Continue reading “Giant Bearing Is At The Heart Of A Camera Mount”

Knitting Machine Rebuild Takes It To The Next Level

Those of us who to textile work may own a sewing machine and even if we’re really into it and have the funds, an overlocker. But there’s another machine in that field that few of us will have, and that’s a knitting machine. These machines have a sliding carriage over a long array of needles, and even the cheaper ones are way more expensive than for example a pretty decent oscilloscope. [Irene Wolf] has a Passap E6000 computerised knitting machine that is by no means an inexpensive one, and she’s made significant improvement to it by giving it new brains, a new motor controller, and replacing the mechanical rear needle bed with a set of computerised ones from the front of another machine.

In her write-up she goes in depth into the arrangement of sensors and electromagnets that operate the machine. She started with a lot of inspiration from a project at Hackerspace Bamberg, but used all the available Passap sensors as inputs where they had used only one. She has two Arduino M0 boards handling the inputs and a Raspberry Pi with control and user interface, and has posted some videos of the system in action one of which we’ve placed below the break.

We probably wouldn’t have had the courage to fearlessly hack such a high-value machine, and we’re particularly impressed by the result. The write-up is particularly interesting not only for the work itself, but for the detailed insight it gives to the workings of these machines. The best news – she’s not finished and there will be more installments.

While you’re waiting for more, remember this is by no means the first hacked knitting machine we’ve brought you.

Continue reading “Knitting Machine Rebuild Takes It To The Next Level”

Tiny Laser Cutter Puts Micro Steppers To Work

The influx of cheap laser cutters from China has been a boon to the maker movement, if at the cost of a lot of tinkering to just get the thing to work. So some people just prefer to roll their own, figuring that starting from scratch means you get exactly what you want. And apparently what [Mike Rankin] wanted was a really, really small laser cutter.

The ESP32 Burninator, as [Mike] lovingly calls his creation, is small enough to be in danger of being misplaced accidentally. The stage relies on tiny stepper-actuated linear drives, available on the cheap from AliExpress. The entire mechanical structure is two PCBs — a vertical piece that holds the ESP32, an OLED display, the X-axis motor, and the driver for the laser, which comes from an old DVD burner; a smaller bottom board holds the Y-axis and the stage. “Stage” is actually a rather grand term for the postage-stamp-sized working area of this cutter, but the video below shows that it does indeed cut black paper.

The cuts are a bit wonky, but this is surely to be expected given the running gear, and we like it regardless. It sort of reminds us of that resin 3D-printer small enough to fit in a Christmas ornament that [Sean Hodgins] did a while back. We’d suggest not trying to hang this on a tree, though.

Continue reading “Tiny Laser Cutter Puts Micro Steppers To Work”

Dual-Wielding Robot Carves 3D Shapes From Foam With Warped Wire

“Every block of expanded polystyrene foam has a statue inside it and it is the task of the dual-arm hot wire-wielding robot to discover it.” — [Michelangelo], probably.

Be prepared to have your mind blown by this dual-wielding hot-wire 3D foam cutter (PDF). We’ve all seen simple hot-wire cutters before, whether they be manual-feed cutters or CNC-controlled like a 3D-printer. The idea is to pass current through a wire to heat it up just enough to melt a path as it’s guided through a block of polystyrene foam. Compared to cutting with a knife or a saw, hot-wire cuts are smooth as silk and produces mercifully little of that styrofoam detritus that gets all over your workspace.

But hot-wire cutters can’t do much other than to make straight cuts, since the wire must be kept taut. “RoboCut”, though, as [Simon Duenser] and his colleagues at ETH Zurich call their creation, suffers from no such limitations. Using an ABB YuMi, a dual-arm collaborative robot, they devised a method of making controlled curved cuts through foam by using a 1-mm thick deformable rod rather than a limp and floppy wire for the cutting tool. The robot has seven degrees of freedom on each arm, and there’s only so much the rod can deform before being permanently damaged, so the kinematics involved are far from trivial. Each pass through the foam is calculated to remove as much material as possible, and multiple passes are needed to creep up on the final design.

The video below shows the mesmerizing sweeps needed to release the Stanford bunny trapped within the foam, as well as other common 3D test models. We’re not sure it’s something easily recreated by the home-gamer, but it sure is fun to watch.

Continue reading “Dual-Wielding Robot Carves 3D Shapes From Foam With Warped Wire”

Conduit, Birdhouse, And Skateboard Become Giant Pen Plotter

If you think you need fancy parts to build a giant robot drawing machine, think again! [Cory Collins] shows you how he built his Big-Ass Wall Plotter v.2 out of stuff around the house or the hardware store, including electrical conduit, gang boxes, scrap wood, and skateboard bearings, alongside the necessary stepper motors, drivers, and timing belt. (You should consider having this trio of parts on hand as well, in our opinion.) With a span of 48″ (1.2 m) on a side, you probably don’t have paper that’s this big.

And while the construction is definitely rough-and-ready, there are a ton of details that turn this pile of parts into a beautifully working machine in short order. For instance, making the rails out of electrical conduit has a few advantages. Of course it’s cheap and strong, but the availability of off-the-shelf flanges makes assembly and disassembly easy. It also hangs neatly on the wall courtesy of some rubber cuphooks.

Note also the use of zip-tie belt tensioners: a simple and effective solution that we heartily endorse. [Corey] makes good use of custom 3D printed parts where they matter, like the compliant pen holder and linear mechanism for the z-axis, but most of the mechanical accuracy is courtesy of wooden shims and metal strapping.

[Corey] uses the machine to make patterns for his paper sculptures that are worth a look in their own right, and you can see the machine in action, sped up significantly, in the video below. This is the perfect project if you have a DIY eggbot that’s out of commission post-Easter: it reuses all the same parts, just on a vastly different scale. Heck, [Corey] even uses the same Inkscape Gcodetools extension as we did in that project. Now you know what we’re up to this weekend.

Can’t get enough pen plotters? Check out this one that lets you write whatever you want!

Continue reading “Conduit, Birdhouse, And Skateboard Become Giant Pen Plotter”

Bricking Your 3D Printer, In A Good Way

In our vernacular, bricking something is almost never good. It implies that something has gone very wrong indeed, and that your once-useful and likely expensive widget is now about as useful as a brick. Given their importance to civilization, that seems somewhat unfair to bricks, but it gets the point across.

It turns out, though, that bricks can play an important role in 3D-printing in terms of both noise control and print quality. As [Stefan] points out in the video below, living with a 3D printer whirring away on a long print can be disturbing, especially when the vibrations of the stepper motors are transmitted into and amplified by a solid surface, like a benchtop. He found that isolating the printer from the resonant surface was the key. While the stock felt pad feet on his Original Prusa i3 Mk 3S helped, the best results were achieved by building a platform of closed-cell packing foam and a concrete paver block. The combination of the springy foam and the dampening mass of the paver brought the sound level down almost 8 dBA.

[Stefan] also thoughtfully tested his setups on print quality. Machine tools generally perform better with more mass to damp unwanted vibration, so it stands to reason that perching a printer on top of a heavy concrete slab would improve performance. Even though the difference in quality wasn’t huge, it was noticeable, and coupled with the noise reduction, it makes the inclusion of a paver and some scraps of foam into your printing setup a no-brainer.

Not content to spend just a couple of bucks on a paver for vibration damping? Then cast a composite epoxy base for your machine — either with aluminum or with granite.

Continue reading “Bricking Your 3D Printer, In A Good Way”